Tag: Products

Pro Spotlight: Update Bathroom Cabinets with Britney Mroczkowski of Build It Brit, Inc.
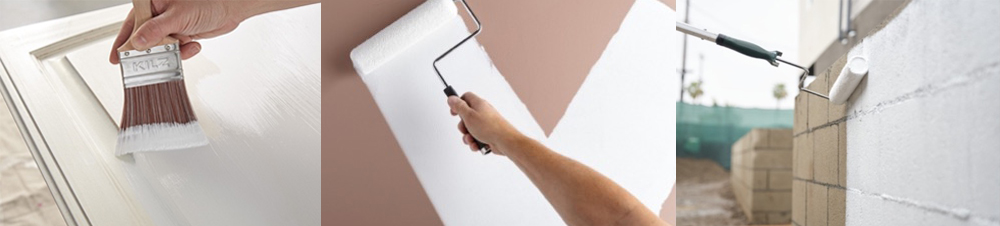
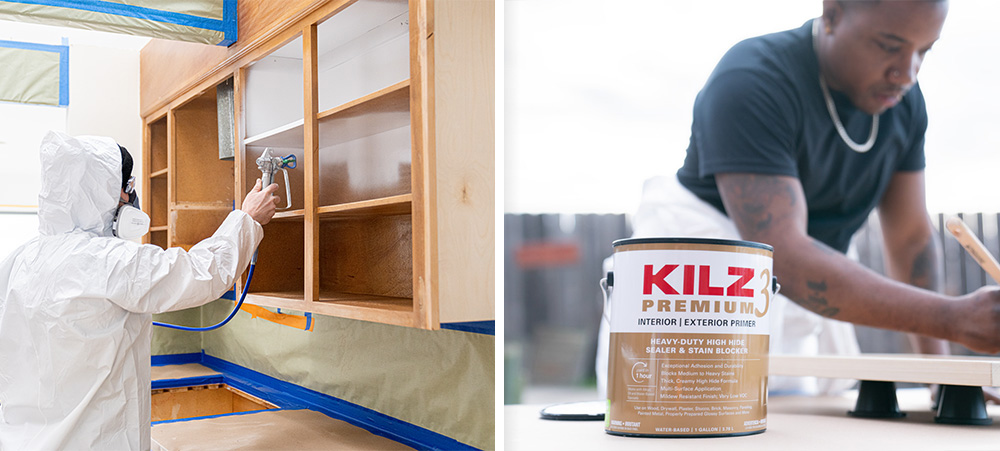
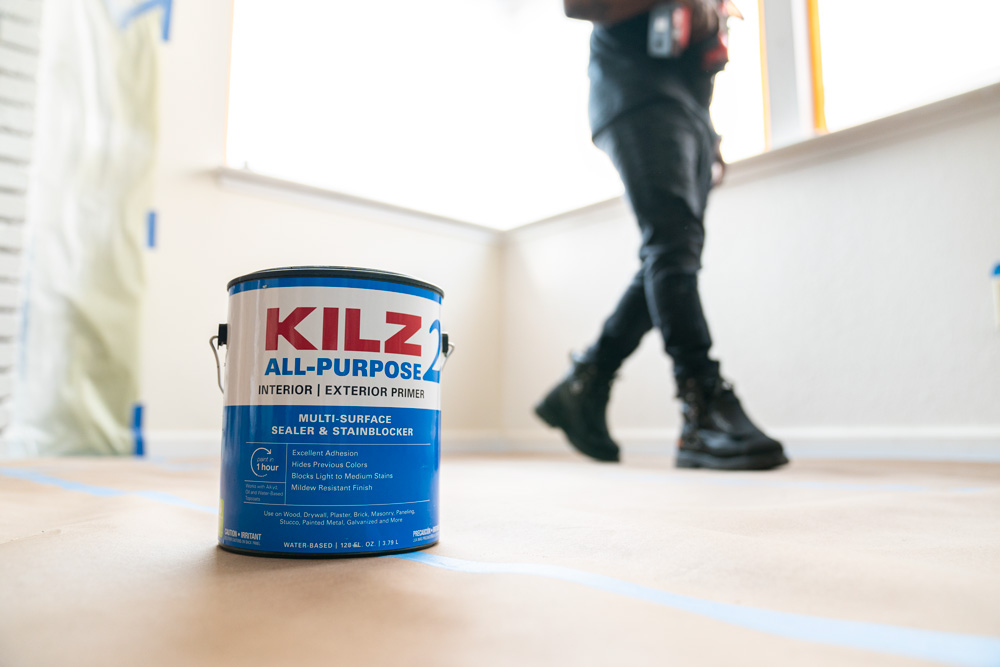
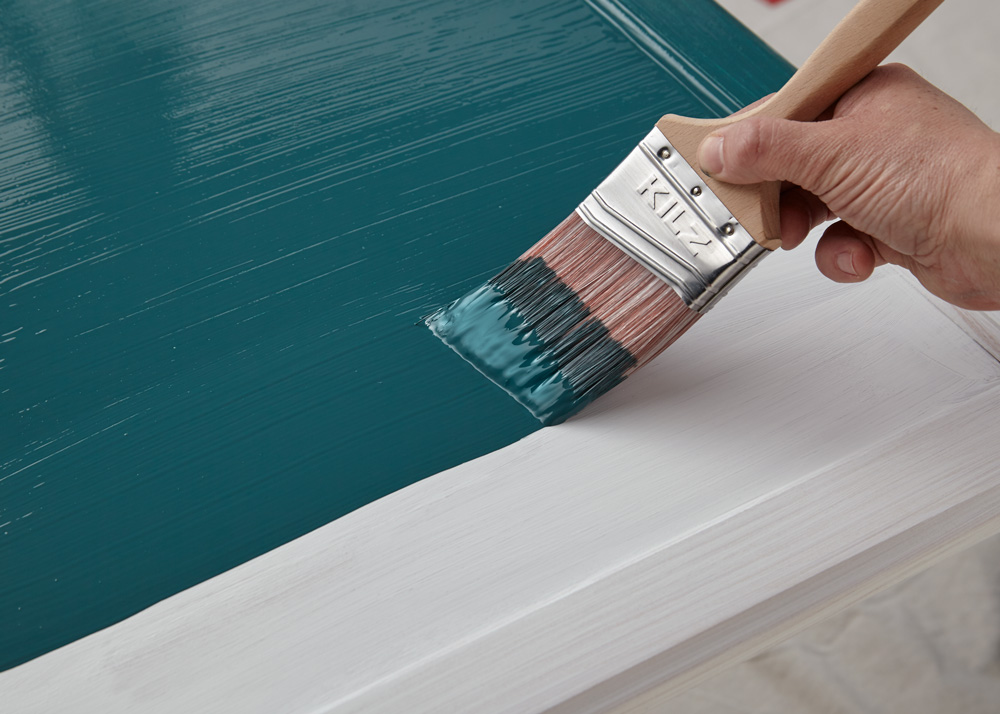
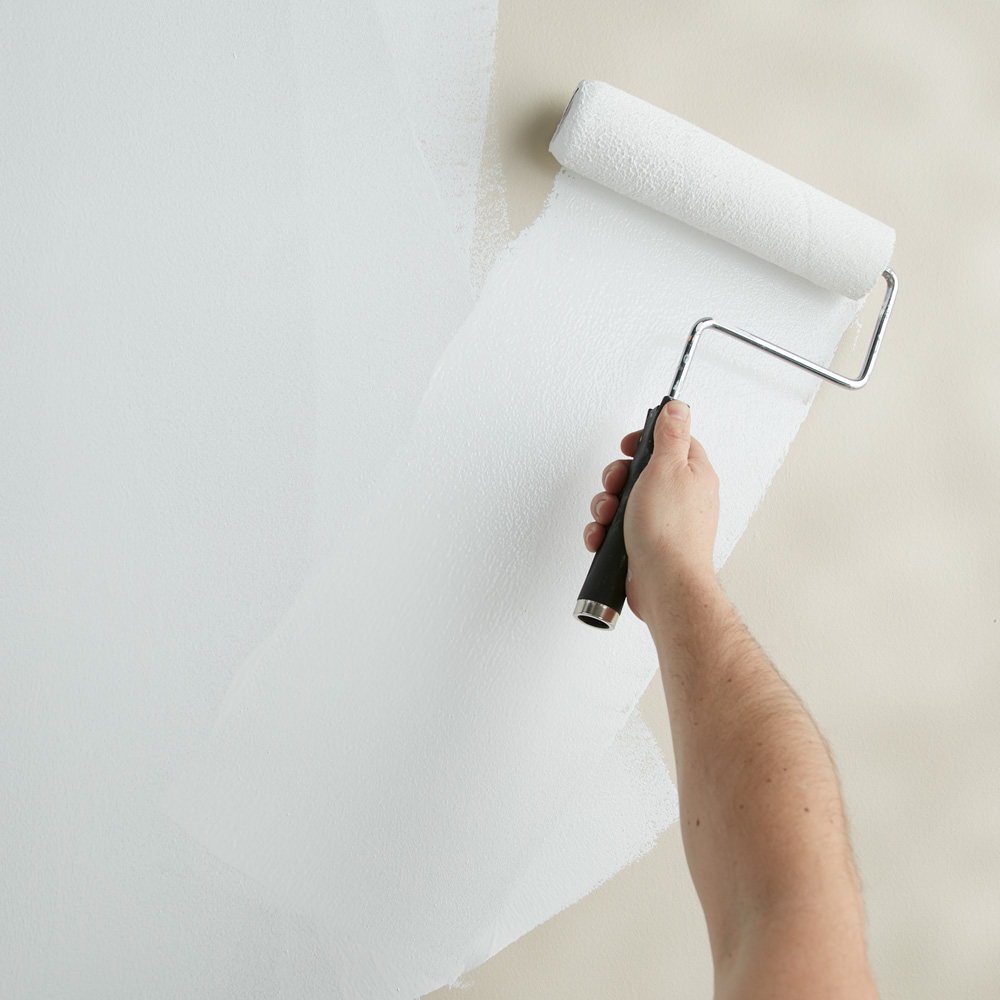
May 31, 2023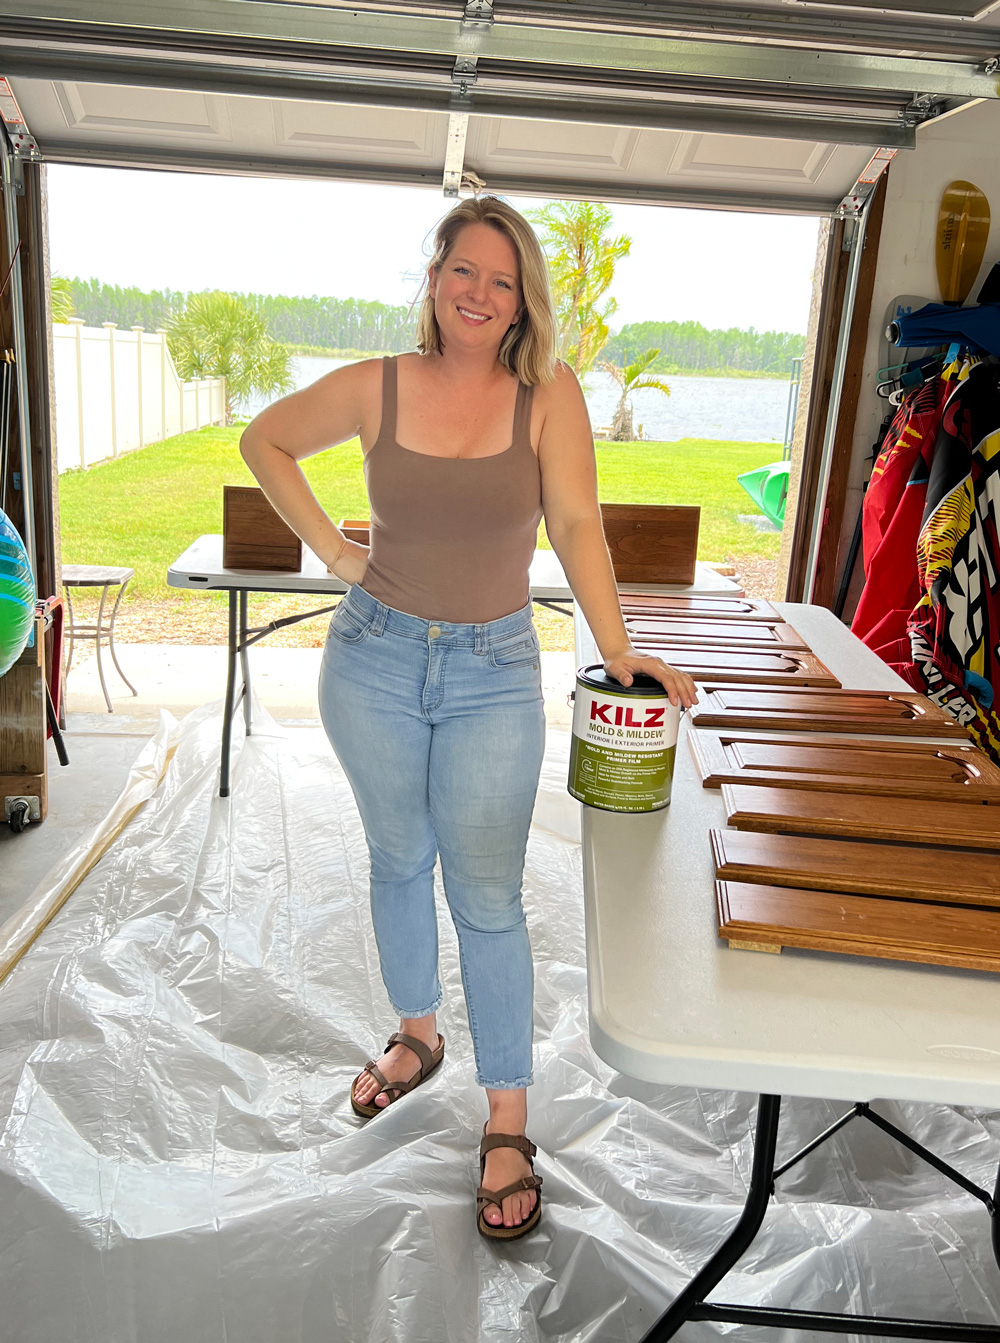 As a licensed general contractor and real estate investor, I know that priming is a fundamental step in completing any paint project. Without primer, paint may peel, crack or flake, resulting in a poor and unsatisfactory finish. And when it comes to achieving a flawless and Instagram-worthy finish, primer is absolutely essential. KILZ® Primers are a good choice as they offer consistent, dependable results.
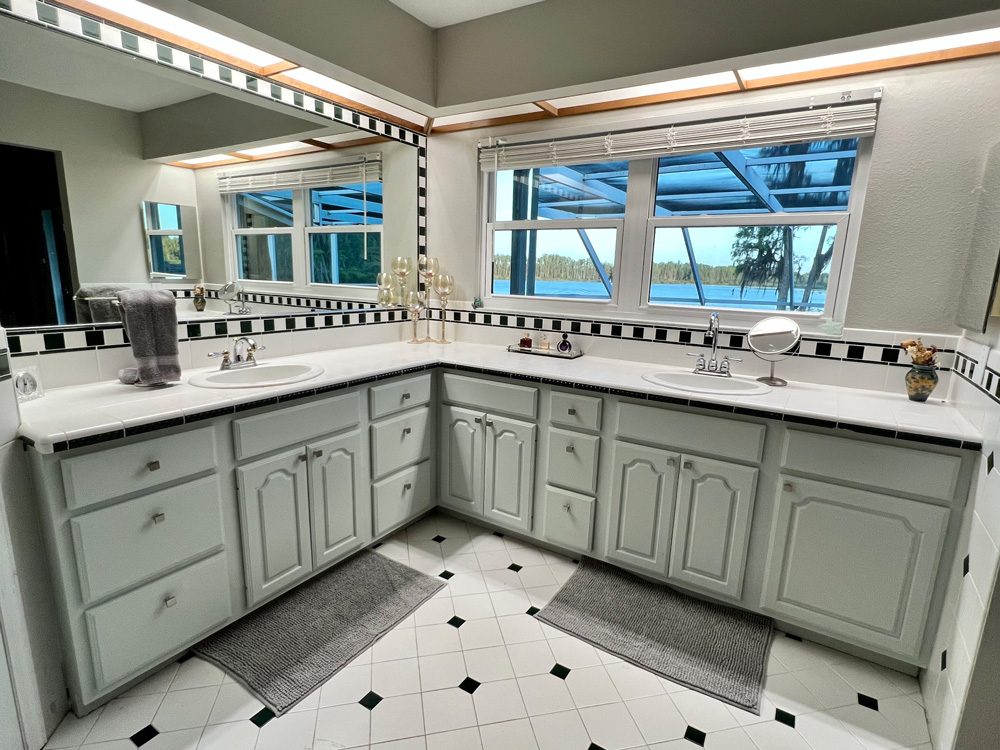
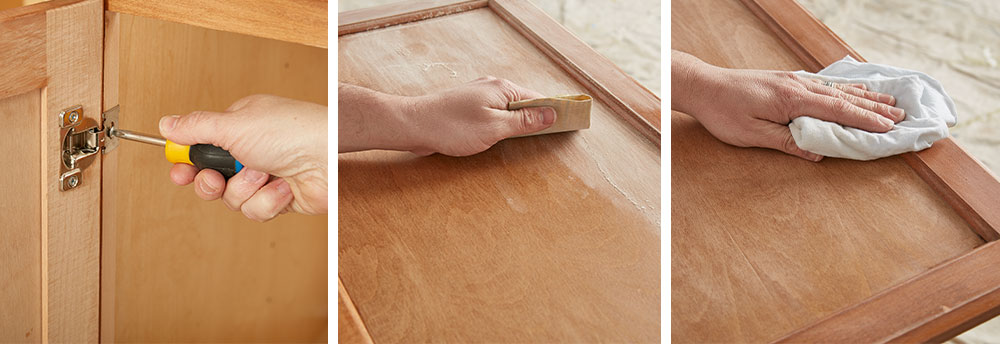
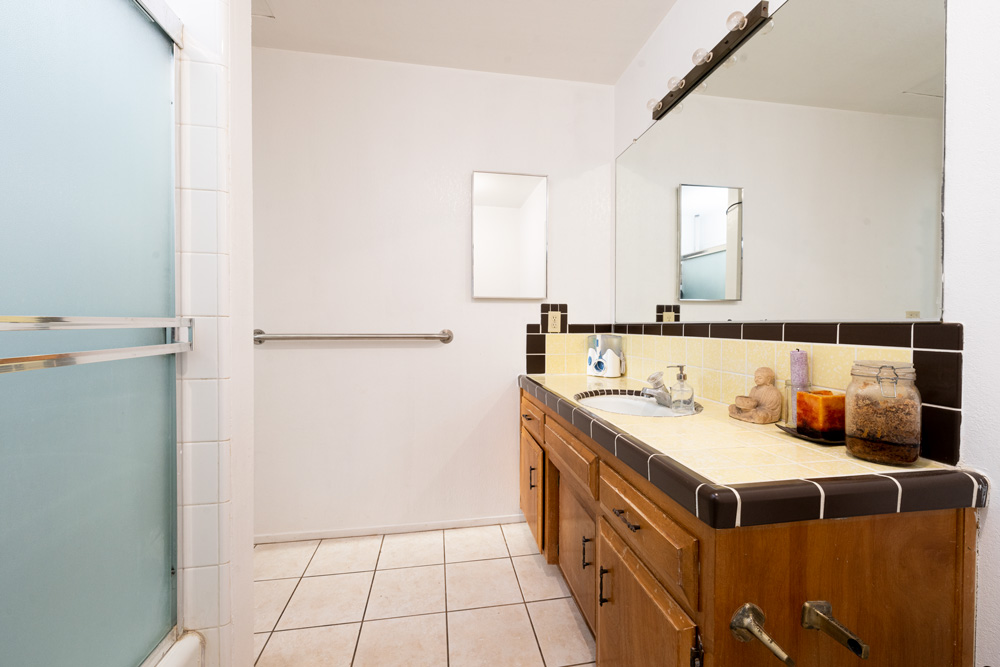
Recently, I decided to do a quick weekend project to update my mom’s ensuite bathroom cabinets. The bathroom has beautiful solid wood cabinets but are a little outdated with a medium-to-dark wood finish. The bathroom has also not been renovated in over 20 years and needed a modern refresh. Painting the cabinets was the perfect solution to updating the space quickly while also making the room brighter.
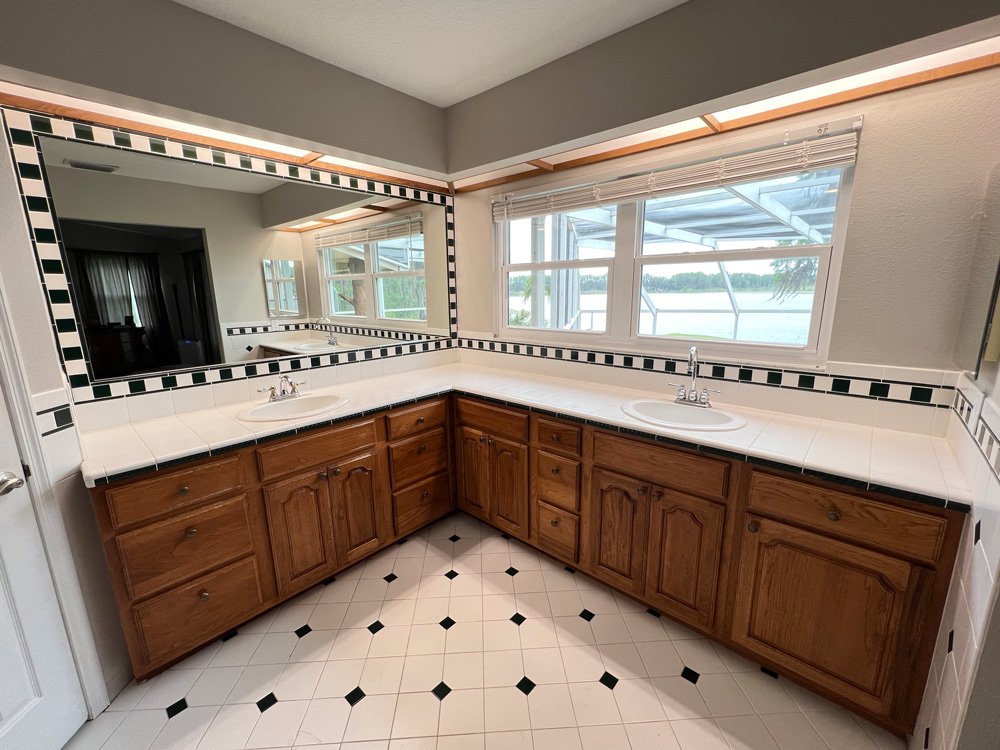
Her primary suite is located on the second floor of the home overlooking a beautiful lake just outside Tampa, Florida. She has been in this home for over 35 years and raised our family here, so it was nice to be able to give back to our family home. To minimize the mess, I removed the cabinet drawers and doors and took them downstairs to the garage where I set up a workstation.
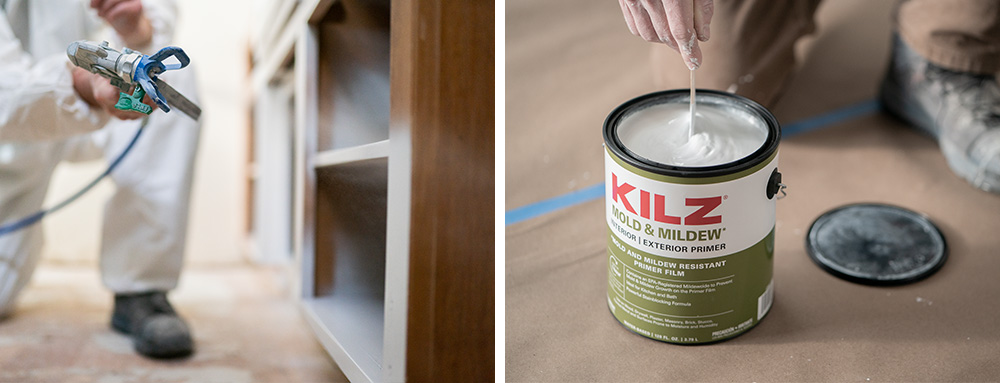
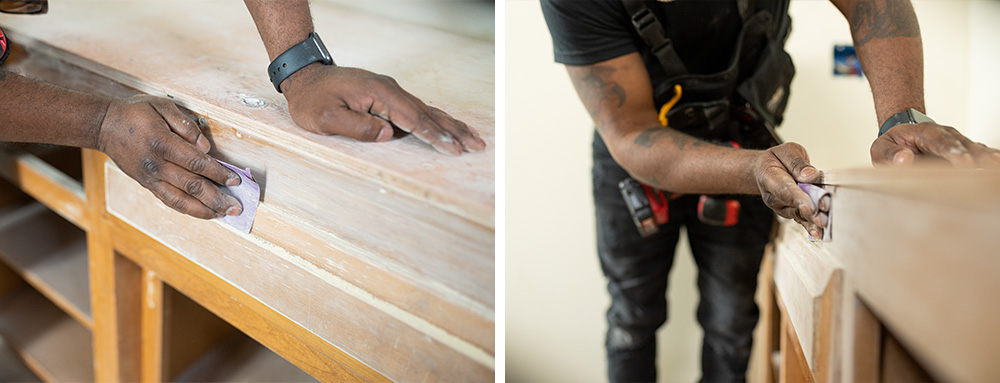
 In the garage, I used a few drop cloths to make sure everything stayed clean and pristine. I set up two tables to create an “assembly line of painting,” where I would sand, prime, and paint. The cabinets were solid wood but had a lacquer finish that I wanted to make sure we could cover. To start the process and ensure a beautiful end result, I scuff sanded down all of the doors and drawers with 150-grit sandpaper and then did a final pass with 220-grit paper. Don’t forget to wear safety gear during this step, I made sure to wear a mask and eye protection.
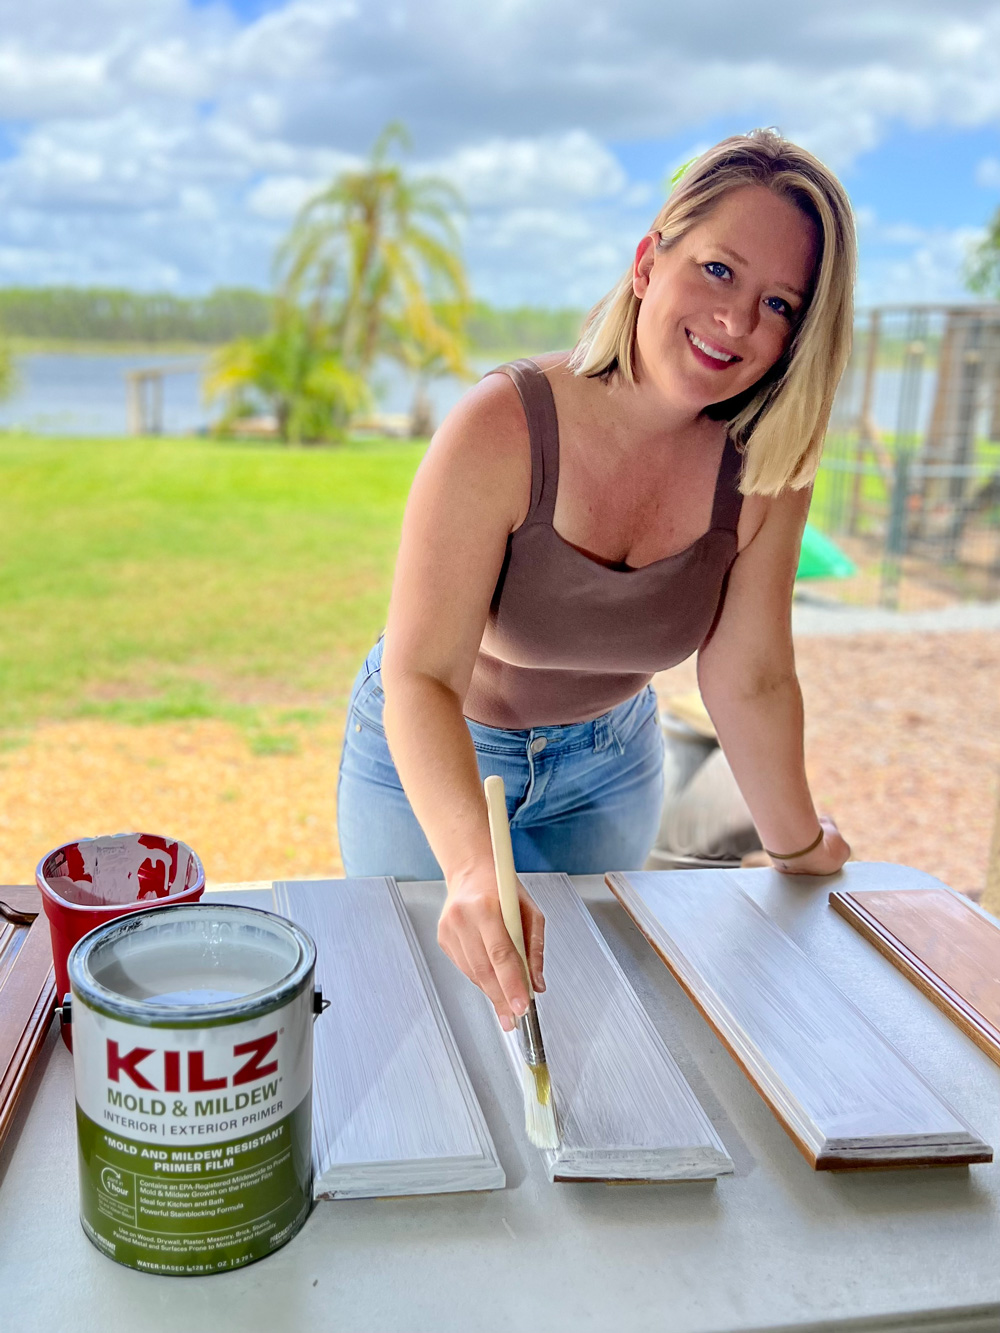
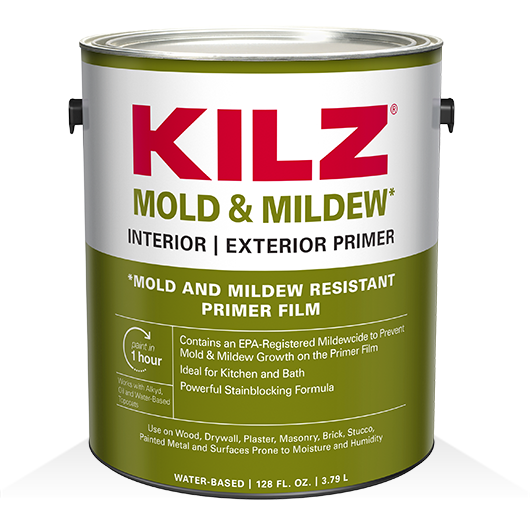
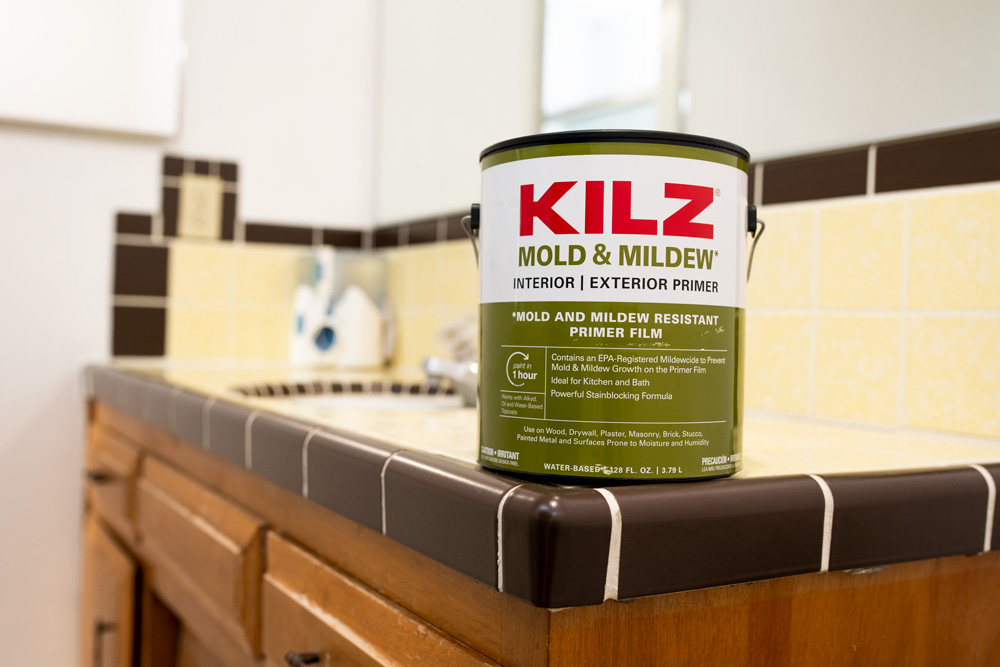
After sanding, I was ready to prime! The primer that we used for this project was KILZ® MOLD & MILDEW Primer. This primer is a water-based, primer-sealer-stain blocker that is specially designed for residential surfaces in high humidity, moisture, and temperature environments such as kitchens, bathrooms, powder rooms, and laundry rooms.
KILZ® MOLD & MILDEW Primer offers excellent adhesion to the surfaces of the bathroom cabinets, ensuring that the paint would stick and stay in place even with high moisture levels typical of bathrooms. Additionally, the EPA-registered active ingredient in this primer creates a mold and mildew-resistant film that protects the primer film from developing mold and mildew growth.
This was particularly important for this personal renovation project for my mom, as it would ensure that her bathroom cabinets would stay mold-resistant in the damp environment. The primer also helped us to achieve a smooth and flawless paint finish.
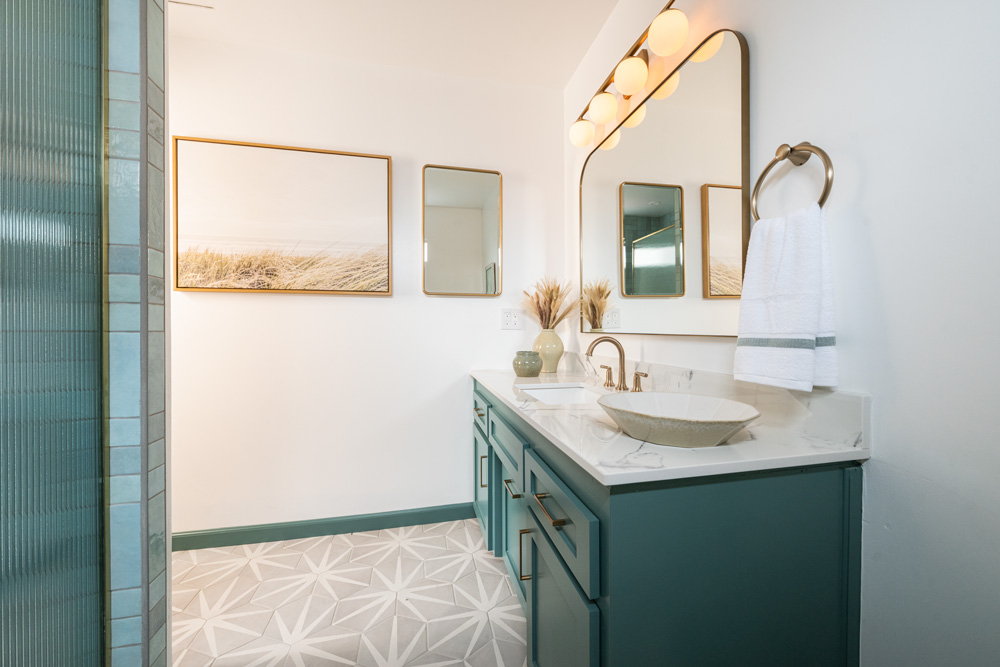
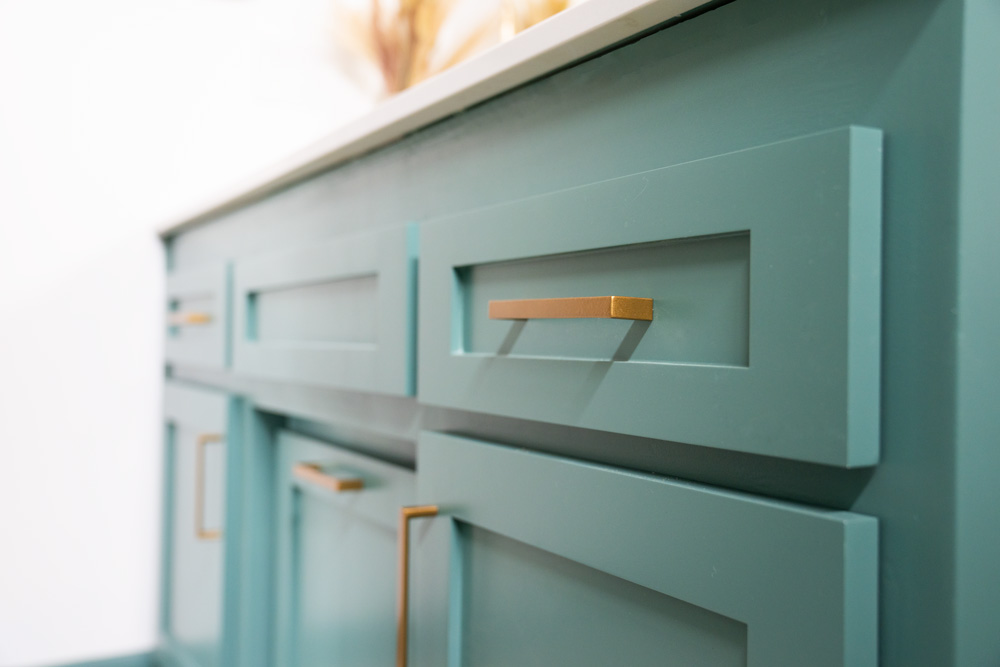
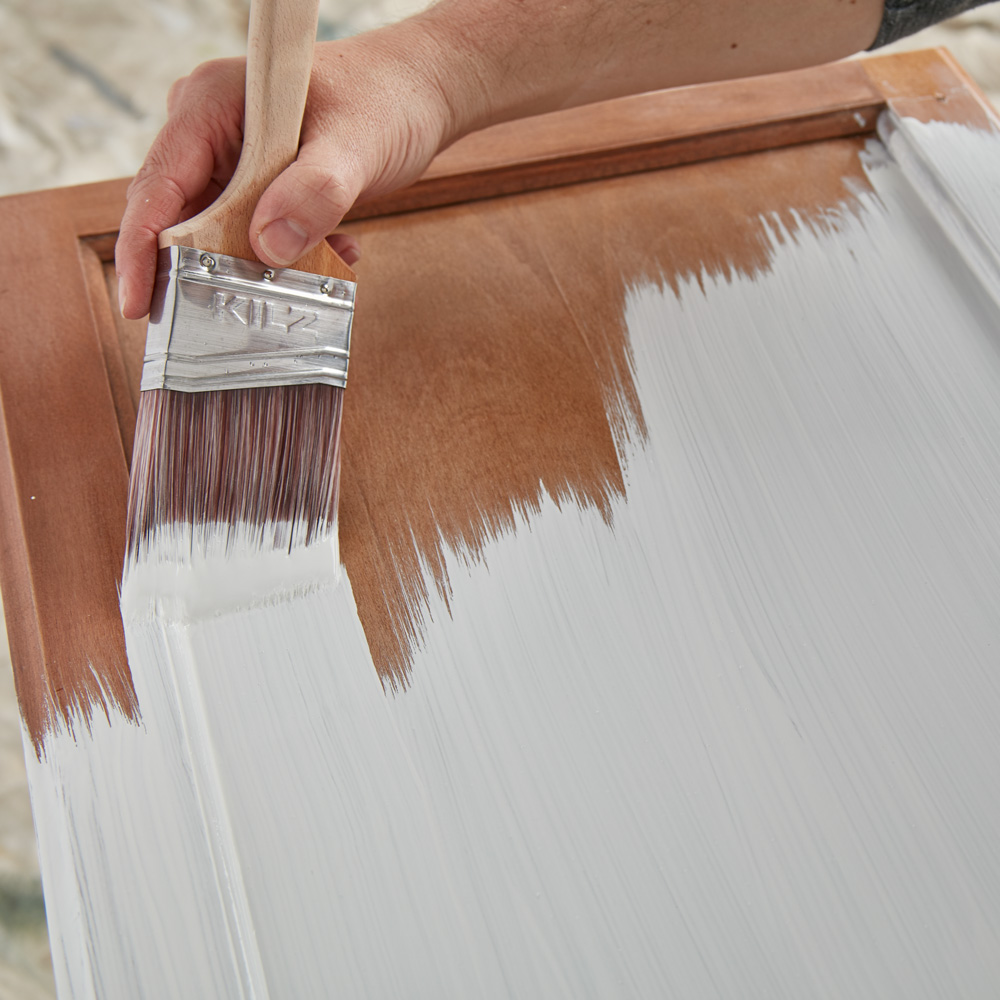
I applied one coat of KILZ® MOLD & MILDEW Primer, allowing it to dry for 2 hours before moving on to the topcoat. We chose Magnolia Home by Joanna Gaines® Cabinet and Trim Paint which I was excited to use for the first time. My mom looked at the color options online and choose the color “Emmie’s Room” which is a very light shade of green.
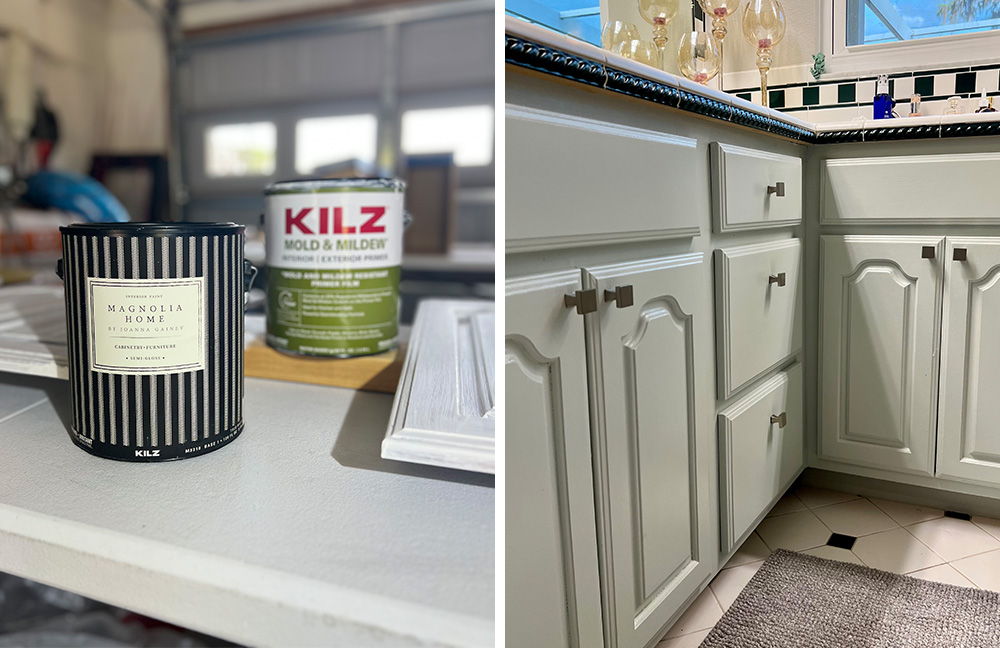
This very light green color complemented the existing white and green tiles in the bathroom perfectly, creating a cohesive and modern look. We applied two coats of the topcoat, allowing each coat to dry completely before applying the next. The final result was stunning and transformed the old and dated bathroom cabinets into a fresh modern look and personally, I think it made the room look much larger.
Not only did this bathroom cabinet refresh make the room look brighter and more modernized, but it also saved my mom a significant amount of money compared to a complete bathroom renovation. When I finally let her come in to see the final results, she couldn’t believe it was the same cabinets. She told me they looked brand new and straight out of a home renovation TV show.
In conclusion, priming is a crucial step in any paint project, no matter how big or small. Not only does it set the foundation for a long-lasting and beautiful finish, but it also ensures that the paint adheres properly to the surface. KILZ® MOLD & MILDEW Primer is an excellent choice for bathrooms and kitchens.
Overall, this project was a personal one for me, as it was a renovation for my mom, who has been my biggest supporter throughout my career. Recently, we started renovating a few investment houses together so it was an honor for her to ask me to work in our family home as well. With KILZ® MOLD & MILDEW Primer and the right workspace, we were able to achieve a beautiful and modernized look for her bathroom cabinets.
To learn more about primer solutions, visit kilz.com.
Always remember to refer to our website kilz.com or product back labels for additional information on which primer is right for your project and detailed instructions on how to apply our products. Check out our Coverage Calculator to understand your estimated paint needs for your upcoming project.
RELATED ARTICLES

get inspired:
FOLLOw us:
@kilzbrand
SHOP
PRODUCTS

The Ultimate Painting Checklist for Any Project
April 26, 2023Preparation is key before starting any paint project in your home. You should know the products you’ll need and what steps to follow. Whether you’re looking to spruce up some old cabinets, repaint an entire room, or refresh an outdoor patio, knowing what to expect will help ensure things run smoothly from start to finish.
Plan Your Approach
There’s a lot to consider when painting different spaces. For indoor and outdoor paint jobs alike, you’ll need to think about the surface—wood, brick, drywall, etc.— its condition, and the function of the space. Are you painting a backyard deck or refreshing kitchen cabinets? Are you changing the color of your bedroom or restoring a water-stained ceiling?
The chosen primer directly influences the success of your project. This crucial step will save you time and money in the long run and make your final color the best it can be.
Choose Your Color
With so many available options, it’s a good idea to test a few different color samples in various lighting conditions before making a final decision. If you’re keeping existing furniture or art in a room, consider how they work with your chosen shade beforehand.
 Choose the Right Primer
For most projects, you can trust a multi-surface primer to prepare the surface for painting. More complex situations require a primer specially engineered for those cases—such as mold, stain, and odors.
Oil-based primers are often better at blocking or sealing stains, especially water-soluble stains. They’re also usually superior at blocking tannin bleed and unwanted odors.
• Choose to prime over a previous oil-based paint.
• Choose to prime on fresh, unsealed, or knotty wood.
• Choose if you need to cover severe stains or odors.
Water-based primers—or “latex” primers—are easier to clean (using soap and water), dry fast, and have low VOCs, making them healthier for you and the environment.
• Choose if priming indoors where ventilation is poor and in spaces sensitive to strong odors.
• Choose when projects require a lower VOC level product, if there is a flammability concern, and/or when there is a preference for clean-up without harsh chemicals.
Our Pro Primer Recommendations:
• KILZ® Mold & Mildew Interior and Exterior Primer: Water-based primer. Ideal for use in high humidity, high moisture, and high-temperature environments.
• KILZ Restoration® Interior Primer: Water-based primer. Ideal for interior, multi-surface paint jobs that may require tough stain blocking and heavy odor coverage.
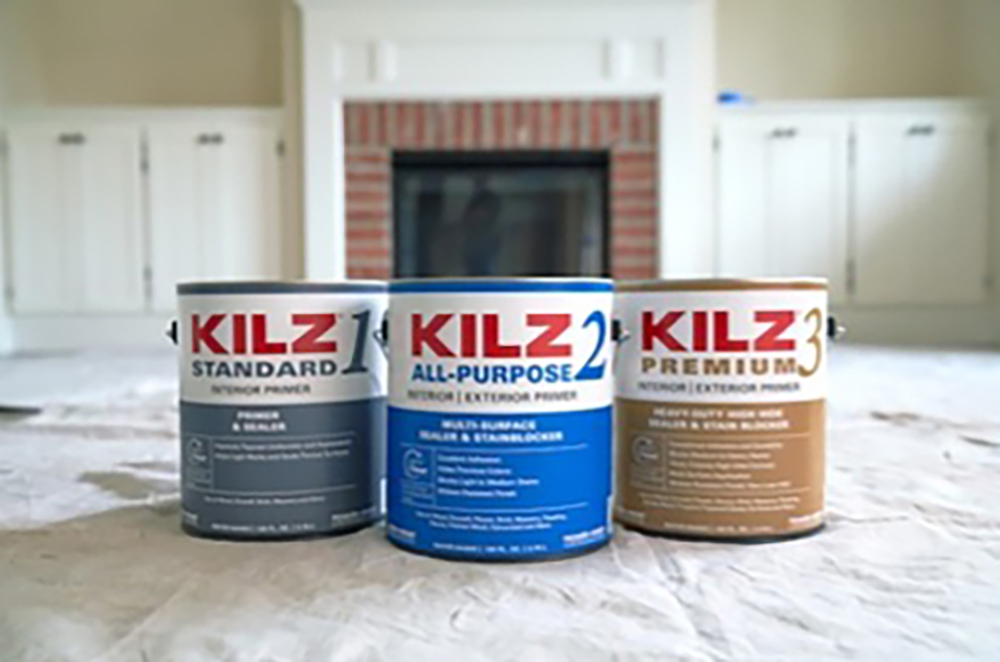
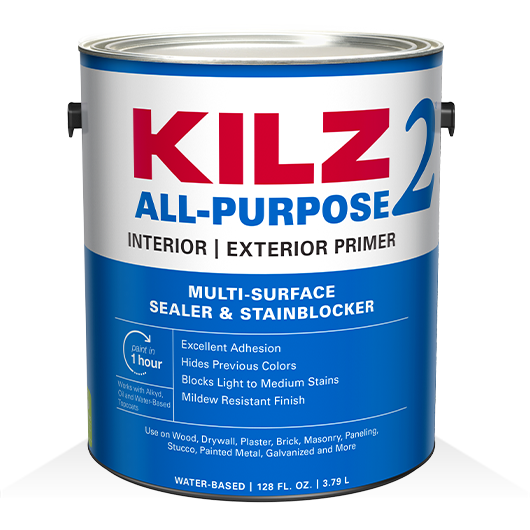
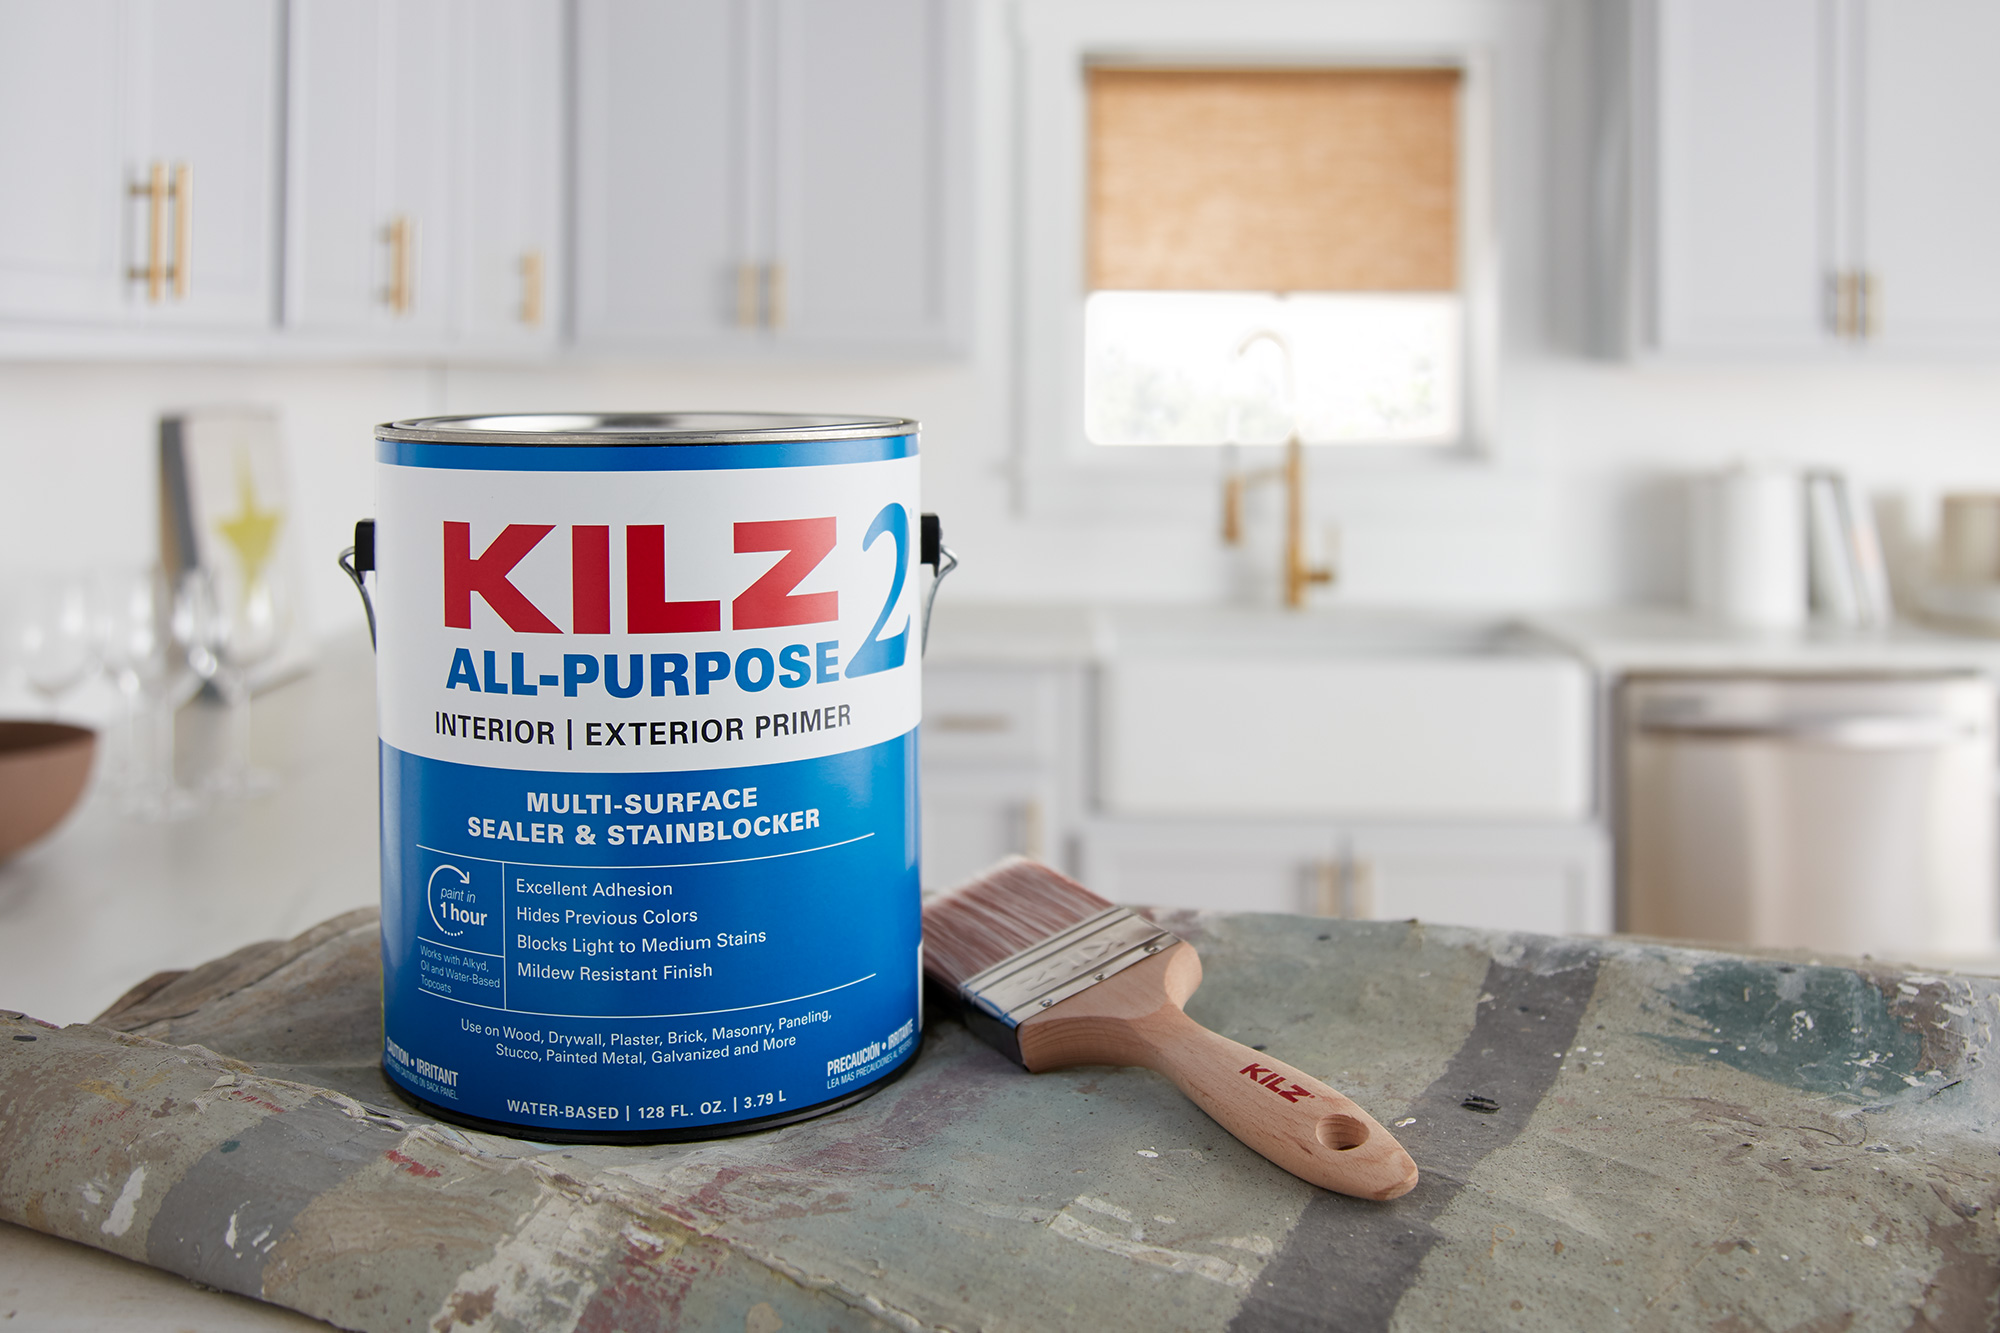
• KILZ 2® All-Purpose Interior and Exterior Primer: Water-based primer. Great overall interior/exterior primer. Ideal for changing wall colors.
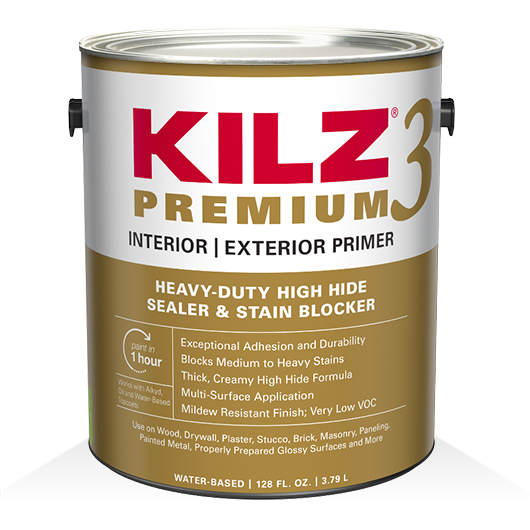
• KILZ 3® Premium Interior and Exterior Primer: Water-based primer. Fast drying, great for adhesion and hiding surface imperfections. It provides a mildew-resistant coating, making it ideal for moisture-prone areas.
What Else Do I Need to Paint a Room? (Supply Checklist)
Depending on the nature of the job, these items can make your life easier.
• Paint roller + Tray – Rollers hold more paint than brushes and can distribute even layers of paint much faster.
• Paint sprayer – For a smooth, professional finish.
• Paint scraper – Removes unwanted layers of paint.
• Trim paint brush – For trimming around windows, molding, and door frames.
• Painter’s tape – A must for creating precise lines and neat edges.
• Sandpaper – For smoothing and prepping surfaces.
• Putty knife – Creates a smooth wall or ceiling surface.
• Drop cloth – Use to protect your furniture and floors.
• Stepladder – For reaching ceilings and the tops of walls.
• Extension pole – To extend your roller’s reach without a ladder.
• Paint guide (edge guard) – Neatly paint molding, trim, and windowpanes without painter’s tape.
Any painting project takes focus, but having the right plan, primer, and tools ahead of time will save you time and money and make you feel like a pro in no time. We hope this inspires your next project, no matter how big or small. Be sure to come back to the blog for more DIY tips, tricks, and ideas.
Always remember to refer to our website kilz.com or product back labels for additional information on which primer is right for your project and detailed instructions on how to apply our products. Check out our Coverage Calculator to understand your estimated paint needs for your upcoming project.
RELATED ARTICLES
get inspired:
FOLLOw us:
@kilzbrand
SHOP
PRODUCTS
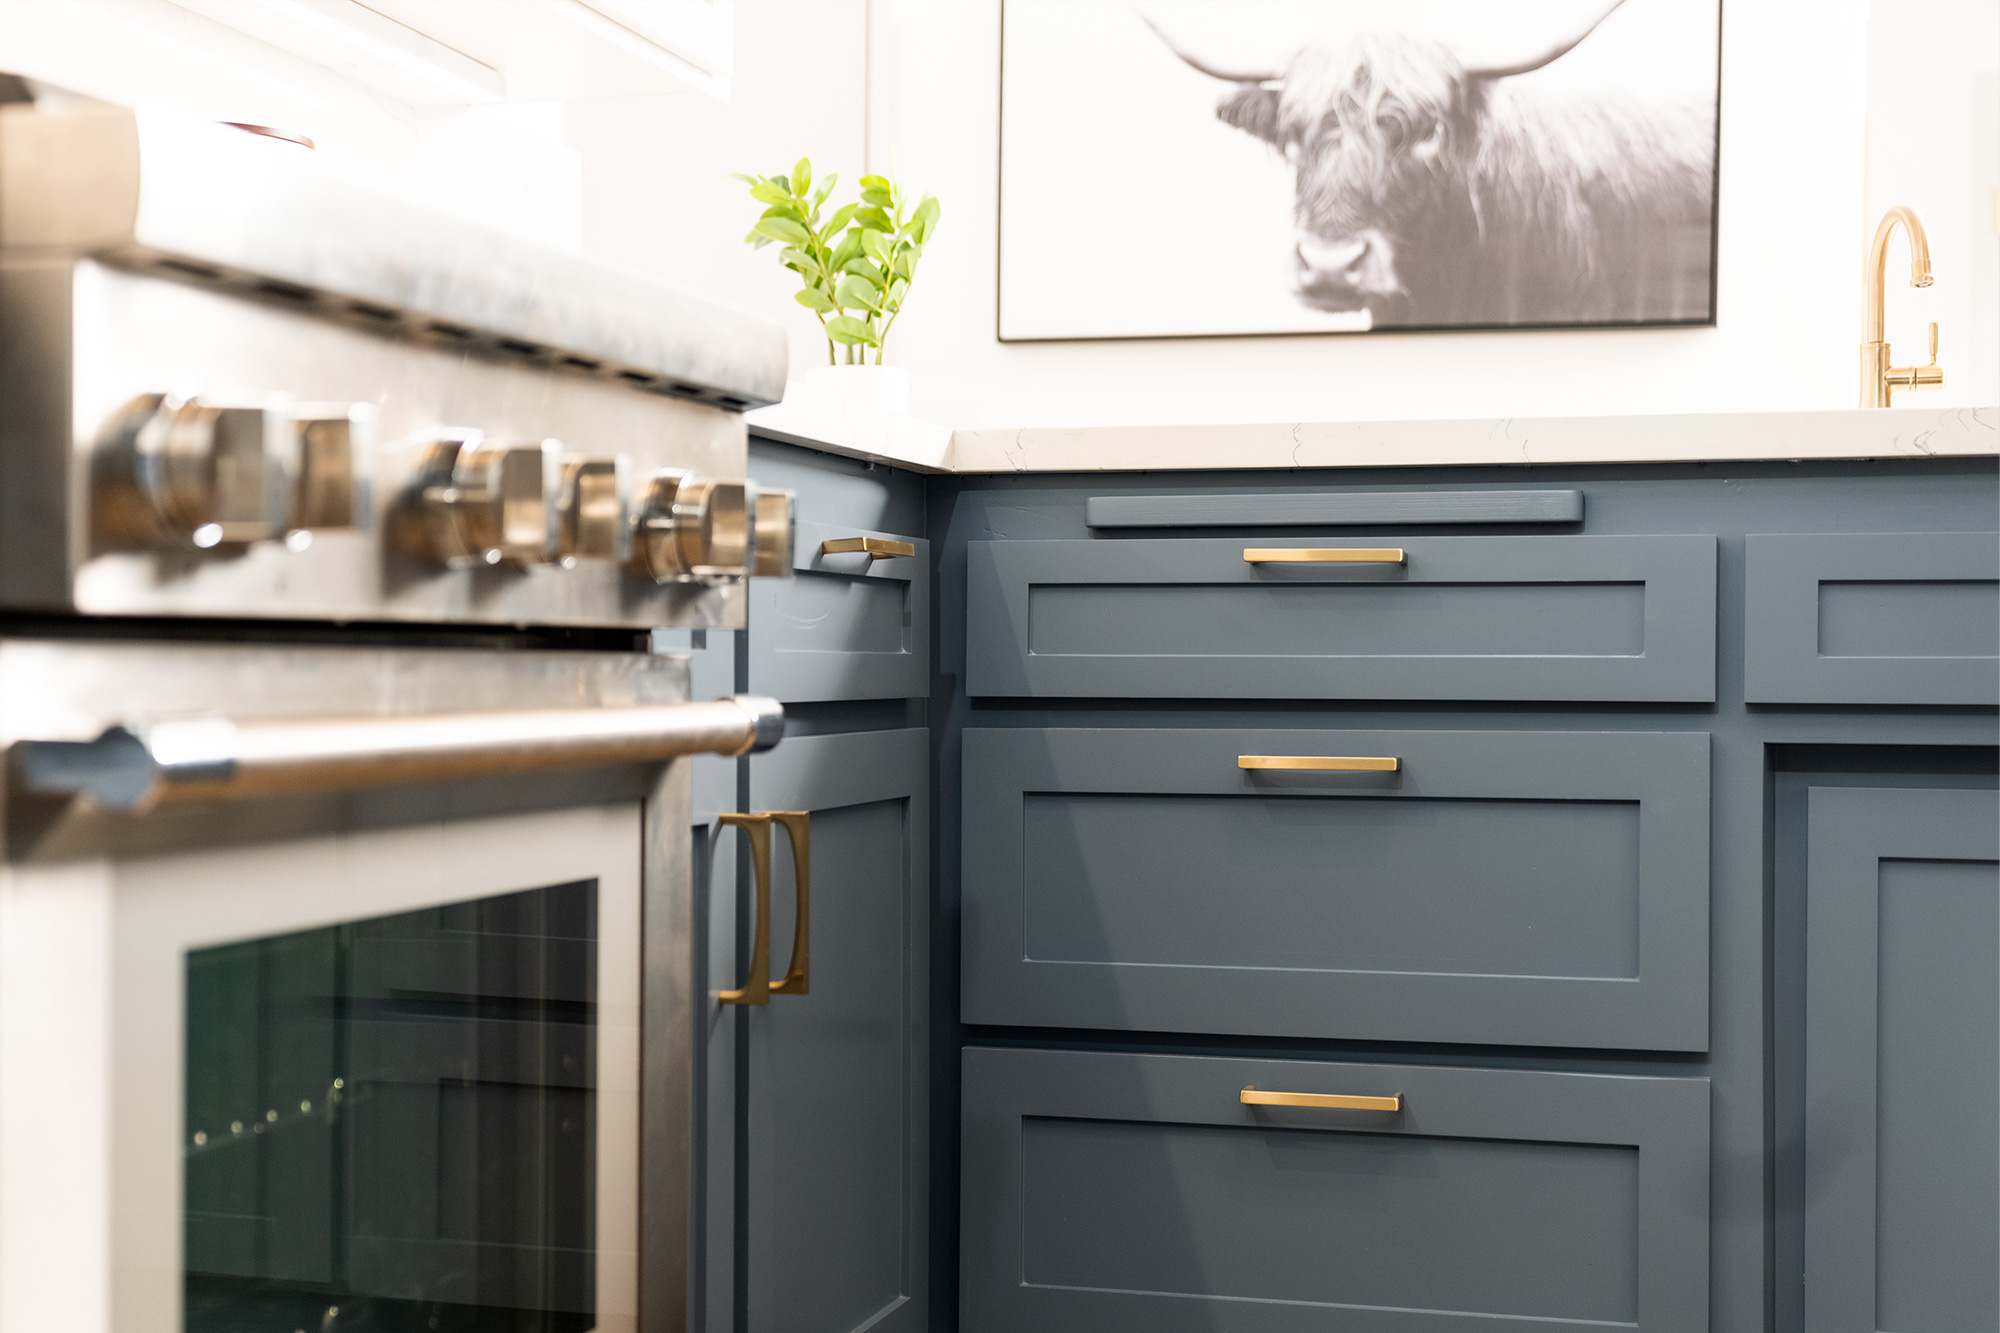
Updating a Kitchen for a New Generation
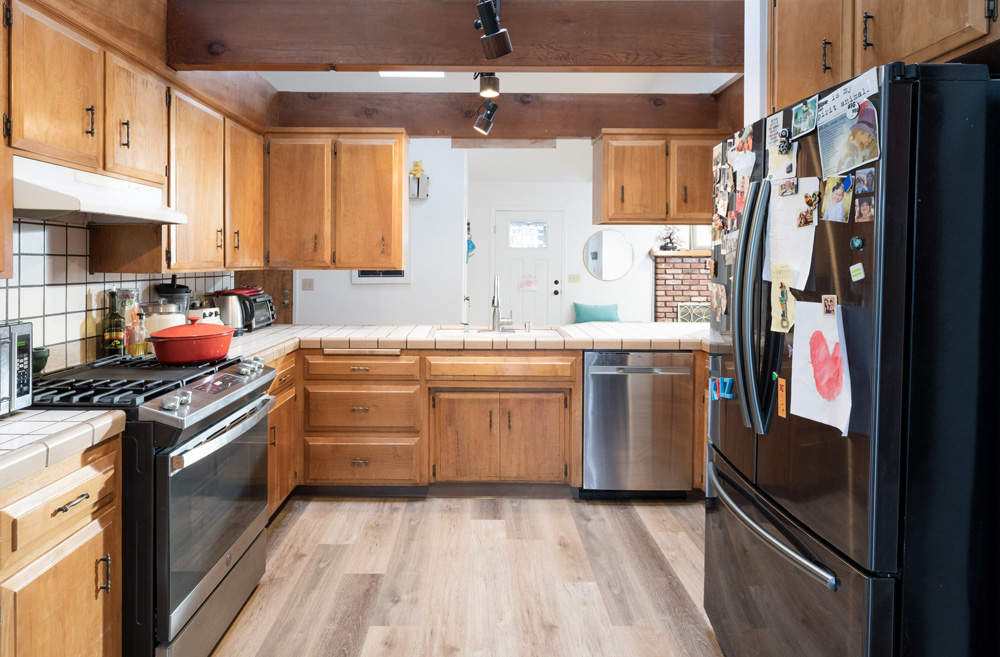
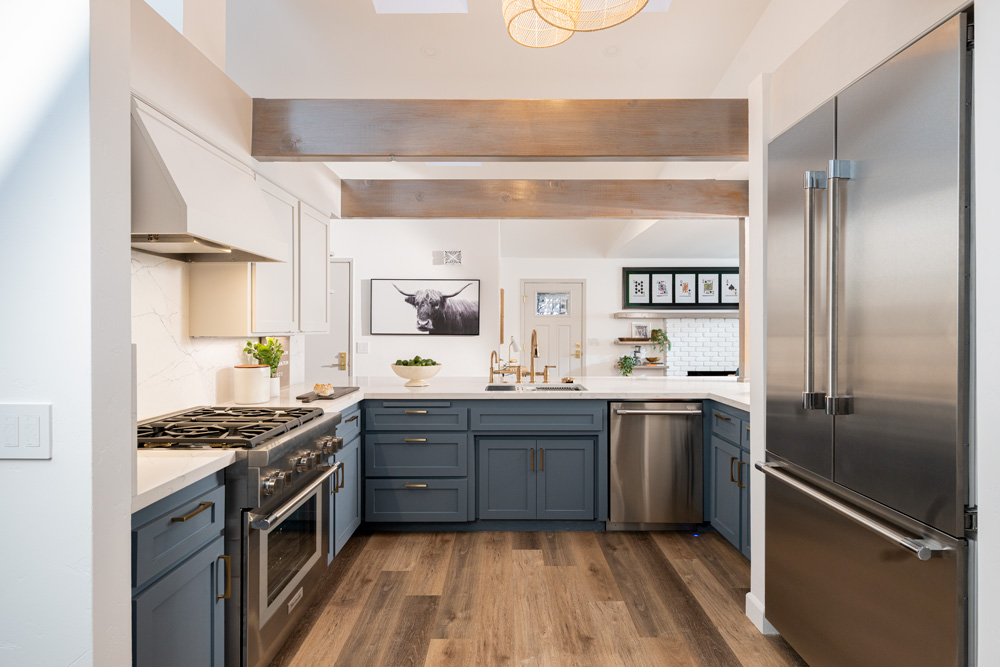
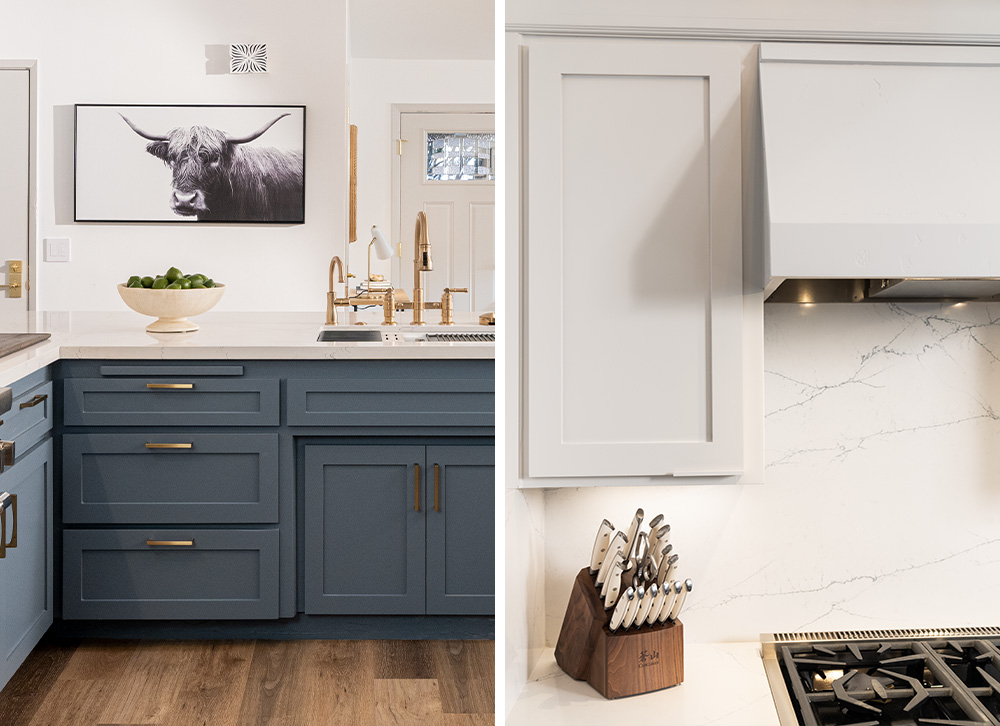
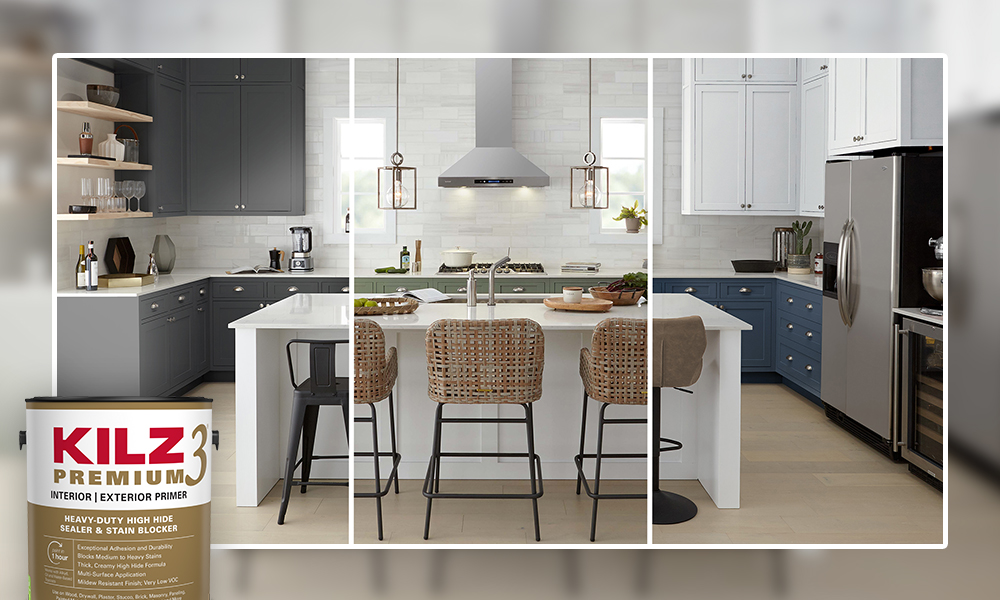
April 17, 2023We’re excited to share details from our Destination Restoration series with an inspired kitchen refresh that doesn’t require gutting the entire kitchen. This series demonstrates how you can breathe new life into an older home (in this case, a 4th generation family home), while keeping its structural integrity intact.
Our expert design and restoration team — Jason Lai (interior designer) and Jared Foster (contractor/pro painter) — worked together to transform a kitchen that was well past its prime. They first conceptualized which cosmetic changes would make the most impact, and then rather than gutting the entire room and starting from scratch, they repurposed and restored. By refreshing dull wooden cabinets, creating bar seating with a stunning new look, replacing heavy black appliances, and updating hardware, countertops, and backsplash, they transformed a dark and dated kitchen into a bright, airy, and modern one, renewing it for years to come.
If it’s your first time restoring a kitchen, it can feel like a big undertaking, which is why we broke down what we did below, so you can get a more detailed understanding of how we upgraded the heart of the home. We’ve also included a step-by-step guide on how to paint kitchen cabinets for a refresh.
Cabinetry
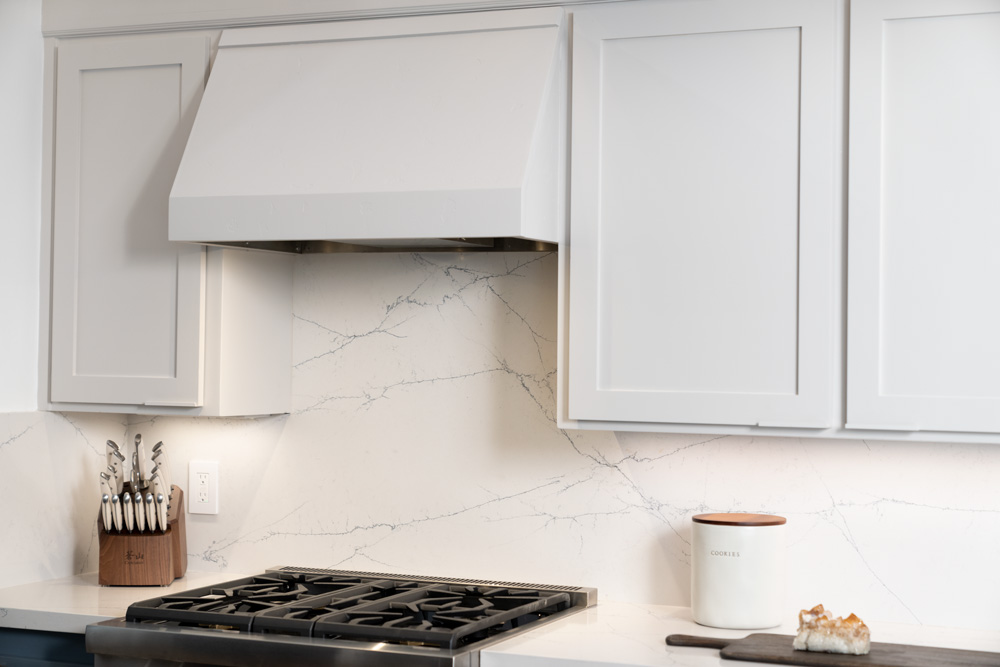
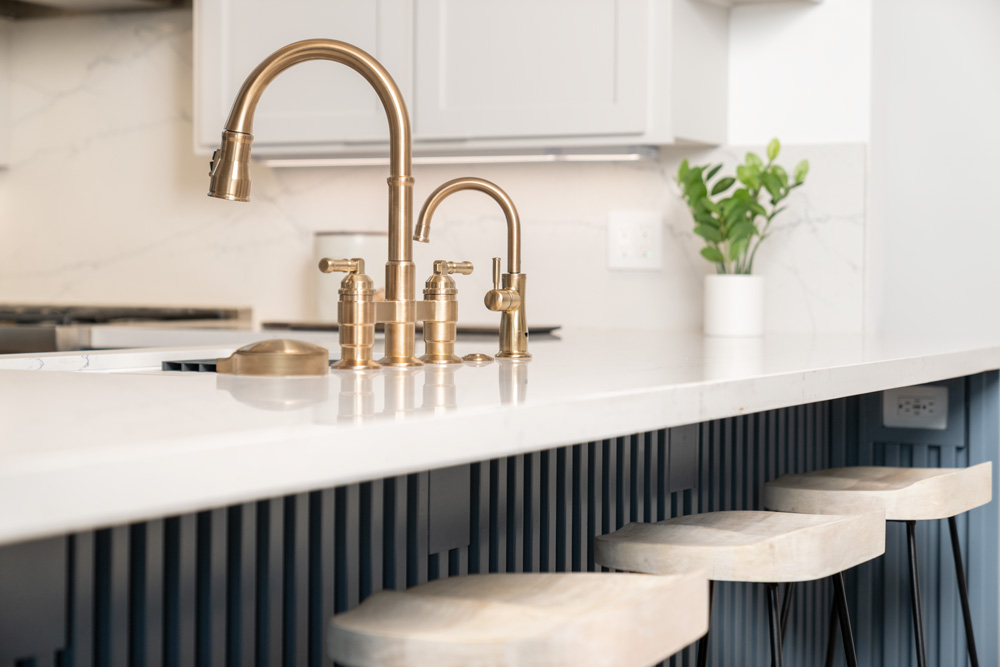
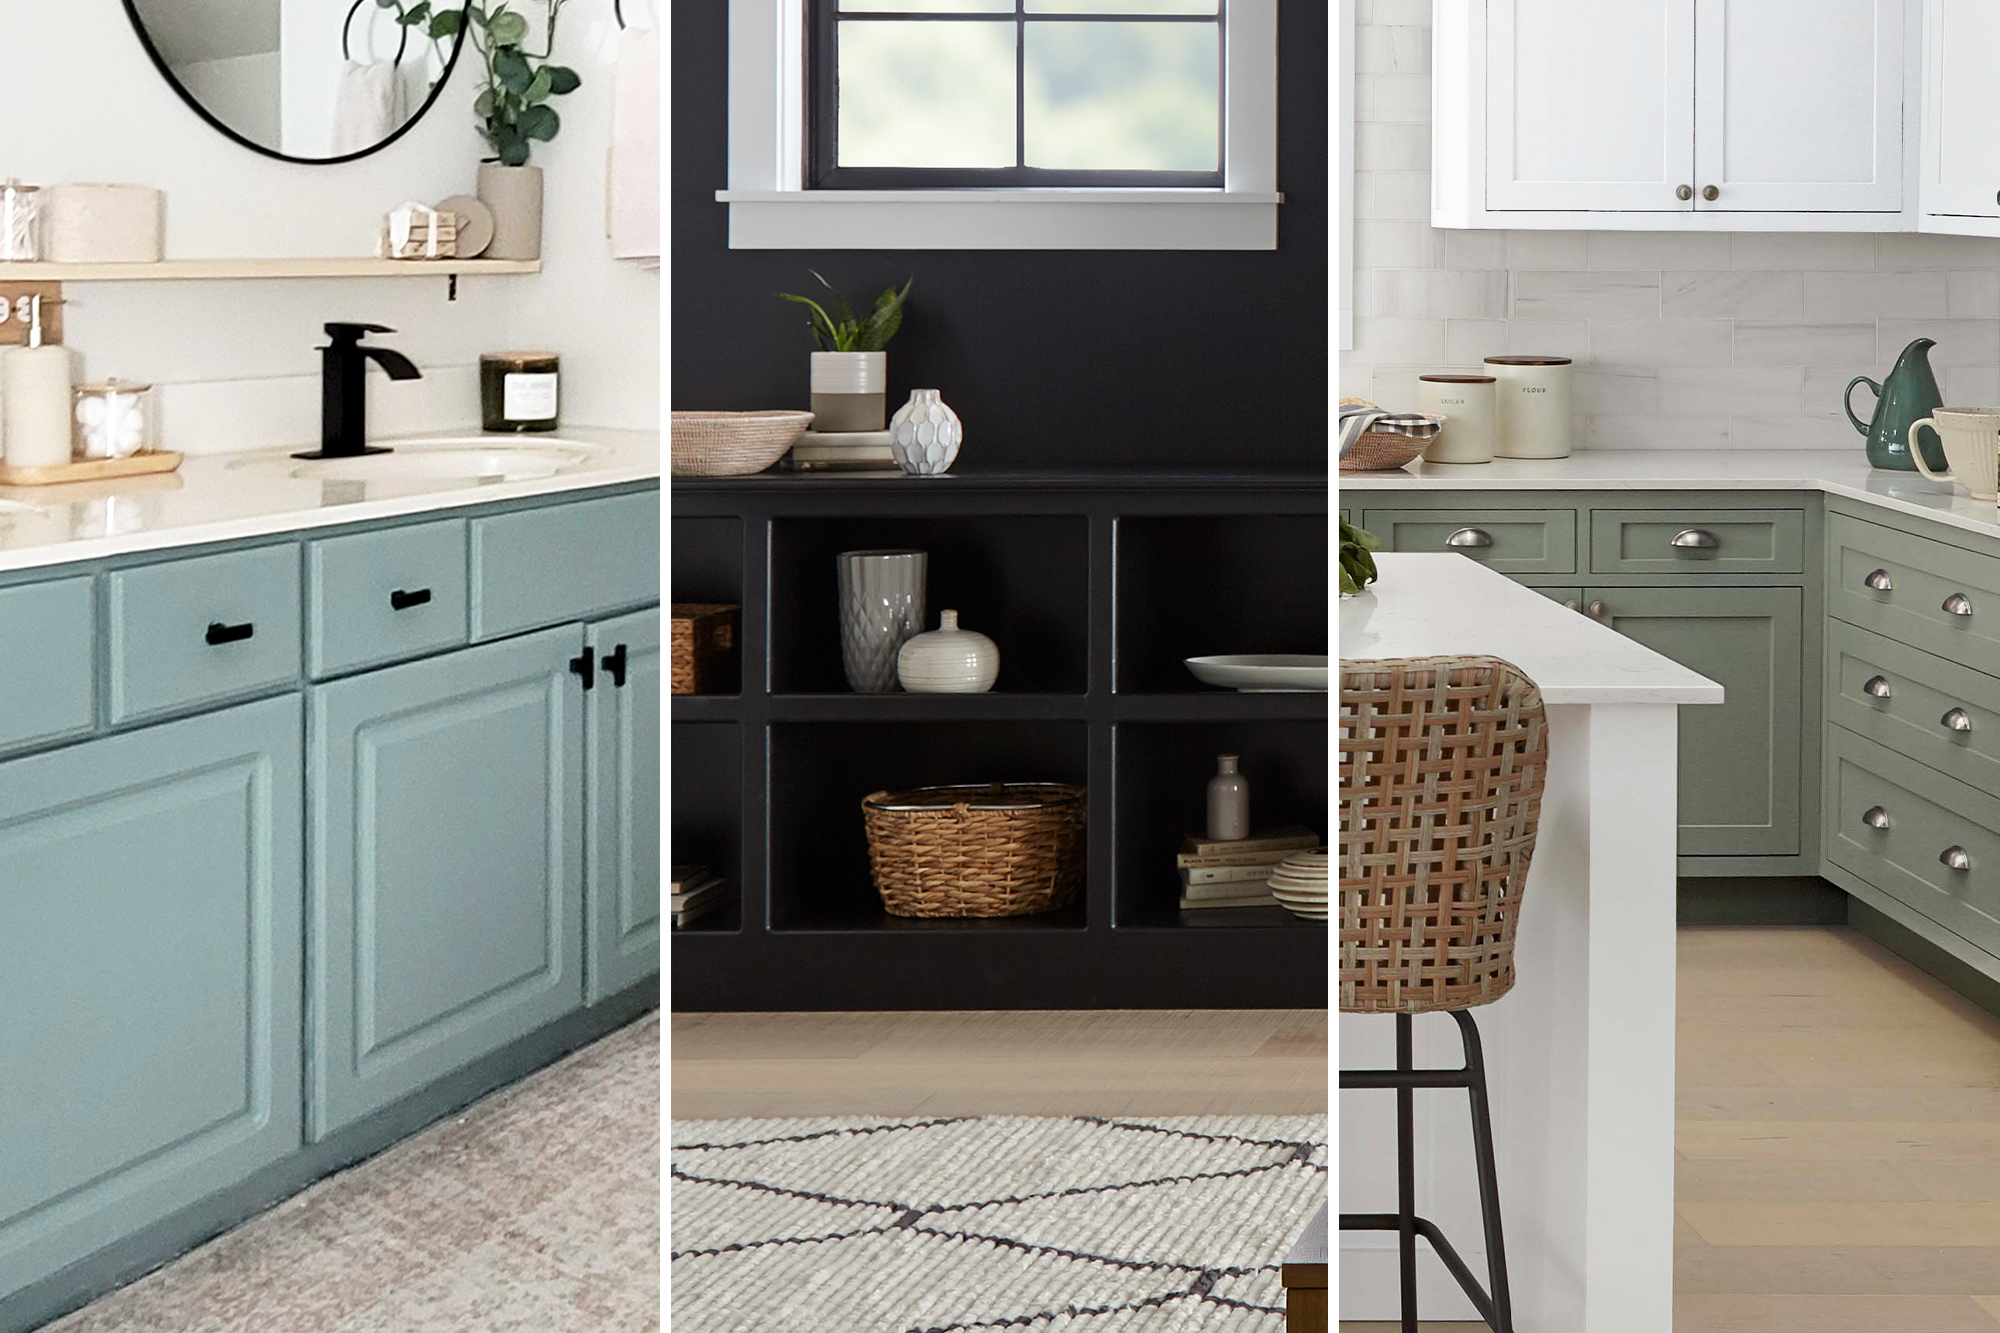
Rather than ripping out and replacing the cabinetry, which can be costly, we gave them a brand-new look and feel with a few simple updates. We removed some of the upper cabinets and modernized the rest by making them shaker style. Then we used KILZ 3® Premium Primer to prep them for a fresh coat of paint. To create some contrast and brightness in the room, we chose Charcoal Blue for the lower cabinets and Chic Grey for the upper, both colors by Behr Paint. Finally, we fitted them with all new hardware.
Ceiling
Because it wasn’t structural, we removed the center beam and stained the remaining beams to match the floors. (Check out the Living/Dining Room restoration to see where that center beam ended up!) We also installed recessed lighting by Kichler Lighting and rattan pendant lights.
Appliances & Additional Lighting
We updated the hood vent, oven, dishwasher, and refrigerator with stainless steel appliances for a sleeker, modern look. To ensure the hood vent matched the upper cabinets, we plastered, primed (again using KILZ 3 Premium Primer) and painted it using the same Chic Grey (a color by Behr). Finally, we installed under cabinet lighting by Kichler, added new electrical outlets throughout, and updated all electrical switches.
Other Changes
We updated the tile countertops and backsplash with a modern, white marble finish. To extend the bar, we added rounded lower cabinets and primed them (using KILZ 3 Premium Primer) for paint (Charcoal Blue by Behr) to match the others. Lastly, we added a 1×1 rail texture detail under the counter with hidden outlets. The sink, faucet, glass rinser, filtered water faucet, and hardware were all updated new products by Delta Faucet to complement the new look.
Why Do You Need to Prime?
Priming is essential for proper surface preparation for any paint project. It’s the difference between a job done and a job done right. Priming helps solve a wide range of problems, including highly porous surfaces, stains, odors, uneven surfaces, texture differences, and adhesion problems.
For this kitchen cabinet facelift we used, KILZ 3® Premium Primer, which is ideal for high-touch surfaces and humidity protection. It was perfect for our cabinet refresh thanks to its exceptional adhesion and ability to hide blemishes, stains, and other imperfections, which can accumulate over time, especially in older, generational homes like this one.
Step-By-Step Guide to Refinish Kitchen Cabinets:
Painting wood kitchen cabinets requires a few basic steps to get the smoothest finish and lasting results. Here’s an easy guide to follow for your next project:
1. Use a screwdriver to remove the cabinet doors and drawers from the cabinet frames and to remove all door handles and hardware.
2. Sand the surfaces of the doors, drawer faces, and cabinet frame to create a smooth surface for priming. Do a first pass with 100-150 grit sandpaper then finish with a second pass of 180-220 grit sandpaper. Remember, the higher the “grit” number, the smoother the finish.
3. When sanding, move the sandpaper in the same direction as the wood grain. If you go against the grain, you will end up with a lot of scratches that will show through your topcoat.
4. After sanding, wipe down the surface with a damp cloth to remove any dust or residue. Allow to dry.
5. Protect your floors and workspace from paint and primer by covering it with a drop cloth.
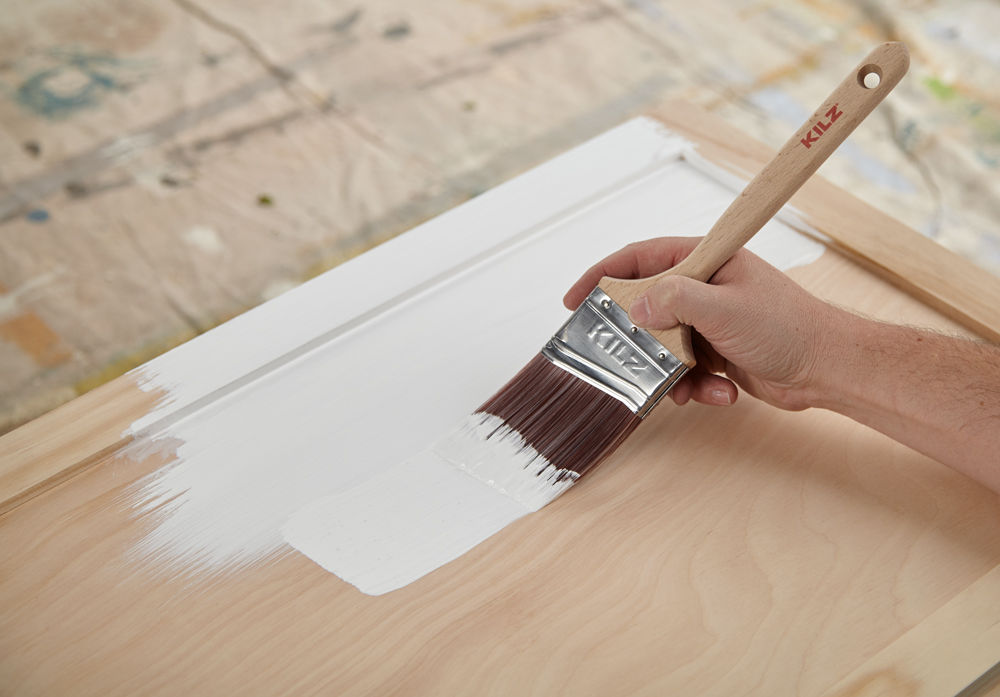
6. Now it’s time to prime! Using KILZ 3® Premium Primer, use a brush to make smooth strokes that go in the same direction as the wood grain.

• Pro-tip: To get better coverage along the sides of your door, raise it off your work surface with bricks.
7. Allow to dry for 2 hours.
8. Once the primer is dry, apply your kitchen cabinet paint of choice using the same application process at the primer.
• Pro-tip: For a really great result, apply primer and paint with a sprayer.

You Will Need:
• Screwdriver
• Dust mask
• 100-150 grit and 180-220 grit sandpaper
• Step ladder for hard-to-reach areas
• Rags to wipe dirty and dusty surfaces
• Painter’s tape
• Drop cloths, canvas, or other reusable material
• Paint roller, brush, and paint tray
• Paint of choice
We hope this episode of Destination Restoration inspires you to take on your own kitchen remodel this year. Be sure to keep KILZ® products in mind for your next project, and come back for more ideas, tips, and project inspiration.
If you loved this restoration, be sure to check out the other episodes of Destination Restoration. Jason and Jared took on the Primary Bedroom, Primary Bathroom, and Living/Dining Room.
Always remember to refer to our website kilz.com or product back labels for additional information on which primer is right for your project and detailed instructions on how to apply our products. Check out our Coverage Calculator to understand your estimated paint needs for your upcoming project.
RELATED ARTICLES
get inspired:
FOLLOw us:
@kilzbrand
SHOP
PRODUCTS
An Outdated Living Room Gets a Facelift
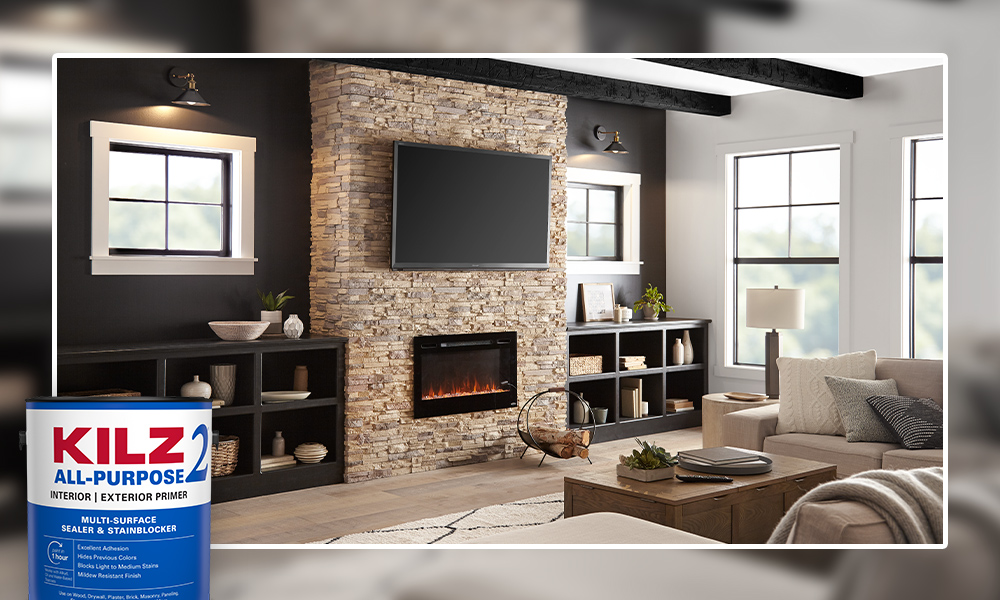
April 17, 2023On this episode of Destination Restoration, we upgraded an open concept family living/dining room, while demonstrating the power of primer in a striking fireplace restoration. Rather than putting this 4th generation home through a full gut rehab, our pros, Jason Lai (interior designer) and Jared Foster (contractor/pro painter) worked to reimagine the space and rejuvenate it for another generation. This series demonstrates how you can breathe new life into an older home while keeping its structural integrity intact.
Jason and Jared worked together to take this space from ordinary to inviting, contemporary, and cheerful with a few tweaks. Keeping in mind aesthetics and functionality, the goal was to avoid tearing things out and starting from scratch, and instead, add value to the existing room. They updated the décor, primed, and painted the fireplace, added new lighting, built a convenient storage unit in the dining area, and overall, made the space look chic and feel cozy.
We’ve broken down each area below so you can get a more detailed look into the upgrades we made. If you’re not sure where to start, we’ve included a step-by-step guide of how to paint brick fireplaces like the one here.
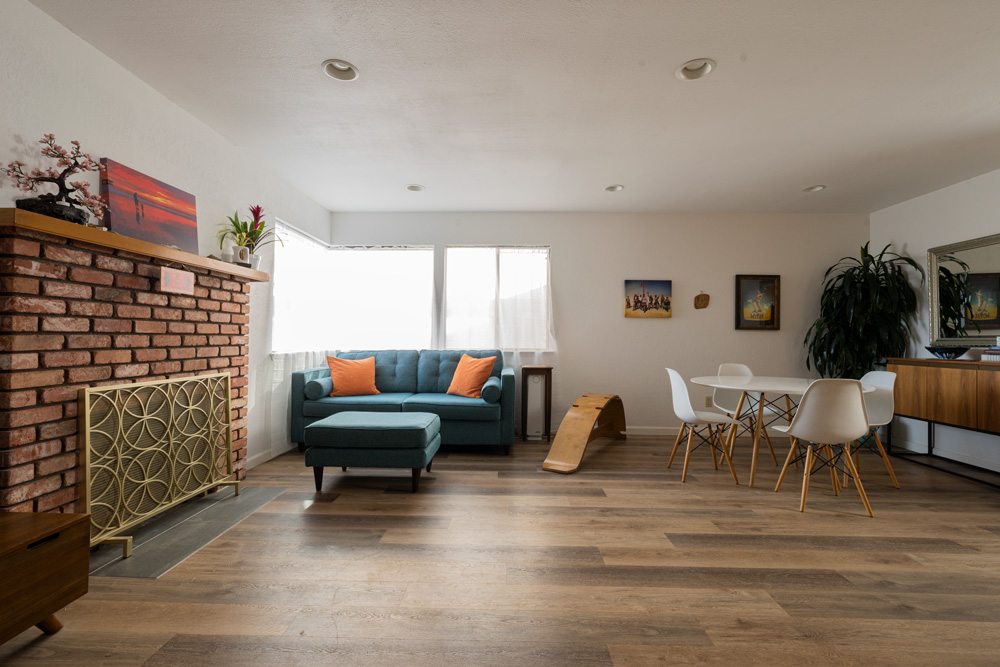
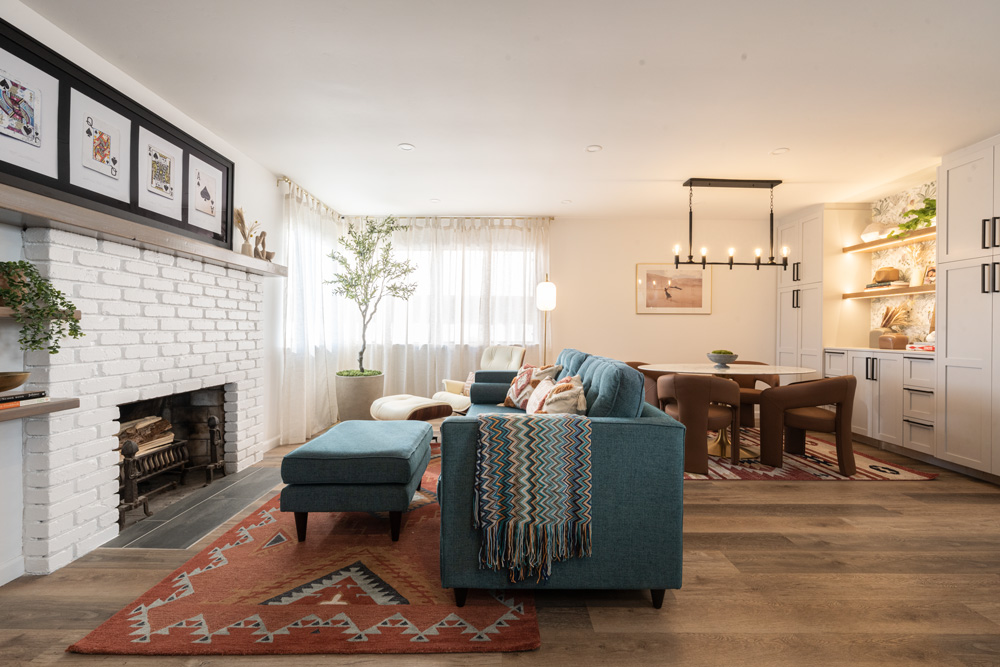
Living Area
First, we primed the fireplace and front door using KILZ 2® All-Purpose Primer. For living room paint colors, the front door was painted Chic Grey and the fireplace Whipped Cream, both colors by Behr Paint. We also replaced the front door hardware for a more modern look. Using the beam we removed from the kitchen ceiling, we stained and repurposed it to extend the mantle out to the left of the fireplace. Finally, we added floating shelves just underneath. These shelves were the result of leftover pieces from the kitchen beam, which were also stained to match.

Dining Area
To spruce up the old dining area, we replaced the buffet cabinet with a larger, built-in storage unit, and brightened it up with under cabinet lighting and a linear chandelier (by Kichler Lighting) over the dining table.
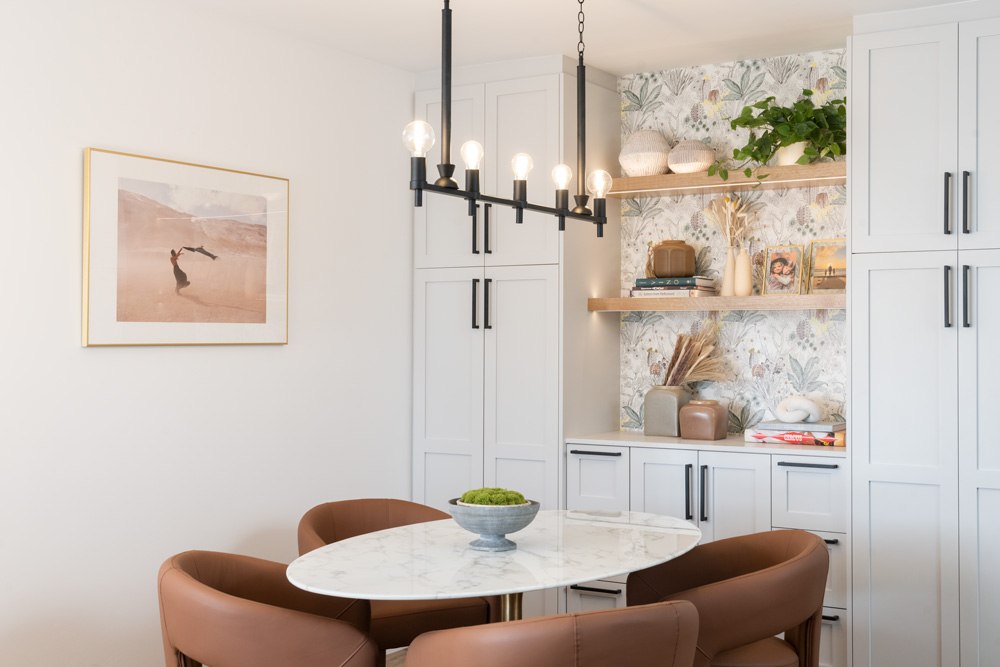
Other Changes
Our interior designer, Jason, added touches of new furniture and décor throughout this space to bring it into the modern day. He chose to keep the existing couch and update the throw pillows and blanket, as well as rearrange the furniture to create a distinct living and dining area within the space.
Why Do You Need to Prime?
Priming is essential for proper surface preparation for any paint project. It’s the difference between a job done and a job done right. Priming helps solve a wide range of problems, including highly porous surfaces, stains, odors, uneven surfaces, texture differences, and adhesion problems.
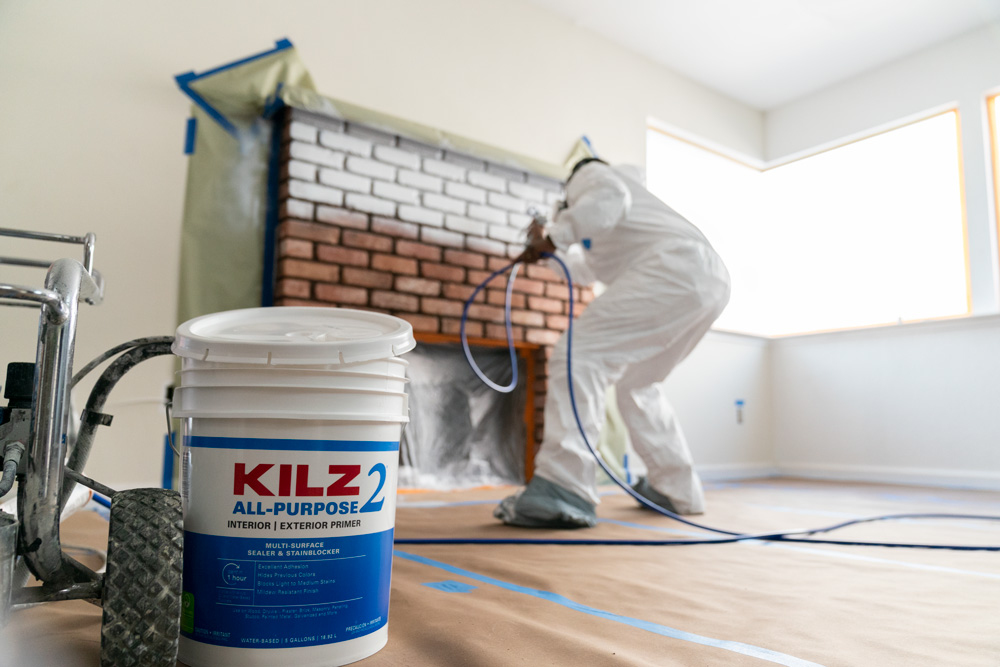
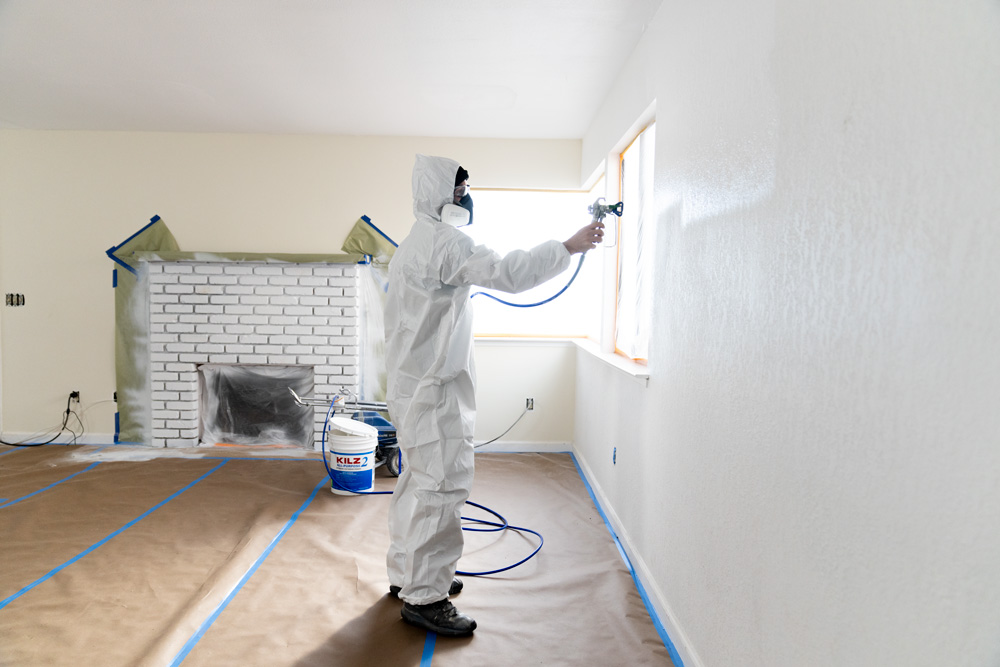
For the purposes of this project we used, KILZ 2® All-Purpose Primer because it dries fast and can be used on many surfaces, including brick. It’s also a great stain blocker with excellent adhesion, mildew resistance, sealing properties and a very mild odor. Its enhanced hiding formula makes it ideal for changing colors, like in the case of our fireplace, and helps lessen the number of coats of paint required, saving you time and money.
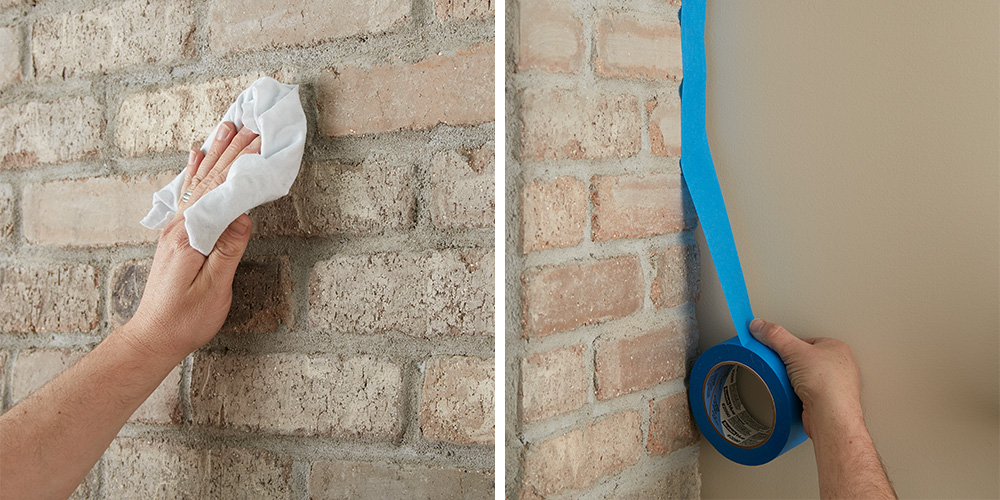
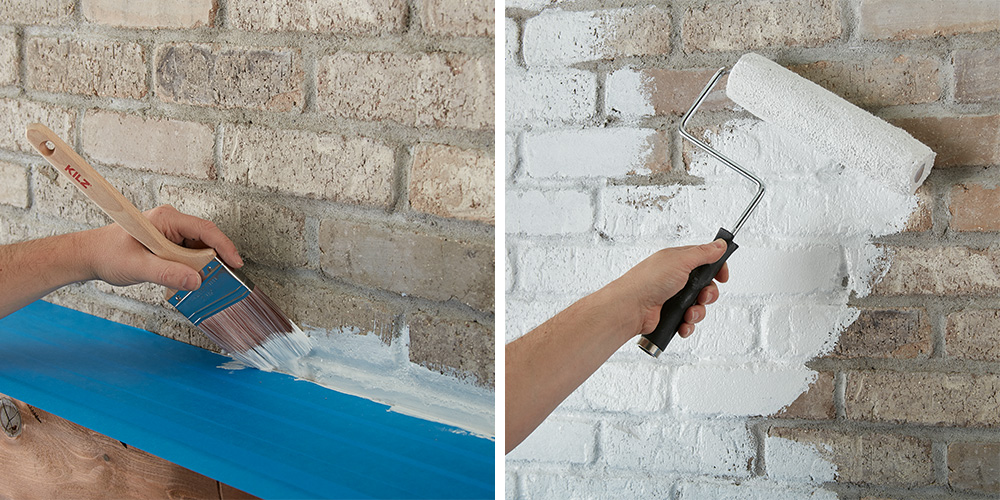
Step-By-Step Guide for a Brick Fireplace Makeover:
A primed and painted fireplace requires a few basic steps from start to finish. Here’s an easy guide to follow for your next project:
1. Clean the bricks. If it’s extra dirty, start with a vacuum and use the crevice tool attachment to clean between the bricks. Next, wipe down the fireplace with a damp cloth to ensure all surfaces are clean and free of any lingering dust. Allow to dry.
2. Tape around the fireplace to protect the walls and floor. Also tape around the mantel and where the brick meets the firebox (the inside where the wood goes!) to keep that area protected from paint and primer.
3. Protect your floors from paint and primer by covering it with a drop cloth.
4. Now it’s time to prime! Using KILZ 2® All-Purpose Primer, start with an angled brush to cut in around the mantle and edges of the fireplace.
5. Next, use a roller to cover the brick faces with primer.
6. Go back with a small, angled brush to fill in any remaining grout areas and crevices in the bricks.
7. Allow to dry for 1 hour.
8. Once the primer is dry, apply paint of your choice using the same application process at the primer.
9. Remove the painter’s tape before your paint is fully dry.
You Will Need:
• Vacuum and rags to wipe dirty and dusty surfaces
• Painter’s tape
• Drop cloths, canvas, or other reusable material
• Paint roller, angled brush, and paint tray
• Paint of choice
We hope this episode of Destination Restoration inspires you to tackle your own living room remodel this year. Be sure to keep KILZ® products in mind for your next project, and come back for more ideas, tips, and project inspiration.
If you loved this restoration, be sure to check out the other episodes of Destination Restoration. Jason and Jared took on the Kitchen, Primary Bedroom and Primary Bathroom.
Always remember to refer to our website kilz.com or product back labels for additional information on which primer is right for your project and detailed instructions on how to apply our products. Check out our Coverage Calculator to understand your estimated paint needs for your upcoming project.
RELATED ARTICLES
get inspired:
FOLLOw us:
@kilzbrand
SHOP
PRODUCTS
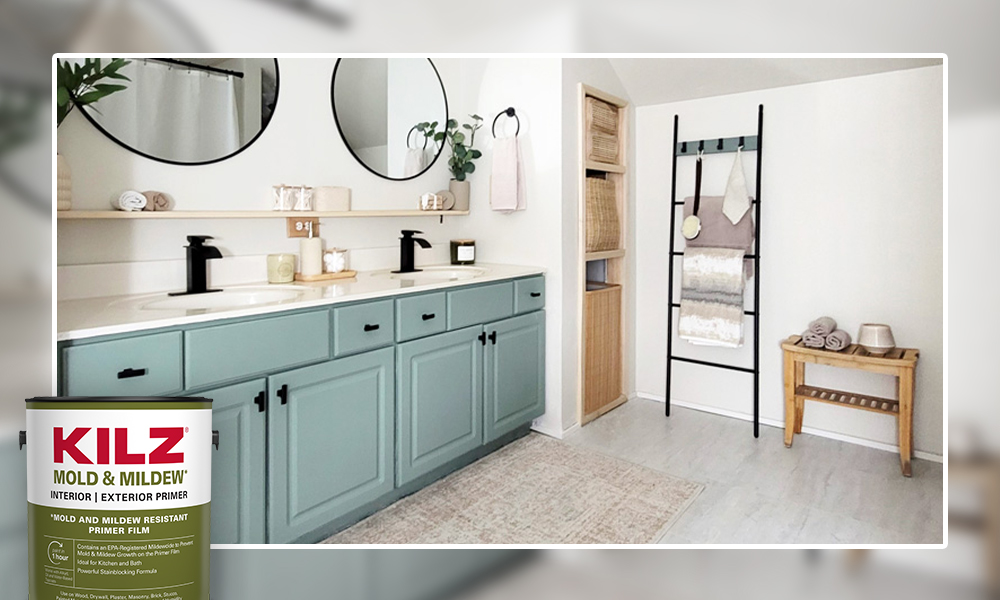
Bringing a Primary Bathroom Back to Life
April 17, 2023In this episode of our Destination Restoration series, we show you how to update a primary bathroom past its prime. This bathroom, like the rest of the rooms in this house, was outdated, dark, and in need of some attention. But, with a few cosmetic fixes, our pros, Jason Lai (interior designer) and Jared Foster (contractor/professional painter) transformed this room into something truly special.
This series demonstrates how you can breathe new life into an older home (in this case, a 4th generation family home), while keeping its structural integrity intact.
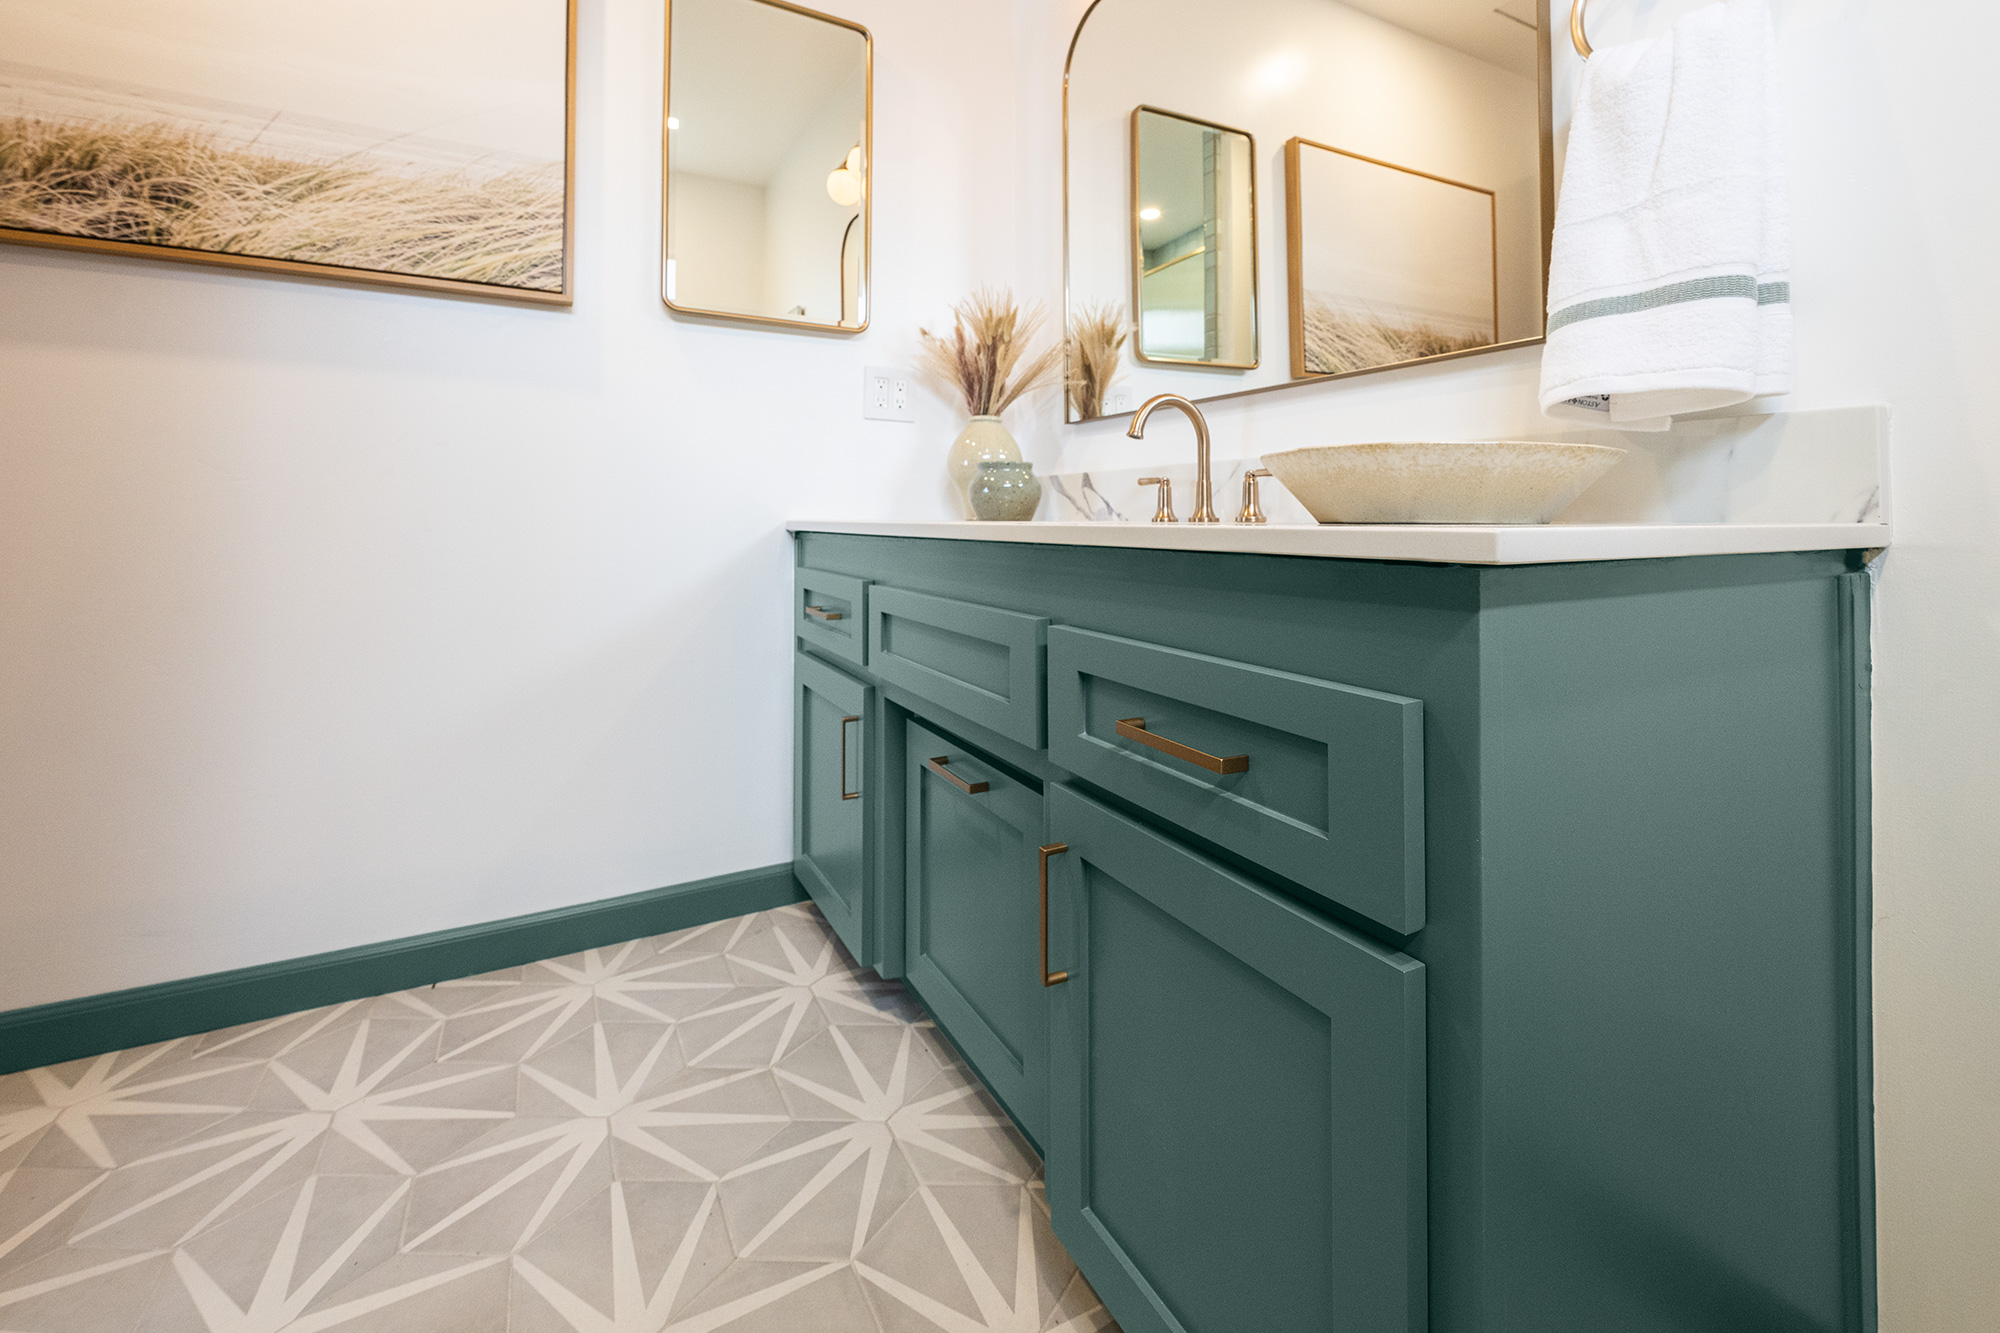
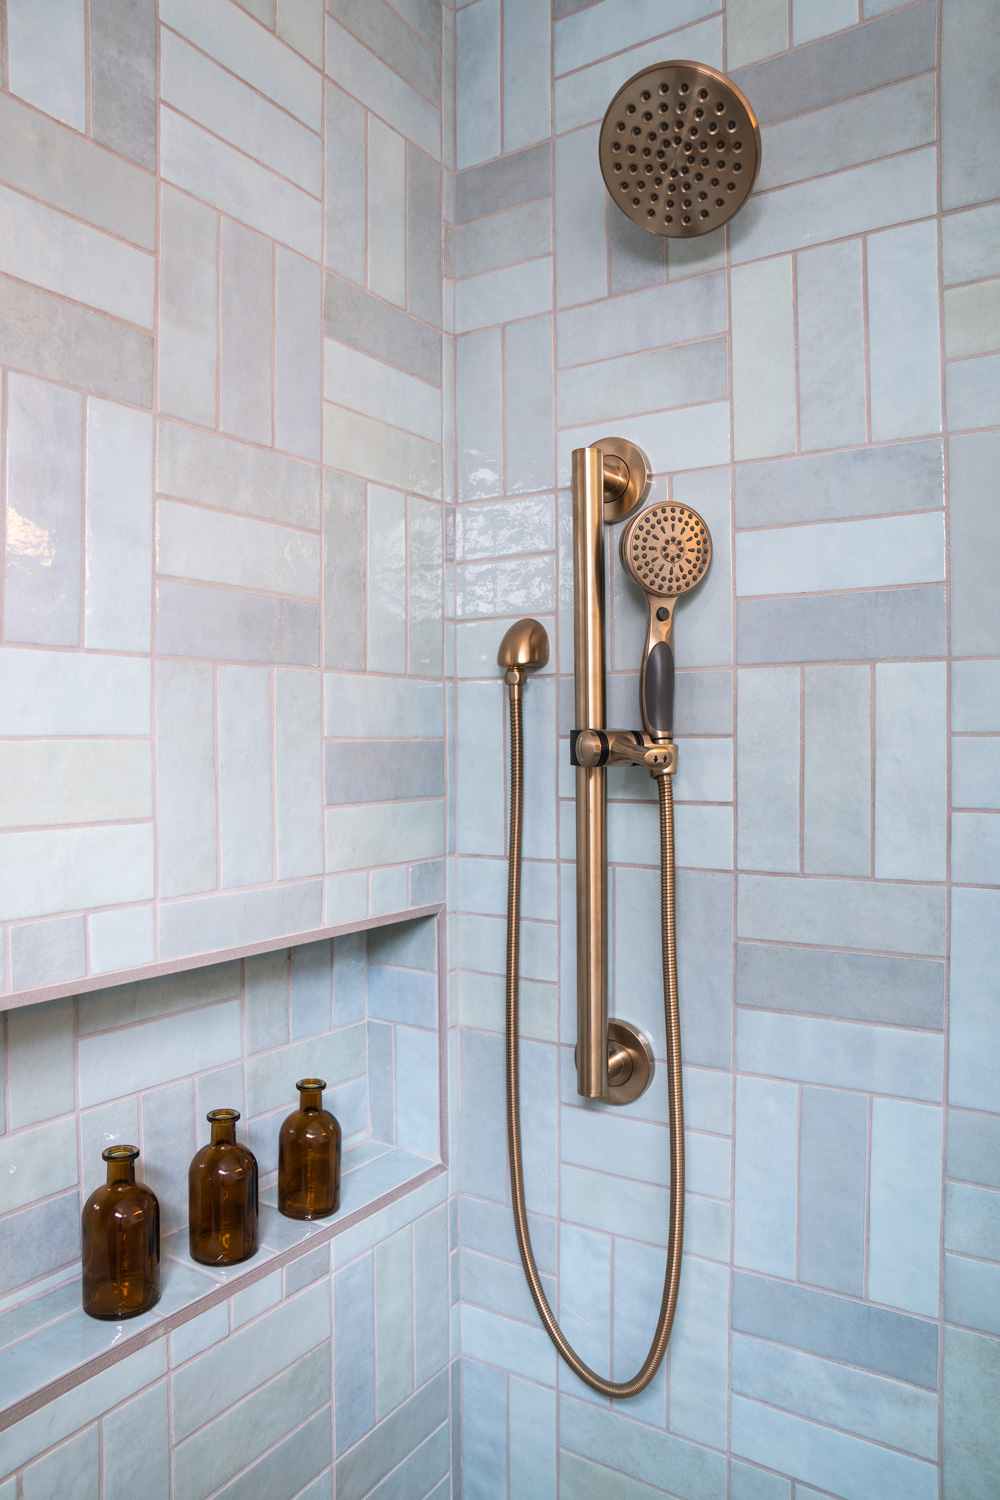
Just off the primary bedroom, the small, 4-piece primary bathroom was in desperate need of a facelift. Like a kitchen, there are many elements to consider in a bathroom, including hardware, tile, glass, and lighting. Not to mention a color scheme and décor. Using KILZ® Mold & Mildew Primer, we were able to restore the existing vanity and give it a fresh topcoat. We also replaced the tile and countertop, updated the walk-in shower, and painted the walls for a fresh new look that complemented the rest of the home.
While the bathroom is a smaller room compared to the others in your home, that doesn’t make it any less of a project. All it takes is a great concept and a team who knows how to execute, and you can bring any bathroom up to date in no time. For some bathroom inspiration, see the breakdown of our project in more detail below. We’ve also included a step-by-step guide on how to paint bathroom cabinets.
Vanity, Cabinets & Walls
To start, we primed the vanity using KILZ® Mold & Mildew Primer and painted it with Aspen Valley, a color by Behr Paint, for a teal effect that tied in well with other areas of the home. We also updated the cabinets to shaker style to mimic the update we made to the kitchen cabinets. For the other bathroom paint colors, we painted the walls, ceiling, and door with Whipped Cream, a color by Behr.
Shower & Hardware
We replaced the bathtub with a sleek walk-in shower, which we also retiled using a multicolored eggshell tile to contrast with the teal of the vanity. Lastly, we installed all new fixtures by Delta Faucet.
Other Changes
The floor was old and dingy, so we replaced it with an updated, geometric pattern tile—a fun detail that tied in well with the rest of the décor—and we added new overhead lighting and sconces by Kichler Lighting.
Why Do You Need to Prime?
Priming is essential for proper surface preparation for any paint project. It’s the difference between a job done and a job done right. Priming helps solve a wide range of problems, including highly porous surfaces, stains, odors, uneven surfaces, texture differences, and adhesion problems.
KILZ® Mold & Mildew Primer is a water-based primer-sealer-stain blocker, specially designed for residential surfaces in high humidity, moisture, and temperature environments, and a perfect choice for our bathroom makeover. It offers excellent adhesion, while providing a sound anchor for paints. The EPA registered active ingredient creates a mold and mildew-resistant film that protects the primer film from mold and mildew growth, so you can enjoy your newly-restored bathroom for years to come.
Step-By-Step Guide To Painting Bathroom Cabinets:
Refinishing a bathroom vanity requires a few basic steps to get the smoothest finish and results that will last in a humid environment. Here’s an easy guide to follow for your next project:
1. Use a screwdriver to remove the cabinet doors and drawers from the vanity and to remove all door handles and hardware.
2. Sand the surfaces of the doors, drawer faces, and vanity to create a smooth surface for priming. Do a first pass with 100-150 grit sandpaper then finish with a second pass of 180-220 grit sandpaper. Remember, the higher the “grit” number, the smoother the finish.
3. When sanding, move the sandpaper in the same direction as the wood grain. If you go against the grain, you will end up with a lot of scratches that will show through your topcoat.
4. After sanding, wipe down the surface with a damp cloth to remove any dust or residue. Allow to dry.
5. Protect your floors and workspace from paint and primer by covering it with a drop cloth.
6. For mildew-prone areas like a bathroom, select a primer formulated for high humidity, moisture, and temperature environments like KILZ® Mold & Mildew Primer.
7. Now it’s time to prime! Using your primer, use a brush to make smooth strokes that go in the same direction as the wood grain.
8. Allow to dry for 2 hours.
9. Once the primer is dry, apply paint of your choice using the same application process at the primer.
• Pro-tip: For a really great result, apply primer and paint with a sprayer.
10. Once your paint is dry, reattach hardware to doors, and then reattach the doors to the vanity.
You Will Need:
• Screwdriver
• Dust mask
• 100-150 grit and 180-220 grit sandpaper
• Rags to wipe dirty and dusty surfaces
• Drop cloths, canvas, or other reusable material
• Paint roller, brush, and paint tray
• Paint of choice
We hope this episode of Destination Restoration inspires you to tackle your own bathroom remodel this year. Be sure to keep KILZ® products in mind for your next project, and come back for more ideas, tips, and project inspiration.
If you loved this restoration, be sure to check out the other episodes of Destination Restoration. Jason and Jared took on the Kitchen, Primary Bedroom and Living/Dining Room.
Always remember to refer to our website kilz.com or product back labels for additional information on which primer is right for your project and detailed instructions on how to apply our products. Check out our Coverage Calculator to understand your estimated paint needs for your upcoming project.
RELATED ARTICLES
get inspired:
FOLLOw us:
@kilzbrand
SHOP
PRODUCTS
From Stained to Stunning: Restoring a Primary Bedroom
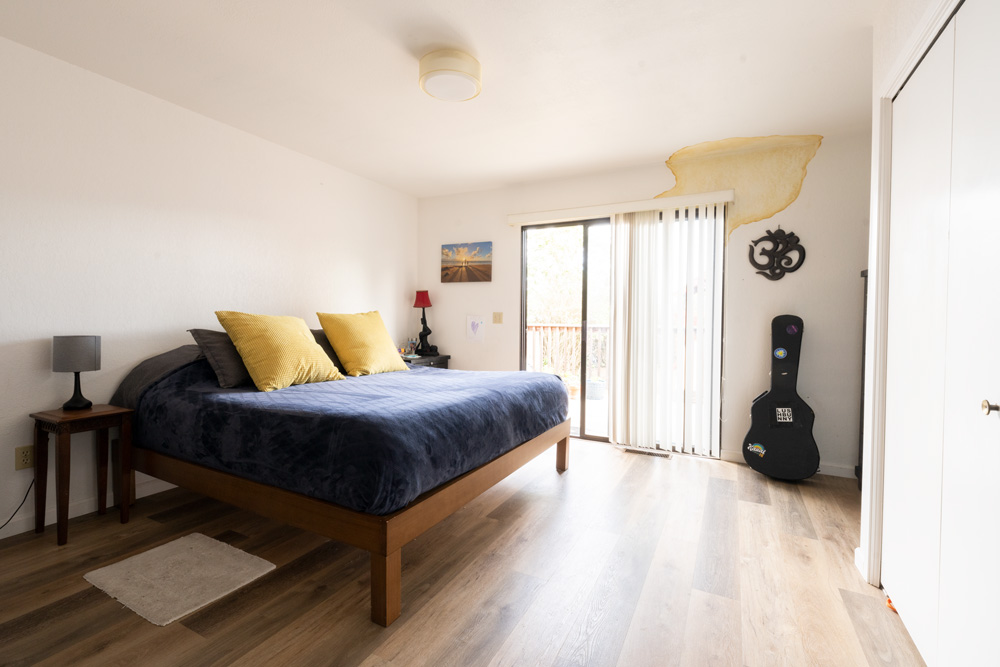
April 17, 2023On this episode of Destination Restoration, we show you how to restore a room that’s suffered a bit of damage. Older generational homes can accumulate imperfections over time, especially stains from things like water damage. In the case of today’s refresh, not only do we take a standard primary bedroom and update it for a new era, but we also tackle how to restore unsightly, odorous stains using primer and a fresh coat of paint.
This series demonstrates how you can breathe new life into an older home (in this case, a 4th generation family home), while keeping its structural integrity intact.
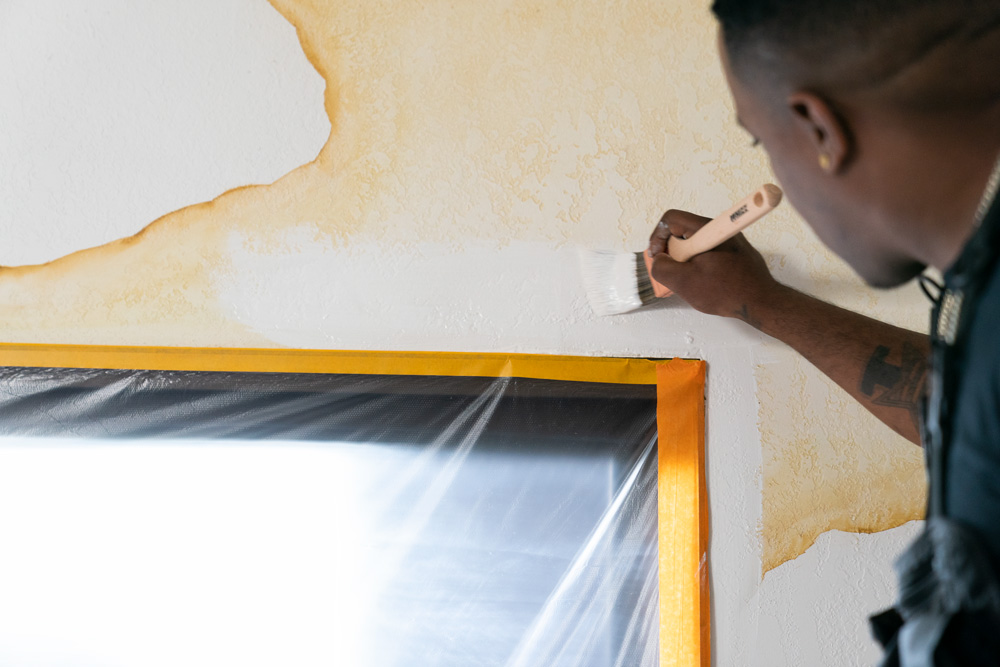
Once again, our fabulous design duo—Jason Lai (interior designer) and Jared Foster (contractor/pro painter) —found a way to update this modest room while addressing the large yellow stain that had leaked its way around the sliding glass door. Our goal was to both cover it up and ensure it wouldn’t show through, which we achieved with a thorough coat of primer and a new coat of paint. Due to the lack of storage in the room, we also wanted to install a custom unit, with ample cabinets to make the space more functional and a modern haven for the parents of this lovely family home.
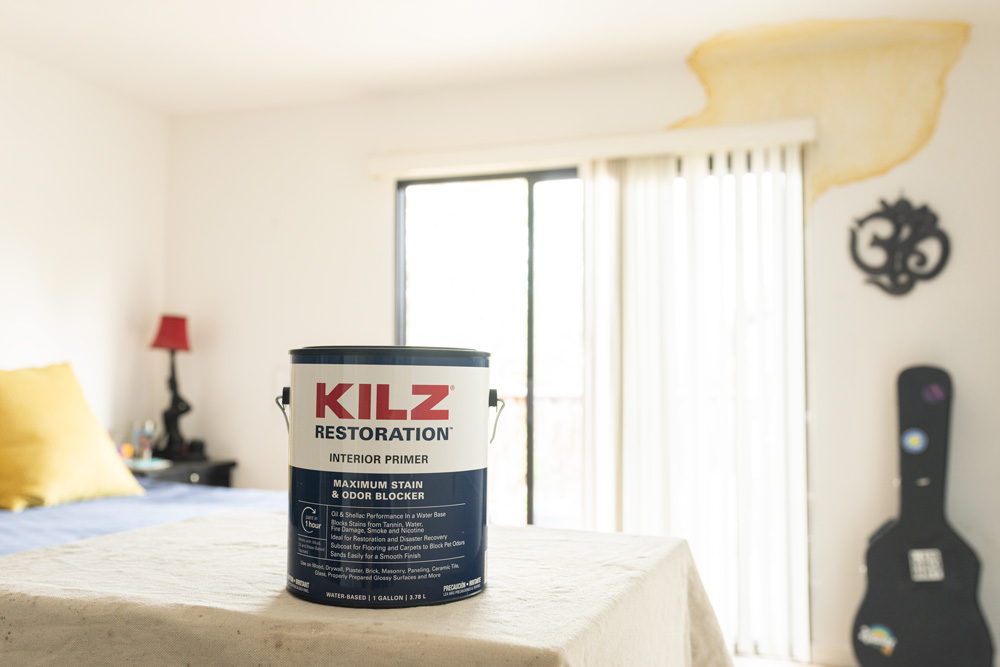
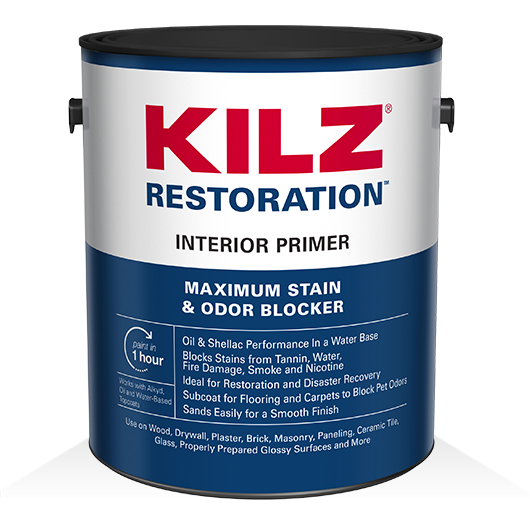
Covering up stains takes a little extra effort but is totally doable with the right tools. Make sure you choose a sturdy primer that’s right for the job, like KILZ RESTORATION® Interior Primer when tackling a similar project of your own, and follow along to see how our pros approached this room makeover. We’ve also included a step-by-step guide on how to paint over water stains using primer.
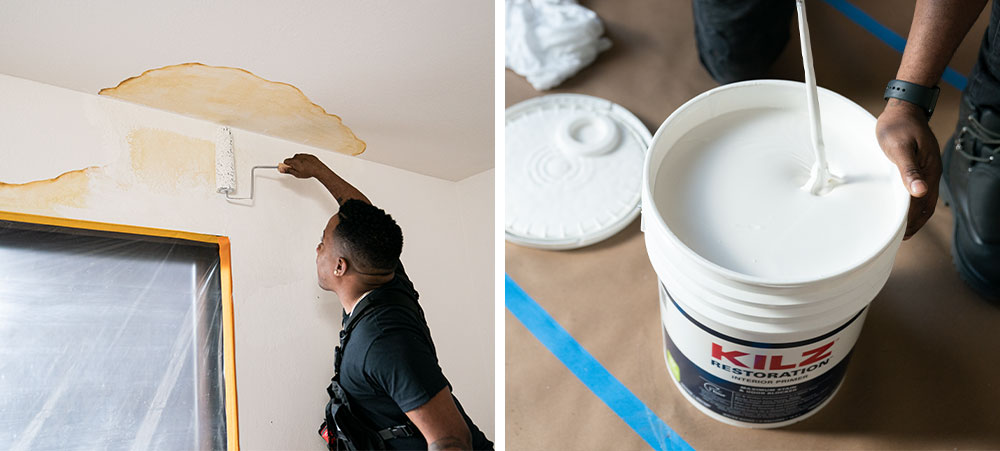
Stain Coverage
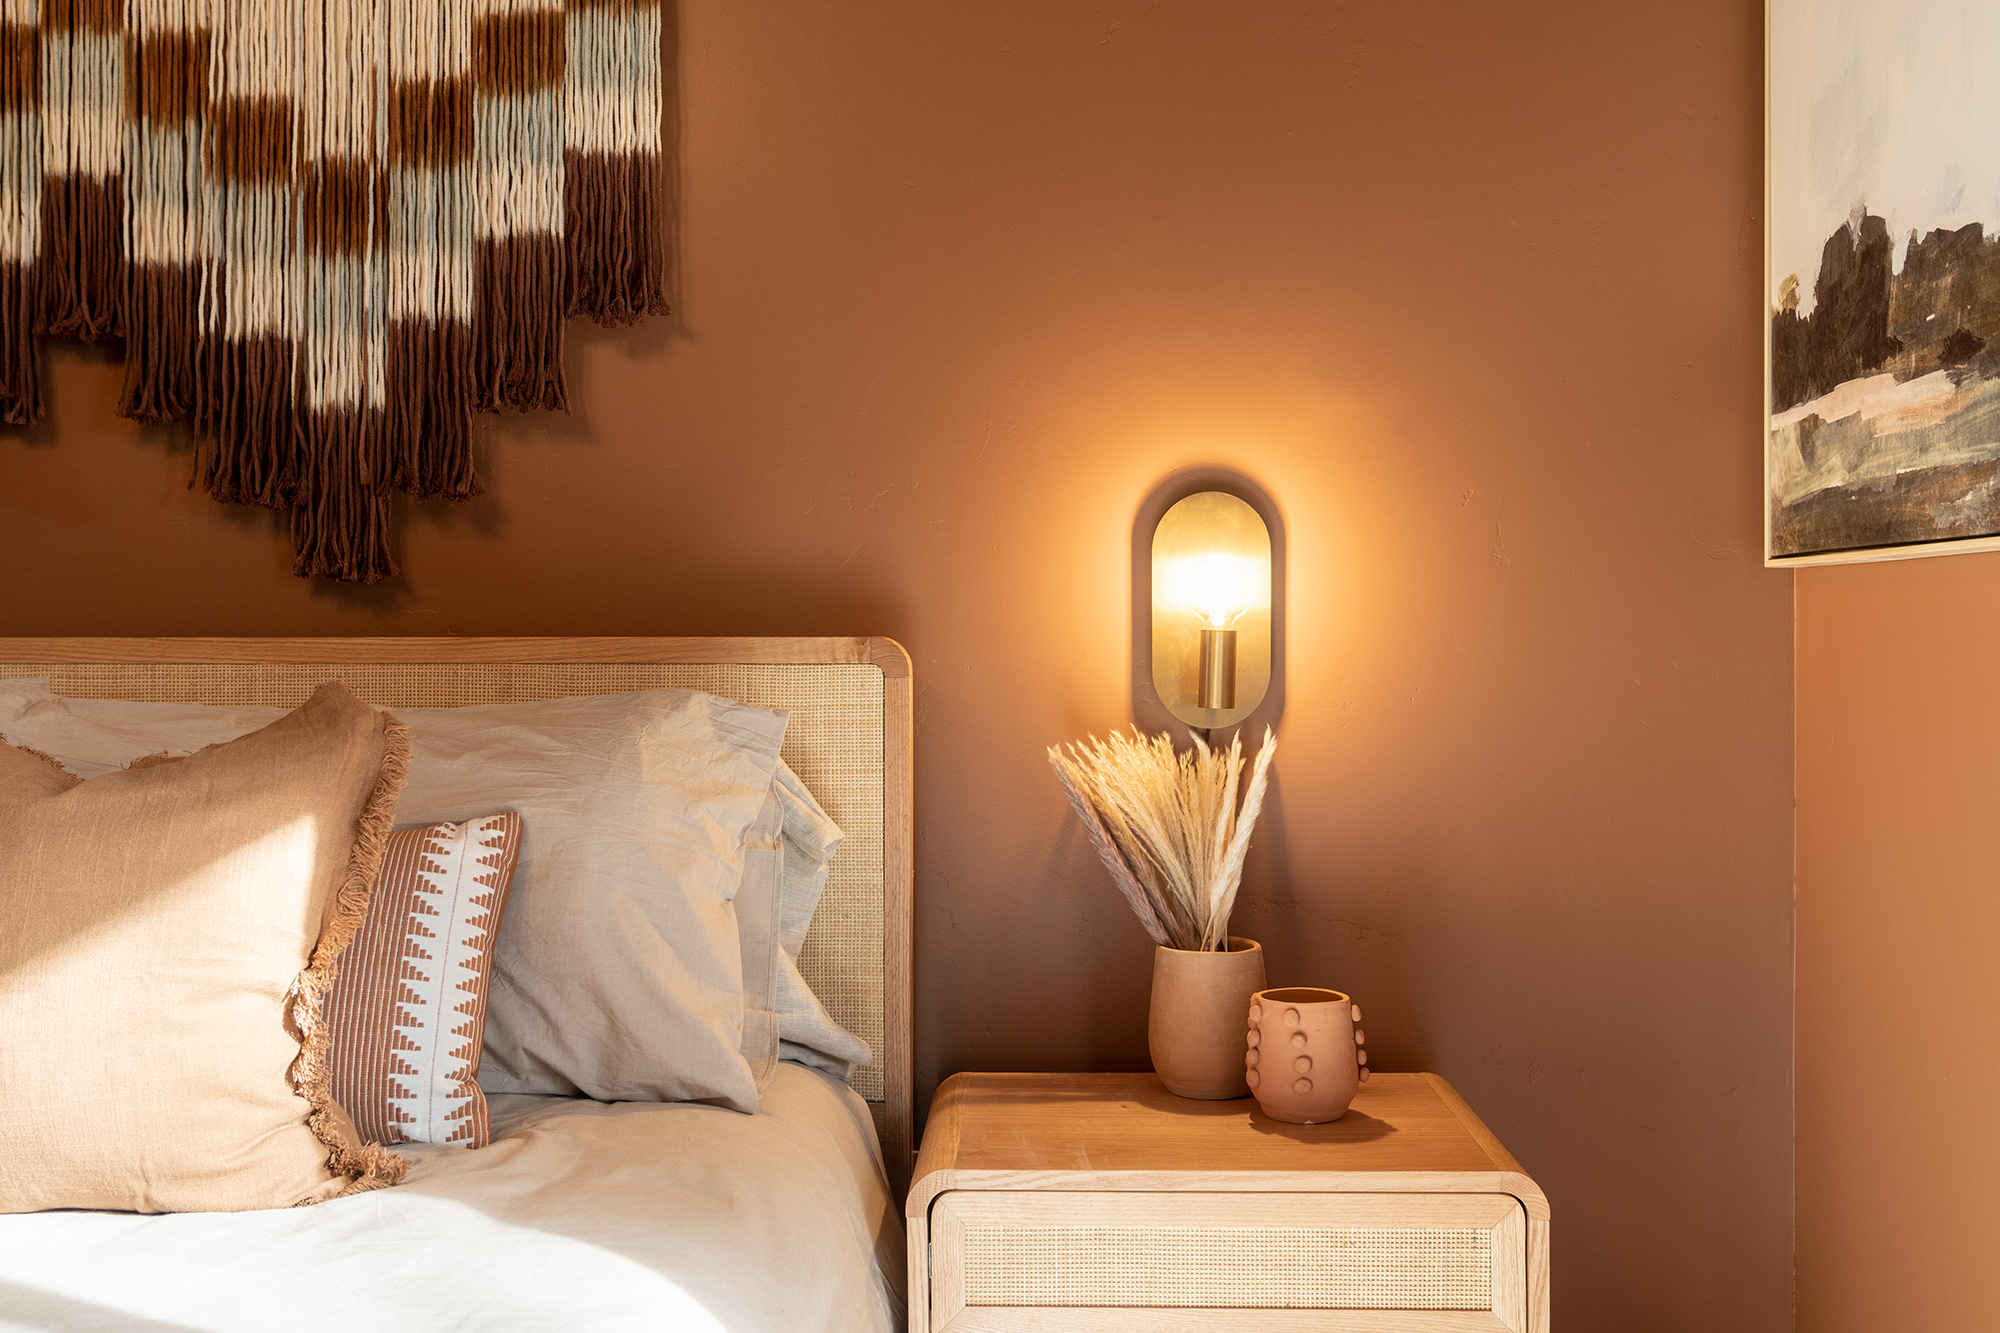
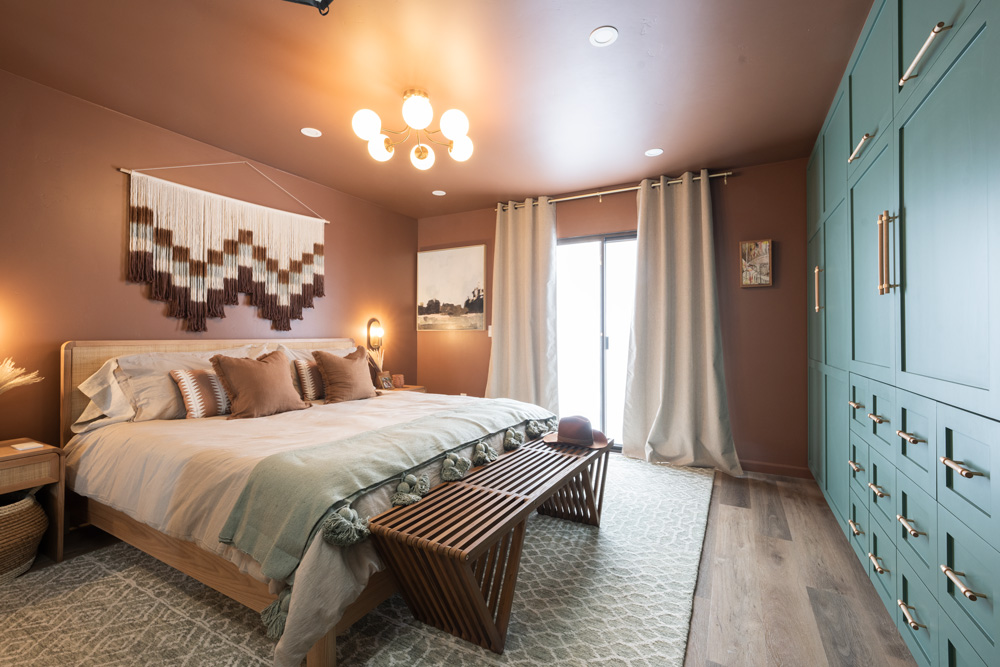
The main goal of this room refresh was to remove any trace of the water stain and get rid of its foul odor at the same time. To do this, we primed over the water stain using KILZ RESTORATION® Interior Primer then painted the walls, ceiling, and molding with Rio Rust, a color by Behr Paint.
Extra Storage
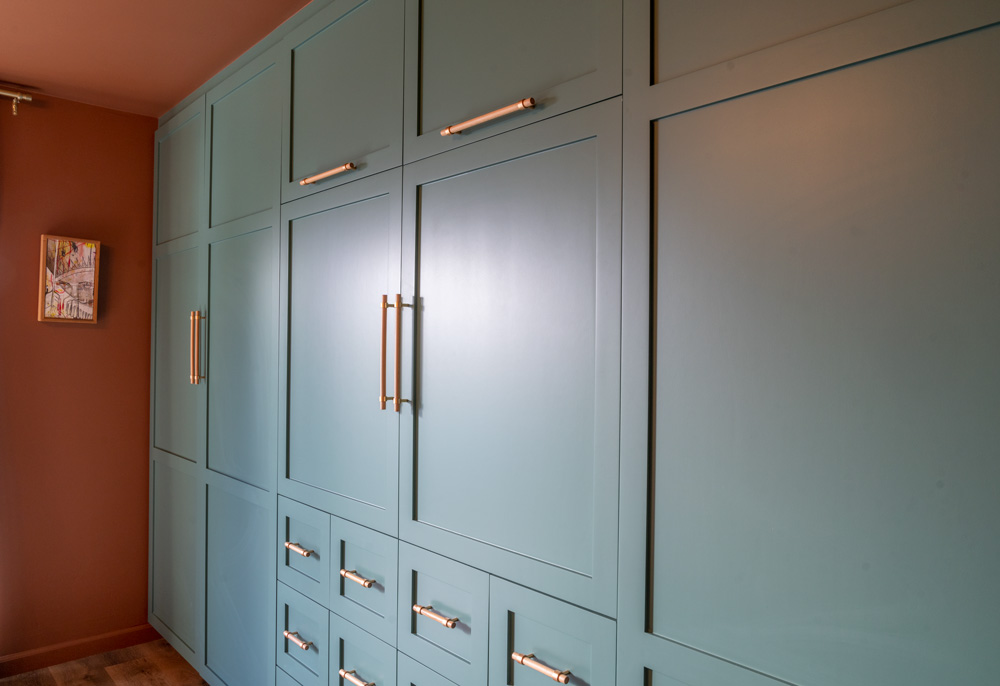
To replace the lackluster closet, we added a custom, built-in closet system with a hidden TV display, perfect for unwinding after a long day. We primed the unit, and then painted it with Forest Edge, a color by Behr Paint, for its ability to stand out and complement the color of the rest of the room. Together, these colors elevated the room and gave it a warm, modern, and cozy feel.
Other Changes
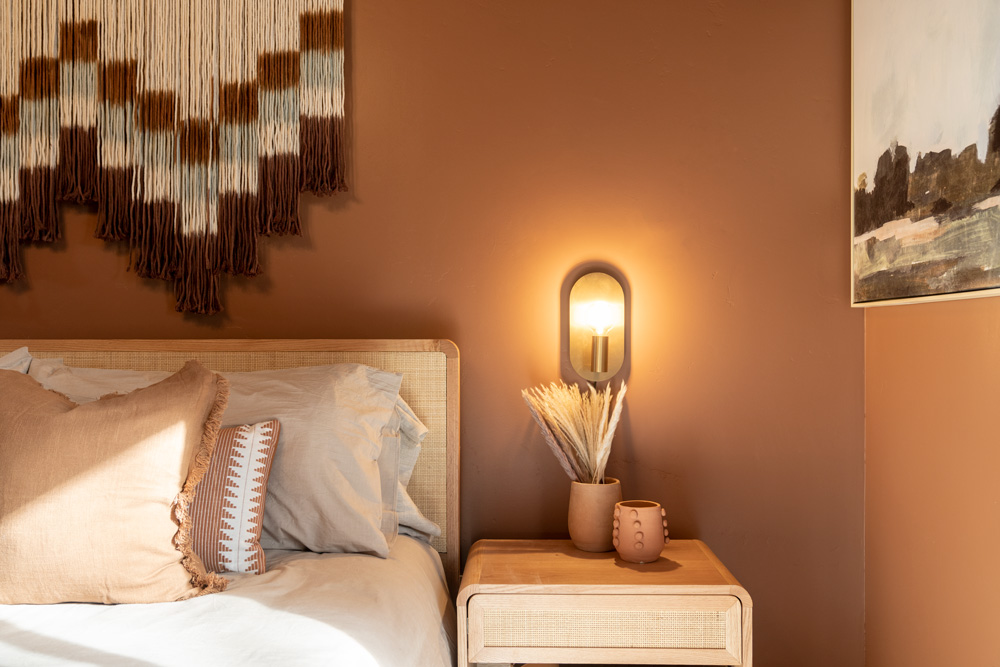
We wanted to update the existing lighting to complement the new design and bring more warmth to the space, so we added a modern chandelier by Kichler Lighting, as well as additional recessed lighting fixtures on the ceiling. We also replaced the door hardware, updated the electrical throughout, and added carefully chosen décor to bring this refined boho-chic look together.
Why Do You Need to Prime?
Priming is essential for proper surface preparation for any paint project. It’s the difference between a job done and a job done right. Priming helps solve a wide range of problems, including highly porous surfaces, stains, odors, uneven surfaces, texture differences, and adhesion problems.
Because this room required stain coverage we used, KILZ RESTORATION® Interior Primer for its superior, water-based sealing and stain blocking formula. It can tackle tough stains from heavy water damage, rust, smoke, nicotine, grease, tannin, ink, pencil, felt marker, pet stains and more. It’s also a champion odor blocker and can be used on many interior surfaces including drywall, woodwork, plaster, masonry, brick, painted metal, ceramic tile, glass, and most other glossy surfaces.
Step-By-Step Guide to Stain Blocking and Priming Walls:
Painting over water stains requires a few basic steps from start to finish. Here’s an easy guide to follow for your next project:
1. Patch any holes from damage and sand smooth to prep the surface (if needed)
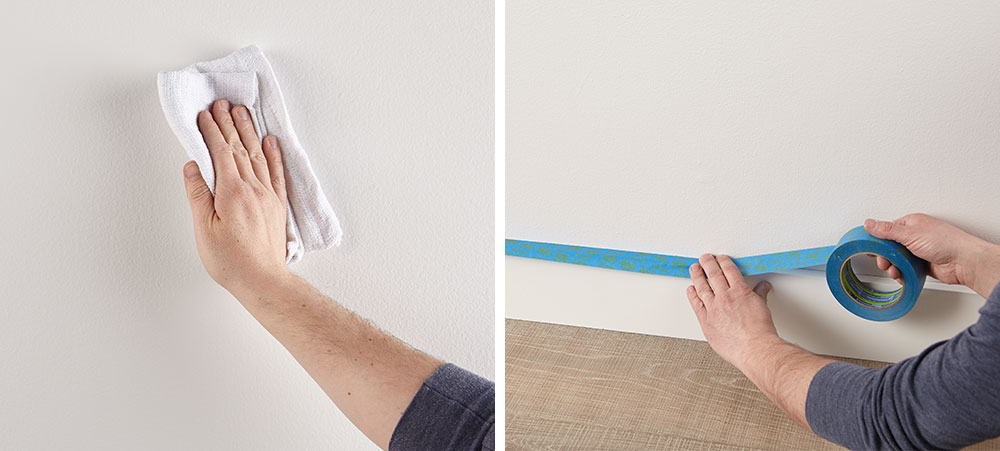
2.Thoroughly clean your surfaces with a damp cloth to ensure they are clean and free of dust. Allow to dry.
3. Tape around the baseboards, trim and moldings.
4. Protect your floors and furniture from paint and primer by covering it with a drop cloth or plastic sheets.
5. For major stains like water, grease, or smoke, select a heavy-duty stain blocker like KILZ RESTORATION® Interior Primer.
6. Now it’s time to prime! Using a brush first to “cut in” around the edges and small crevices, then use a roller to fill in the larger areas.
7. Allow to dry for 1 hour.
8. Once the primer is dry, apply paint of your choice using the same application process at the primer.
9. Remove the painter’s tape before your paint is fully dry.
You Will Need:
• Dust mask
• Pole sander with sandpaper, 60-80 grit
• Extension pole for prep and painting, 3’-7′
• Step ladder for hard-to-reach areas
• Rags to wipe dirty and dusty surfaces
• Painter’s tape
• Drop cloths, canvas, or other reusable material
• Plastic sheets, for protecting furniture
• Spackle and applicator
• Paint roller, brush, and paint tray
• Paint of choice
• KILZ RESTORATION® Interior Primer
We hope this episode of Destination Restoration inspires you to tackle your own bedroom remodel this year. Be sure to keep KILZ® products in mind for your next project, and come back for more ideas, tips, and project inspiration.
If you loved this restoration, be sure to check out the other episodes of Destination Restoration. Jason and Jared took on the Kitchen, Living/Dining Room, and Primary Bathroom.
Always remember to refer to our website kilz.com or product back labels for additional information on which primer is right for your project and detailed instructions on how to apply our products. Check out our Coverage Calculator to understand your estimated paint needs for your upcoming project.
RELATED ARTICLES
get inspired:
FOLLOw us:
@kilzbrand
SHOP
PRODUCTS
Primers Save You Time, Money, and Labor
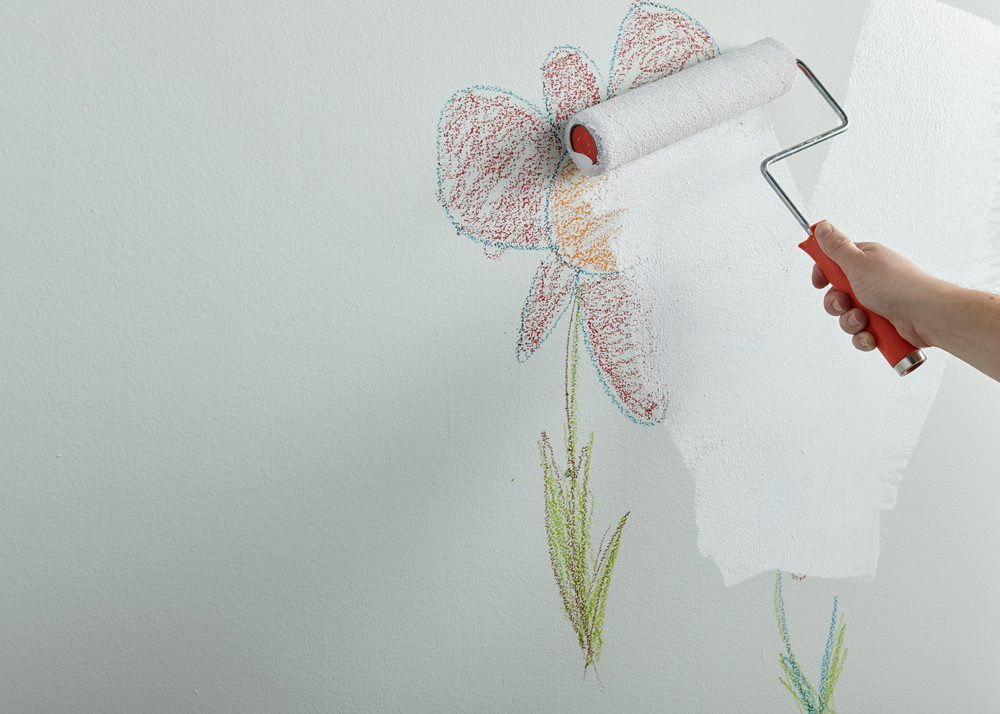
January 18, 2023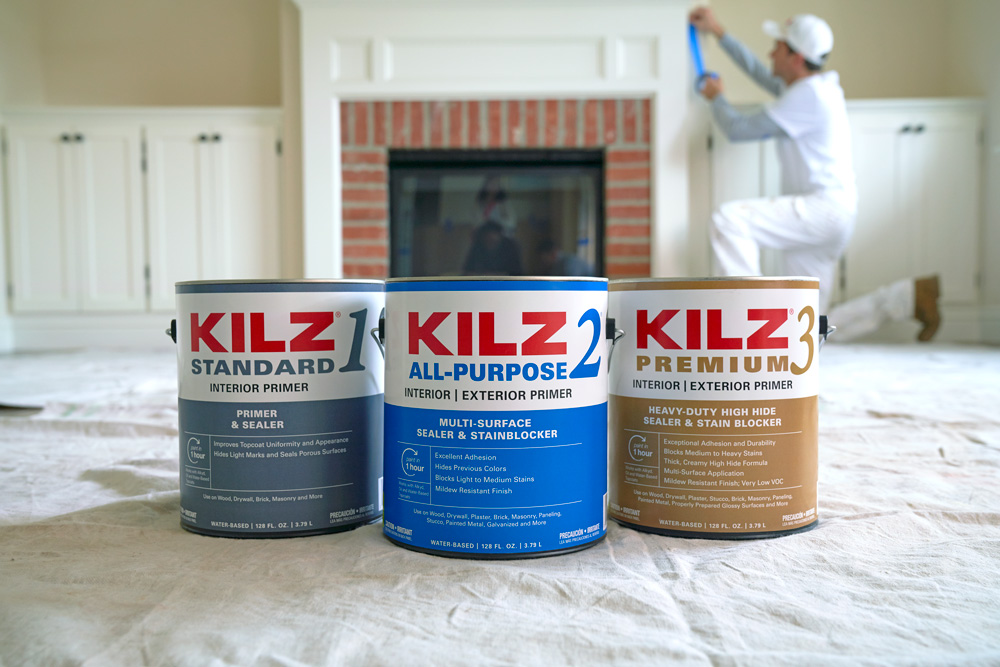 Primer is essential to properly prepare a surface for the best results for your paint project. Many issues can ruin a project and not make it look its best, affecting your time and money. This could lead to purchasing more paint due to a porous surface not being sealed or using more coats to hide that old color. Priming provides a clean slate for the color of your topcoat to shine. Additionally, primer helps hide any stains, such as water leaks, pet accidents, or years of smoke residue. Some paints have trouble adhering to certain surfaces, which could result in chipping, flaking, or peeling over time. Primer acts like glue to help the topcoat adhere and last longer.
Primer can save you time by sealing porous surfaces evenly and resulting in fewer coats of topcoats. Primer acts as an “anchor” for the paint to adhere to the painted surface, reducing the probability of retouching paint and re-doing a project sooner. For those more technically advanced, primers hold a unique feature that allows you to paint on a new concrete or masonry surface sooner.
Primer can save you money because it is formulated to solve specific problems before you paint, creating a suitable surface for lasting results. Primer costs less than the topcoat, so using a primer first and then applying the topcoat would be cheaper than applying multiple coats of topcoat only. You also save money in the long term due to better, longer-lasting results, which means less need to repaint or repair.
Primers can save you labor because they provide an ideal base coat to which the topcoat can adhere better and result in a better-looking, longer-lasting paint finish. Applying primer also can solve several problems, and best prepare the surface for painting, resulting in less time and later labor do-overs.
The KILZ brand offers primer for all types of substrate and surface issues. Check out our offering here!
Always remember to refer to our website kilz.com or product back labels for additional information on which primer is right for your project and detailed instructions on how to apply our products. Check out our Coverage Calculator to understand your estimated paint needs for your upcoming project.
RELATED ARTICLES
get inspired:
FOLLOw us:
@kilzbrand
SHOP
PRODUCTS
Our Favorite Projects of 2022
November 17, 2022The end of the year is right around the corner, which means it’s time to look back on some of our biggest accomplishments of 2022. What better way to recap the last 12 months than to revisit some of your favorite projects? From kitchens to bathrooms to living spaces, 2022 did not disappoint. When it came to updating, revamping, and overhauling, the year was full of inspiring home makeovers, so let’s recap some of our biggest standouts, and get excited to tackle another year of home improvement.
1. How to Prime Kitchen Cabinets for Color That Pops
You may remember this gorgeous kitchen update from earlier in the year. This project featured three different kitchen inspirations, all using KILZ 3®PREMIUM Interior and Exterior Primer, which came to life thanks to varied design concepts and paint combos that gave the original space some much needed personality. Two toned kitchen cabinets were a theme for this project, and using subtle, yet distinct colors that played off one another, we achieved a polished effect that would make any pro proud. See the full project.
2. Pro Spotlight: Angela Cacace Creates a Spacious and Fresh Feeling Bathroom
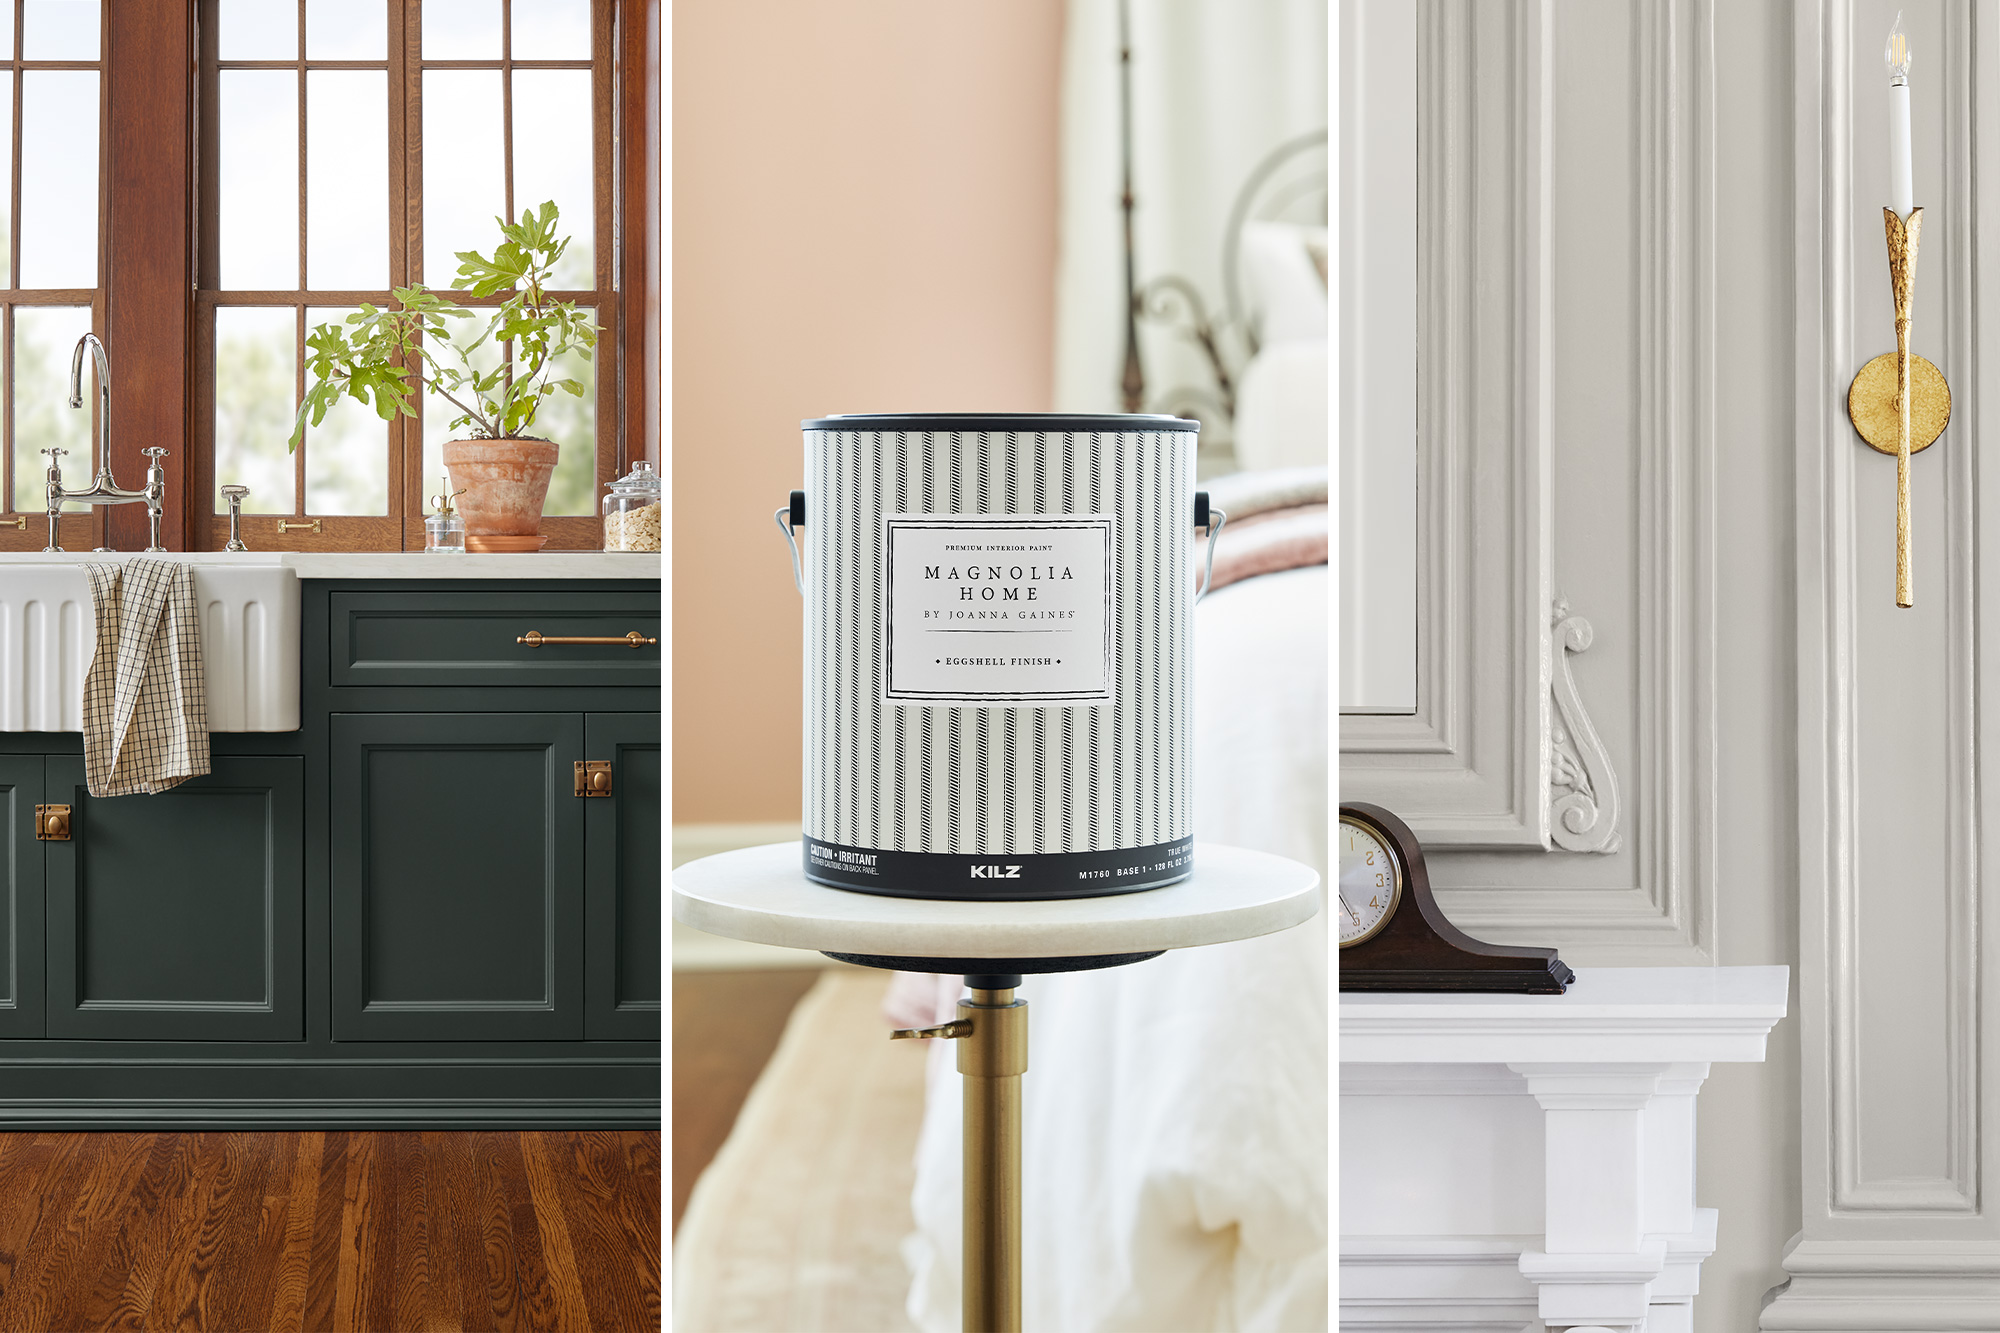
This outdated bathroom was in desperate need of a makeover, and pro designer and contractor, Angela Cacace, took everything from budget to aesthetic to difficulty into consideration. She used KILZ® Mold and Mildew Resistant Primer to start, and then finished the room using light and airy paint selections from the Magnolia Home by Joanna Gaines® collection to make the bathroom feel fresh, bright, and spacious. Achieving the creamy and neutral result was no small feat considering the hot pink “before” color of the walls and the heavy black cabinets. Primer was an absolute must for this project, and the true star of the show. See the full project.
3. Restoration vs. Original – What’s the Difference?
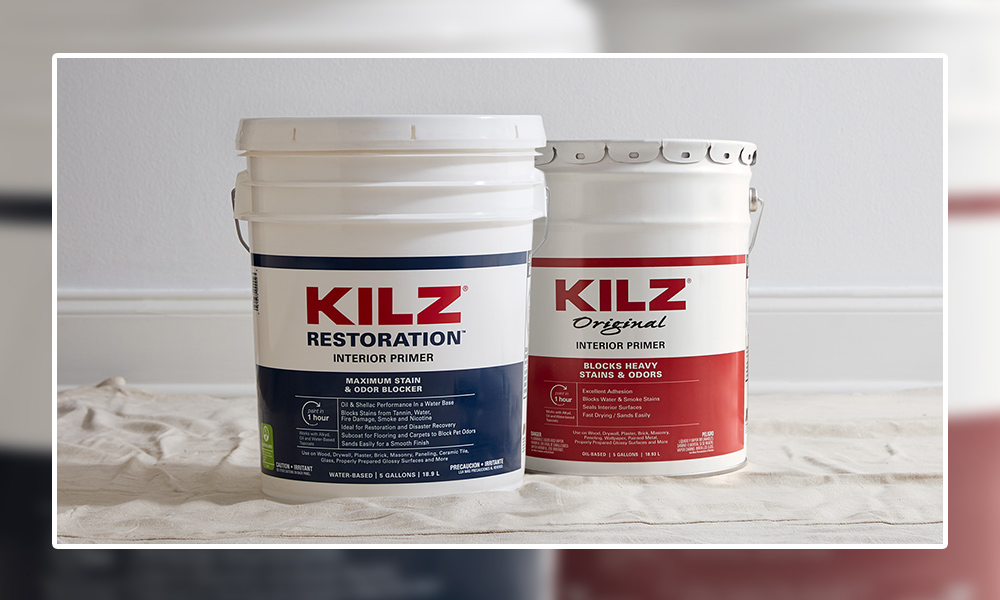
For this article, we talked to John Golamco, Project Manager and Primer Category lead with the KILZ® brand. His 25 years of experience gave him critical insight into this category. He explained the fundamental differences between the primers and compared them in more detail. According to John, KILZ® Original is an oil-based primer that works great for blocking severe stains and odors. It also has a more pungent solvent odor and requires mineral spirits or paint thinner to clean up. KILZ Restoration® on the other hand is a water-based primer that also blocks severe stains and odors but has lower VOCs and meets all national regulations. It’s a low-odor primer and can be cleaned up easily using soap and water. See the full article.
4. PRO SPOTLIGHT: Make A Front Door Pop with Jared Foster
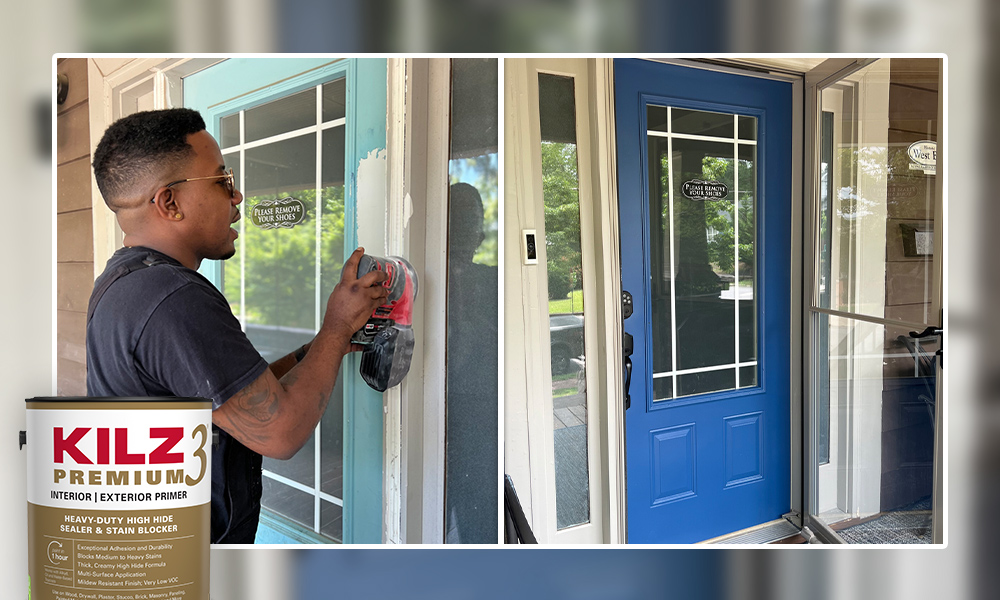
We know a thing or two about details, which is exactly what we wanted to highlight with this front door refresh. Carpenter, Jared Foster, sought to complement the already calm vibe of his front porch with an equally relaxed color scheme, and he walked us through his process in bringing it to life. “Once I laid on the primer and allowed it to dry, I was able to spray the door and trim using BEHR® paint, remove all the paper and tape and enjoy the new look. All and all, this project was completed in 48 hours. Having used KILZ 3® PREMIUM Interior and Exterior Primer,I knew this door color would pop,” said Jared. See the full project.
5. Creating a Family Room that Brings People Together
This chic, yet cozy family room makeover was all about encouraging togetherness. Using a modern farmhouse look as inspiration, we crafted a similar feel with soft white paint, dark accents, and intentional décor. Taking the room from light to dark meant priming the walls for the best possible paint application, so we used KILZ 2® All-Purpose Primer, which made the job a breeze thanks to its great adhesion and fast-drying formula. The finished room breathed new life into a familiar space and created a relaxed, yet sophisticated atmosphere, perfect for spending time with loved ones. See the full project.
This was a great year for DIY home makeovers, and even though the year is ending, we’re not slowing down. Whether you’re taking a little break or busy planning next year’s projects, we hope this inspirational list gives you the motivation you need to make your vision come to life. Thanks for spending the year with us. We can’t wait to see what new ideas you’ll bring to life in 2023.
Always remember to refer to our website kilz.com or product back labels for additional information on which primer is right for your project and detailed instructions on how to apply our products. Check out our Coverage Calculator to understand your estimated paint needs for your upcoming project.
RELATED ARTICLES
get inspired:
FOLLOw us:
@kilzbrand
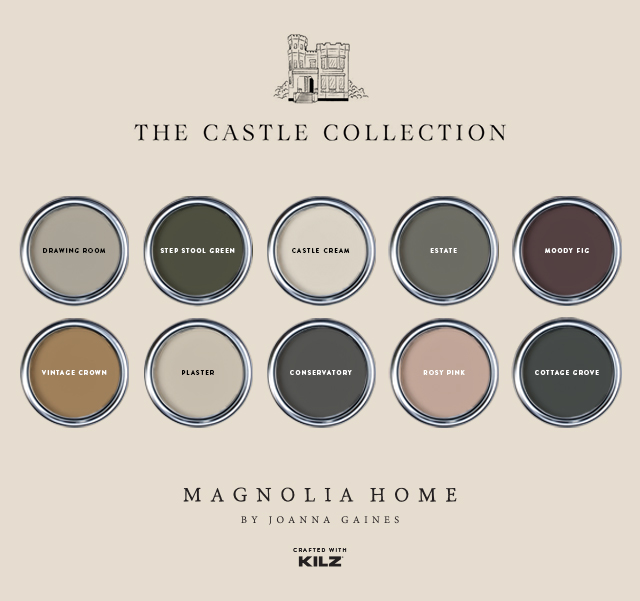
THE CASTLE COLLECTION: TEN NEW COLORS FROM MAGNOLIA HOME BY JOANNA GAINES®
October 14, 2022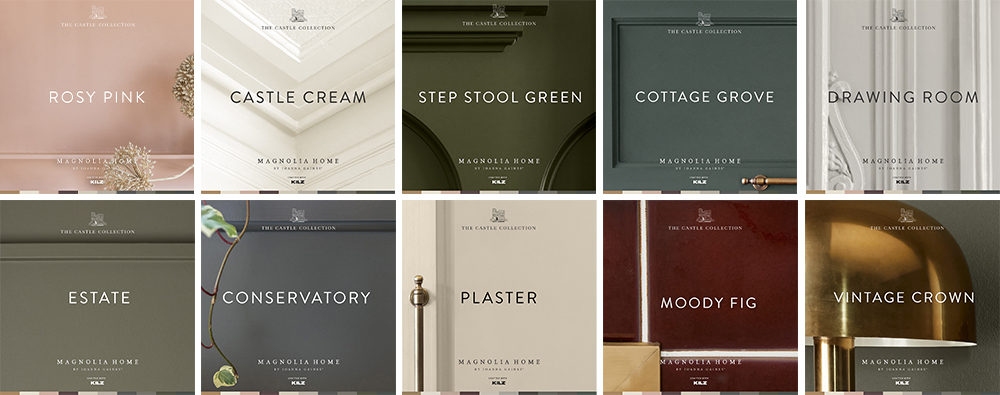
The Castle Collection has been released by Magnolia Home by Joanna Gaines®, a paint palette of ten brand new colors inspired by Magnolia’s Castle renovation, a historic landmark in Waco, Texas. The Castle Collection is comprised of ten rich and timeless paint colors that honor the Castle’s history, each specially designed and curated by Joanna Gaines.
“I wanted to honor the history of the castle with rich, unique colors that would complement its grand and traditional aesthetic, while still creating a timeless palette for any style of home.” – Joanna Gaines
 The Castle restoration is the centerpiece of the Gaines’s newest season of their hit TV show. A special edition of their series Fixer Upper: The Castle premiered on the Gaines’ Magnolia Network, Discovery+ and HBO Max on October 14th, 2022. The season follows Chip and Joanna through six episodes of the restoration journey, including the development of The Castle Collection color palette.
Different personal connections or Castle inspirations helped Joanna to name each of the ten unique colors from the Castle collection palette. They are used through the completed castle, and will be featured on Fixer Upper: The Castle.

Rosy Pink: A dusty subtle pink with a nostalgic tone

Castle Cream: A creamy, soft white with a timeless essence

Step Stool Green: A lively, deep olive

Cottage Grove: A moody navy infused with a deep green hue

Drawing Room: A soft French Gray

Estate: A deep sage, with a soft gray undertone

Conservatory: A rich and warm dark charcoal gray

Plaster: A light beige with a warm soothing tone

Moody Fig: A beautifully saturated burgundy

Vintage Crown: an elegant, muted gold
These paint colors are now available at Ace Hardware, Lowe’s and Magnolia.com/shop.
Visit Kilz.com/Magnolia for more information on the Castle Collection.
RELATED ARTICLES
get inspired:
FOLLOw us:
@kilzbrand

join the conversation:
SHARE this post: