Tag: Kitchen
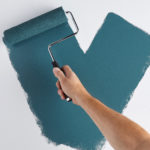
Project Spotlight: A Step-by-Step Guide to Painting Your Kitchen Cabinets
November 1, 2023Hi! My name is Abby from Making It With Abby. I am a self-taught DIYer who loves to learn new things and take on all sorts of different projects. I find so much joy in creating with my own two hands and teaching others how they can do it too! As a new homeowner, I started building furniture, but it wasn’t until 7 years later that I started taking on other types of home projects, which is when Making It With Abby was born!
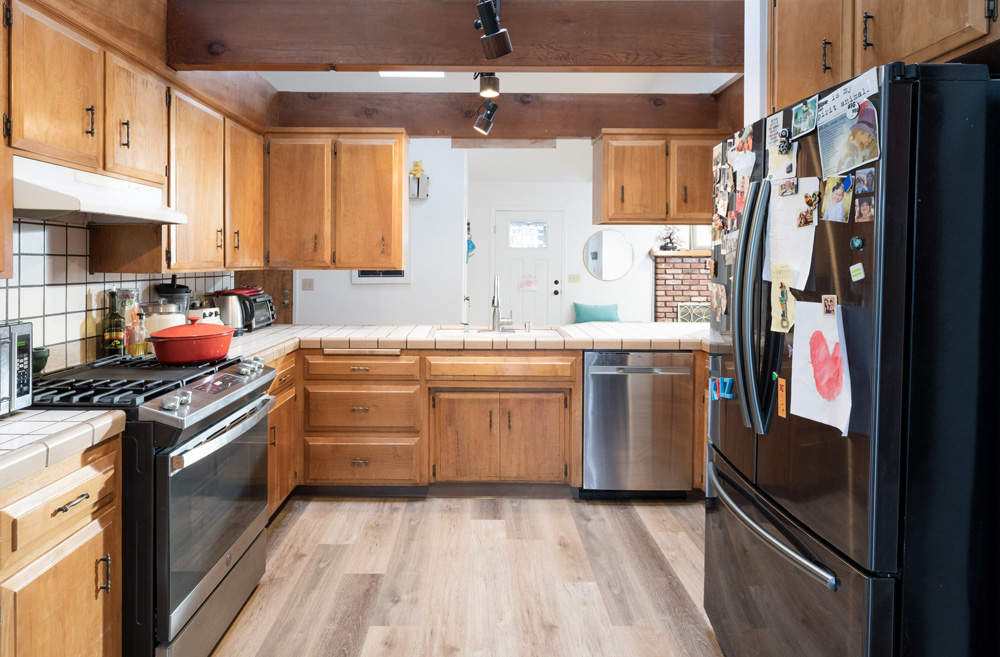
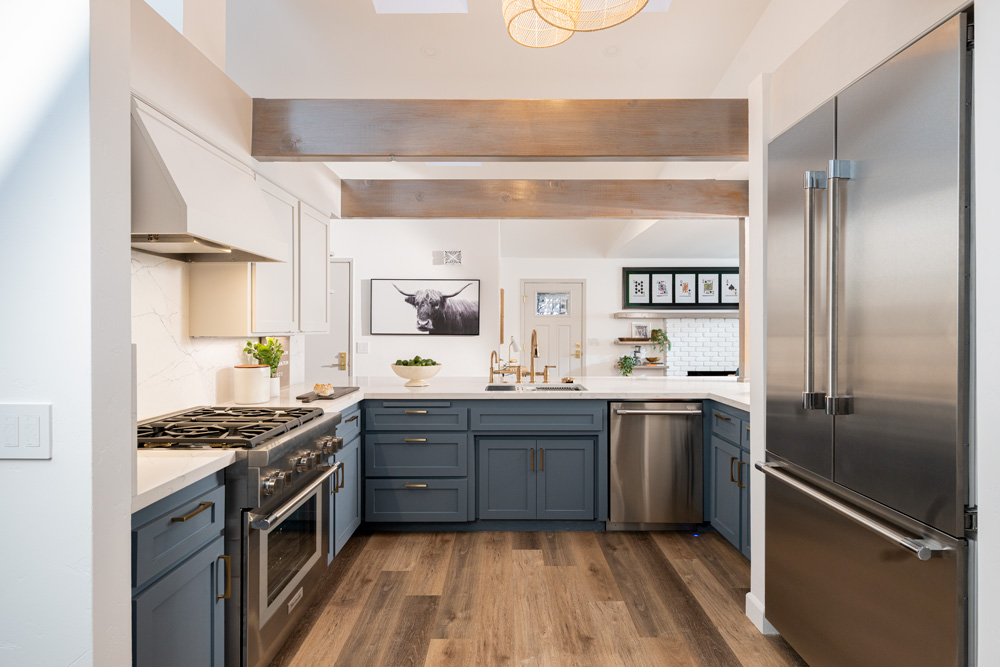
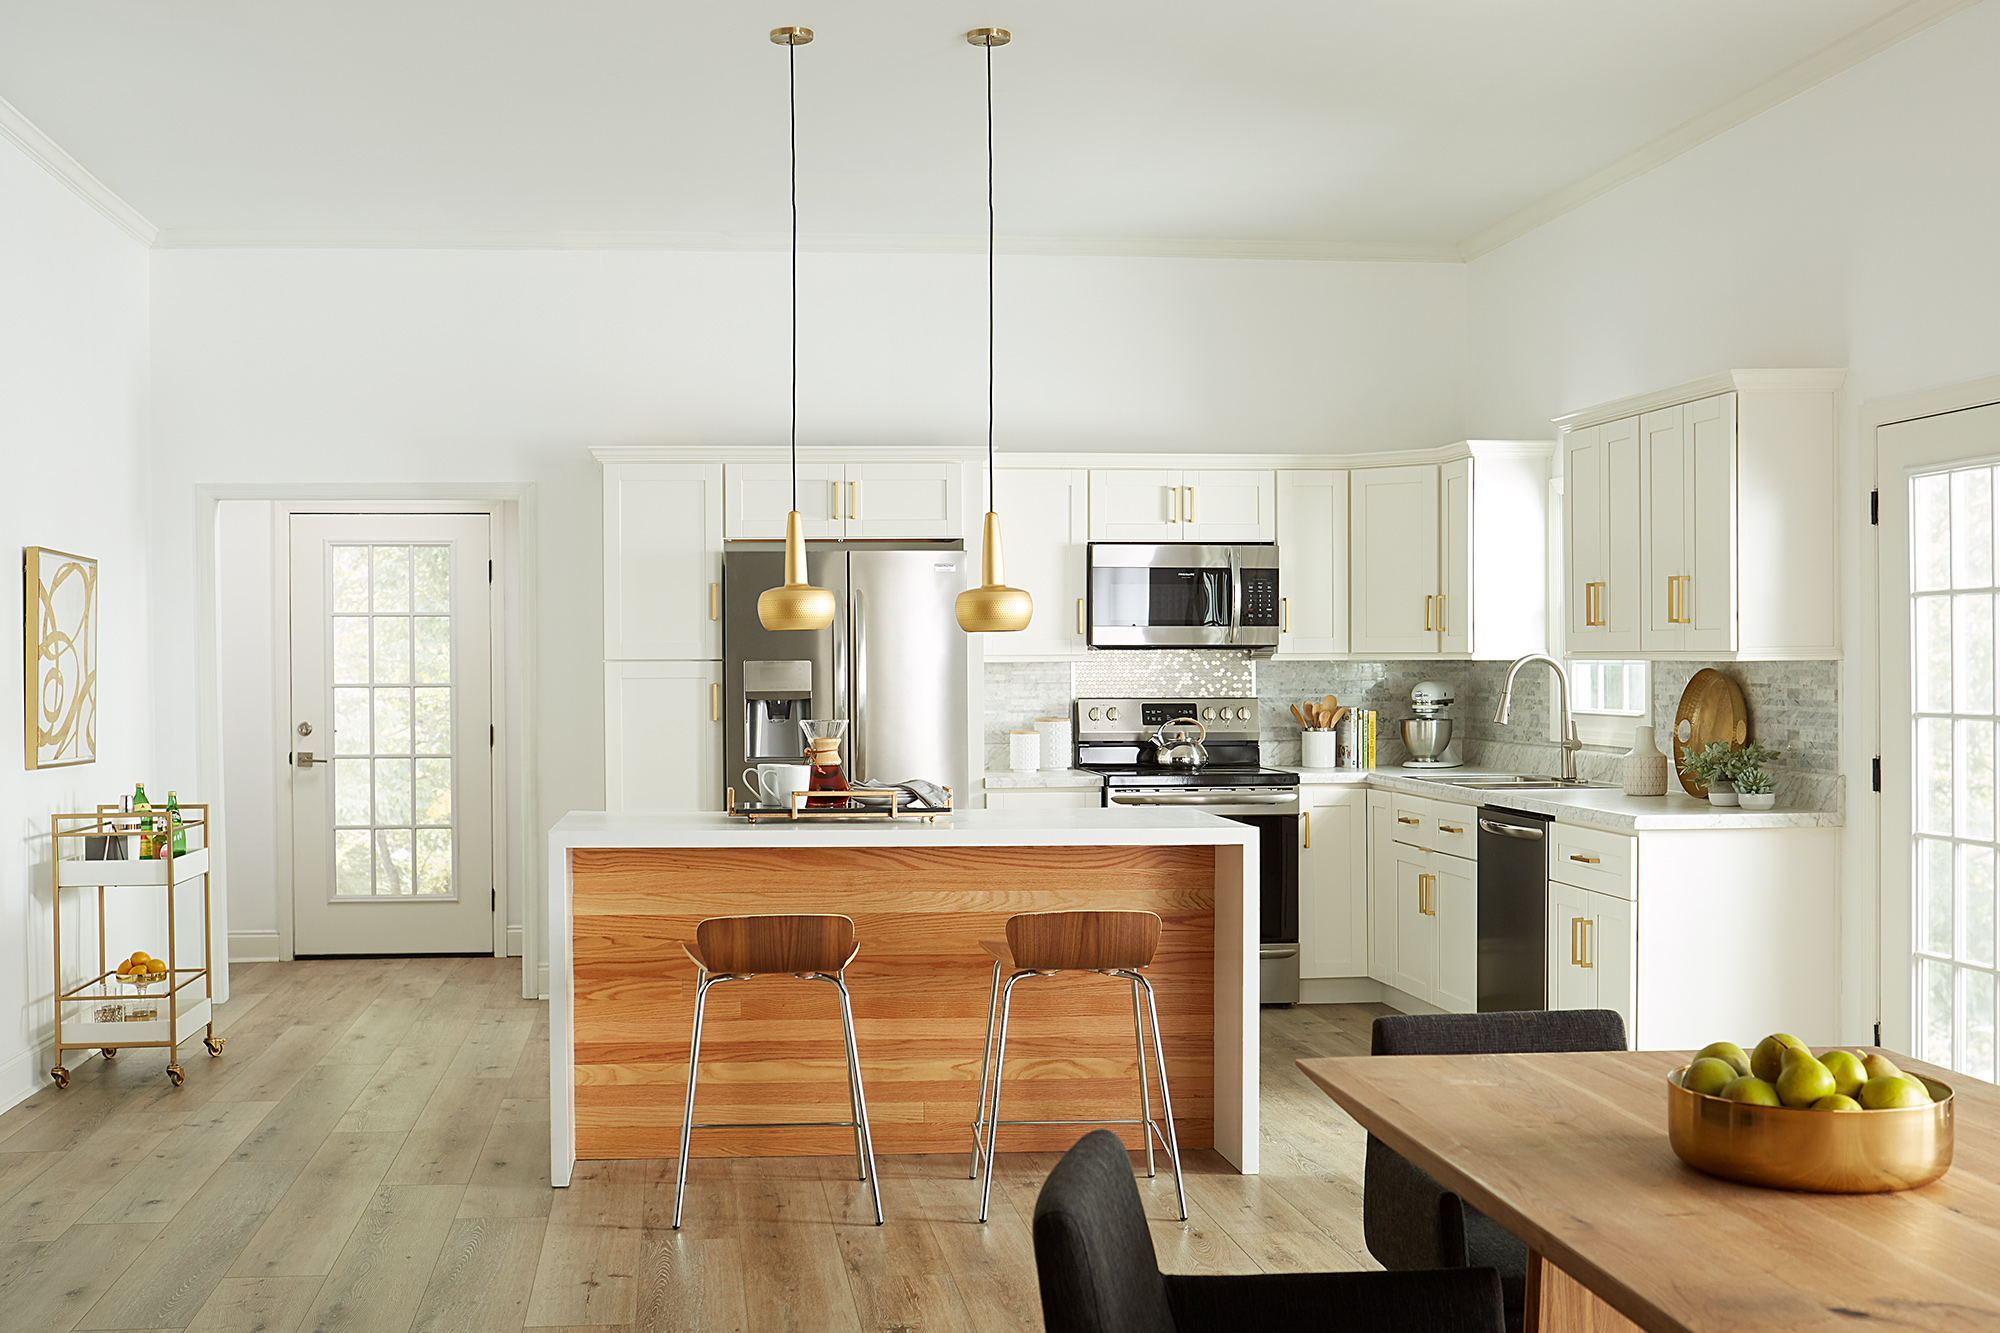
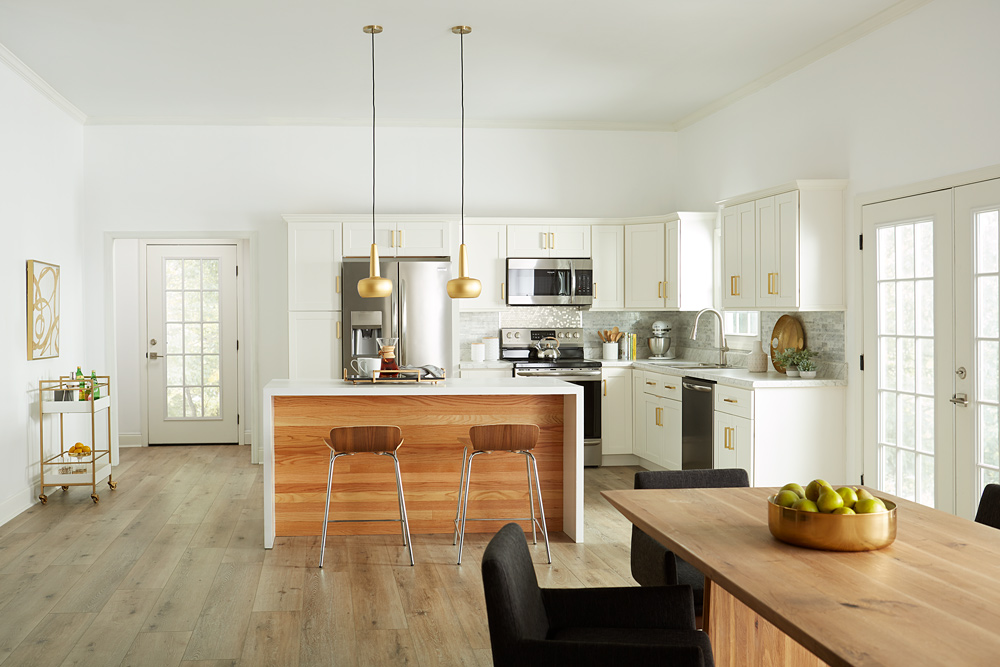
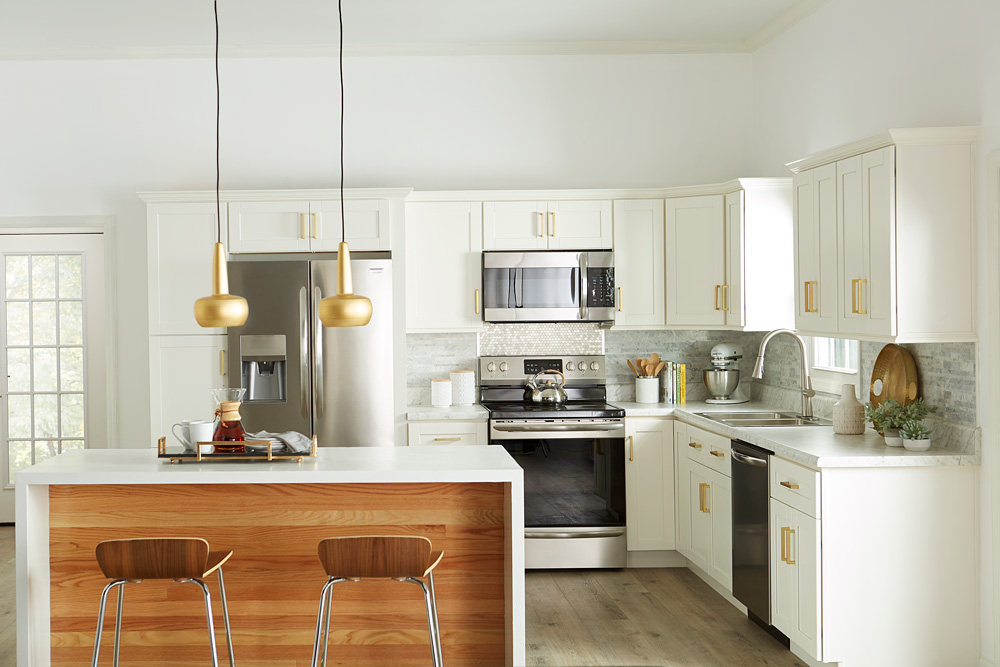
When we built our second home 7 years ago, I didn’t have a strong design sense or style, so when my builder suggested a dark gray/brown stain for our kitchen island, I agreed. I never really liked it and especially disliked how much dirt it showed. I recently renovated our dining area, and it left our island looking out of place. I started thinking about painting it to better fit the space and be a color I actually love.
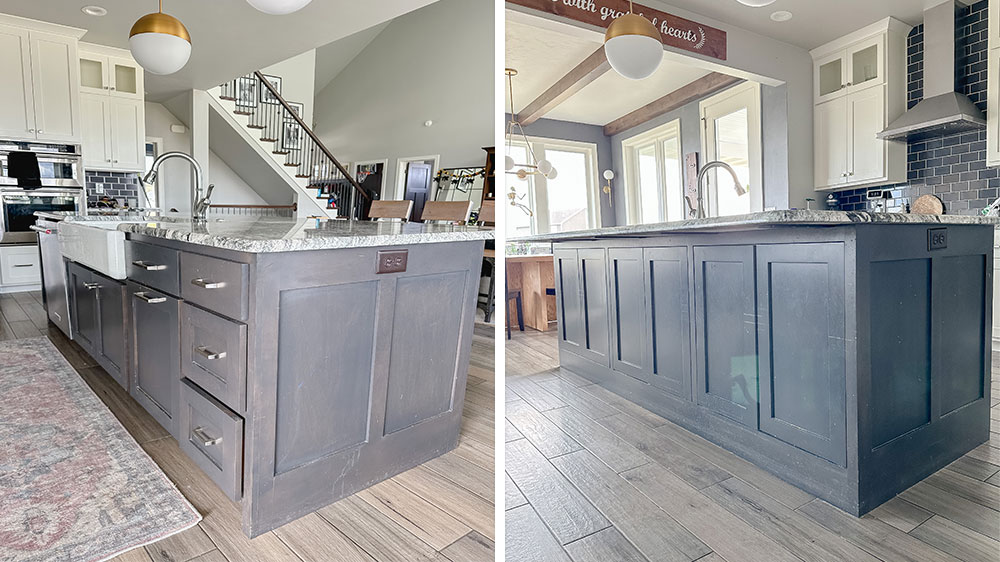
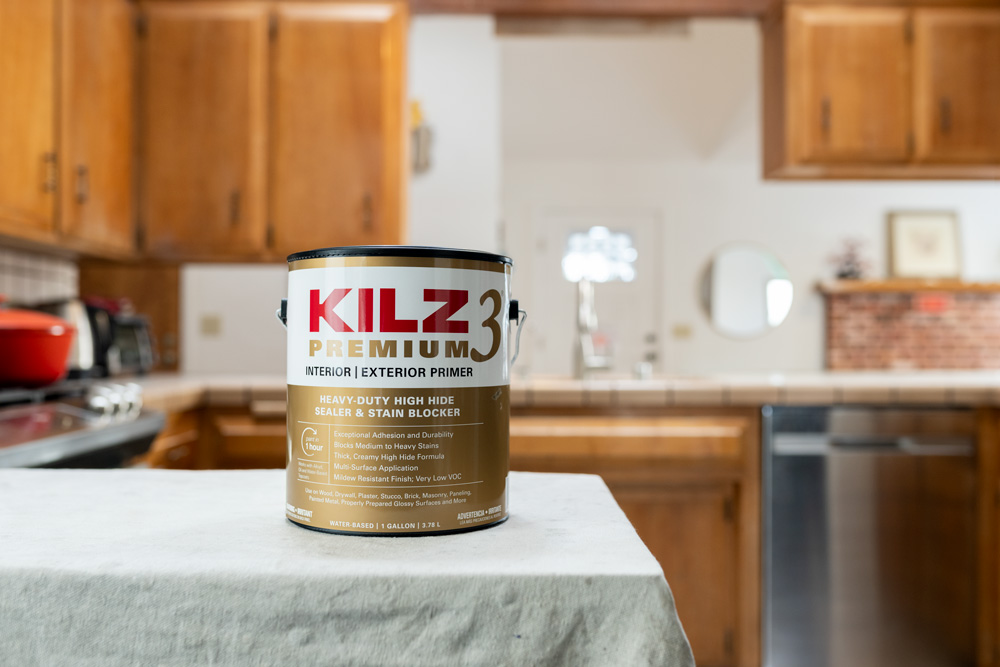
I think a lot of people are in the same boat and don’t like the color of their cabinets, or their cabinets just need a fresh coat of paint. It may seem daunting to think about painting your kitchen cabinets or an island, but it is actually very simple. Best of all, painting your cabinets can breathe new life into your kitchen, giving it a fresh and updated look. In this tutorial, I’ll take you through the entire process using KILZ 3® PREMIUM Primer, ensuring a durable and beautiful finish that will stand up to the demands of a high-traffic kitchen. Let’s get started!
Step 1: Prepare Your Cabinets
The first step in this cabinet transformation journey is preparation. To do this, you’ll need to:
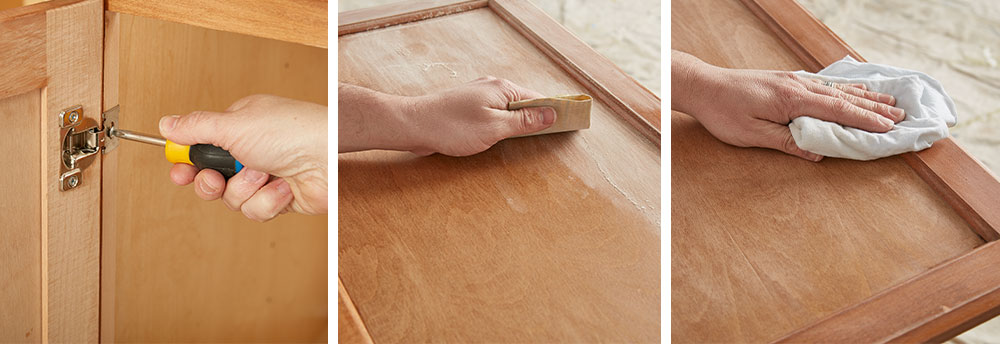
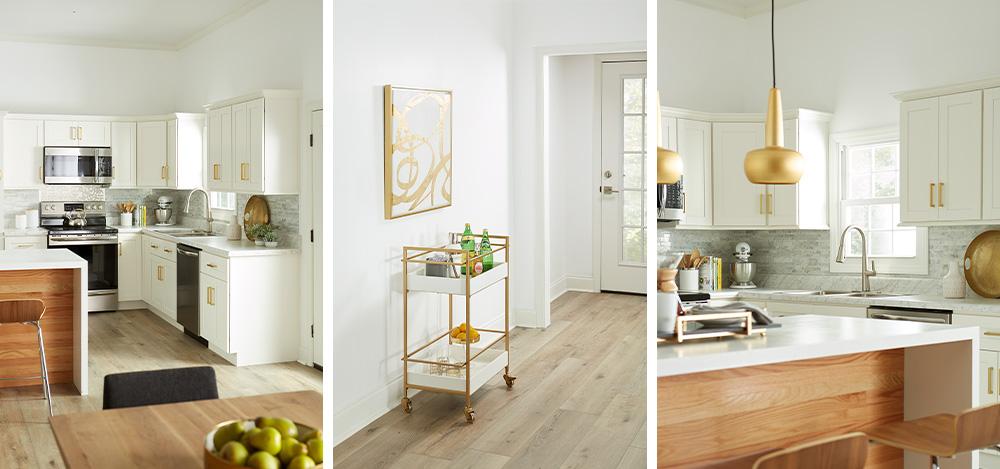
• Remove Decorative Hardware: Begin by taking off all the hardware from your cabinets. Place screws, hinges, and other small parts in a secure place to ensure you don’t lose any.
• Remove Cabinet Doors: Carefully remove the cabinet doors so you have easy access to the cabinet frames for painting. I also removed the hinges where it was blocking areas that needed to be painted, but the other hinges just needed to be covered with painter’s tape.
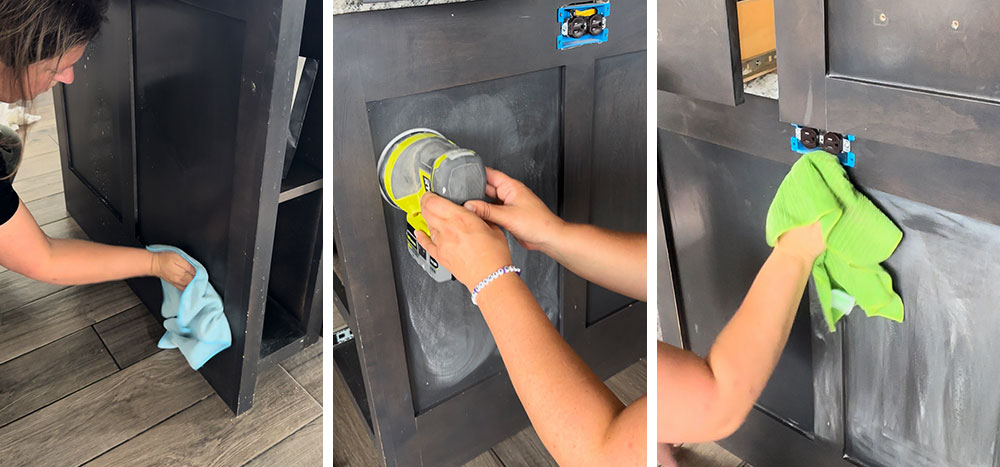
Step 2: Clean and Degrease
Before applying any primer or paint, it’s important to clean your cabinets thoroughly to remove dirt and grease buildup. Use a degreaser to cut through kitchen grime, ensuring a clean surface for the products.
Step 3: Scuff Sand the Cabinets
To improve paint adhesion, lightly scuff sand the cabinet surfaces. This step removes any sheen and provides a better grip for the primer. I recommend using 150 or 180 grit sandpaper.
Step 4: Wipe Down the Cabinets
After sanding, wipe down the cabinets with a damp cloth to remove any dust and residue from sanding. A clean surface is essential for a smooth finish.
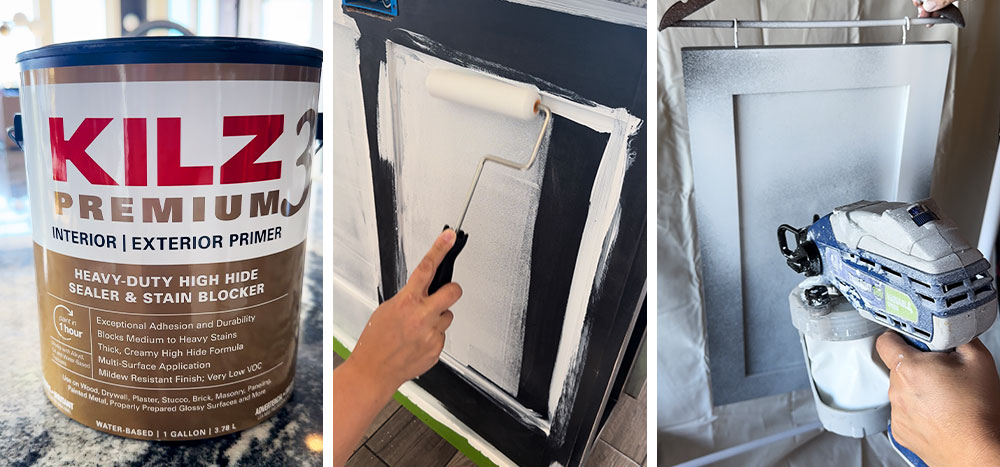
Step 5: Primer Application
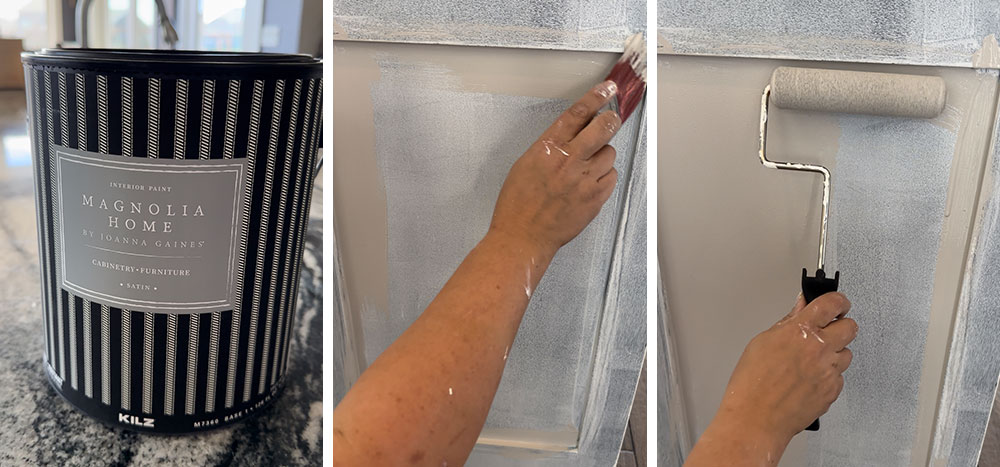
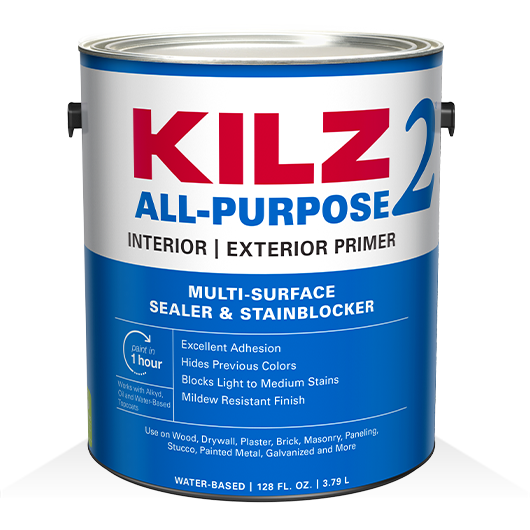
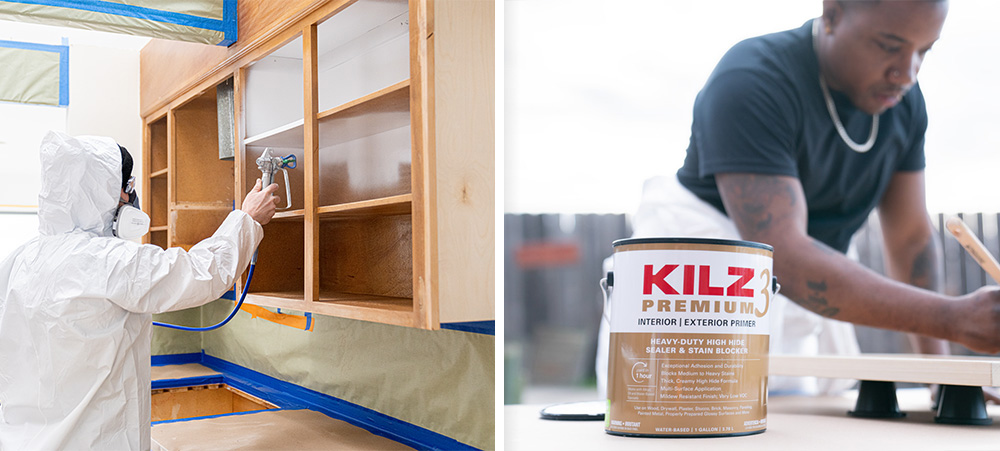
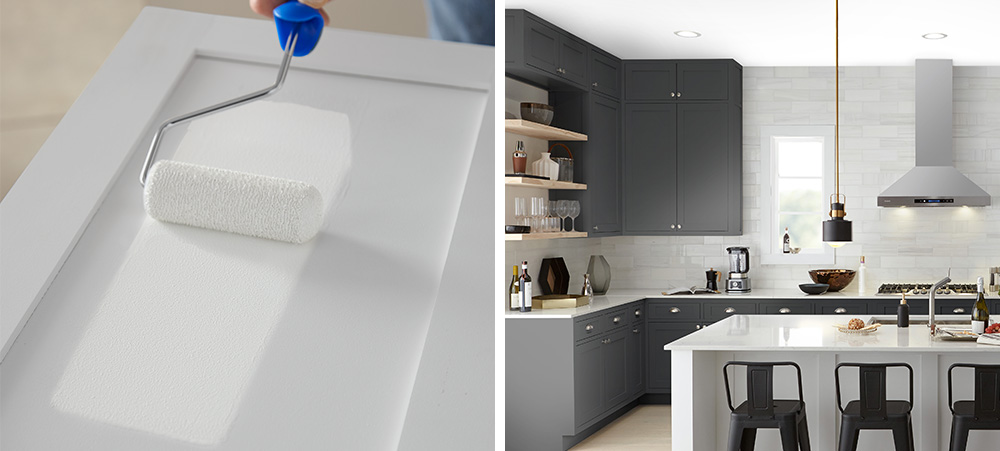
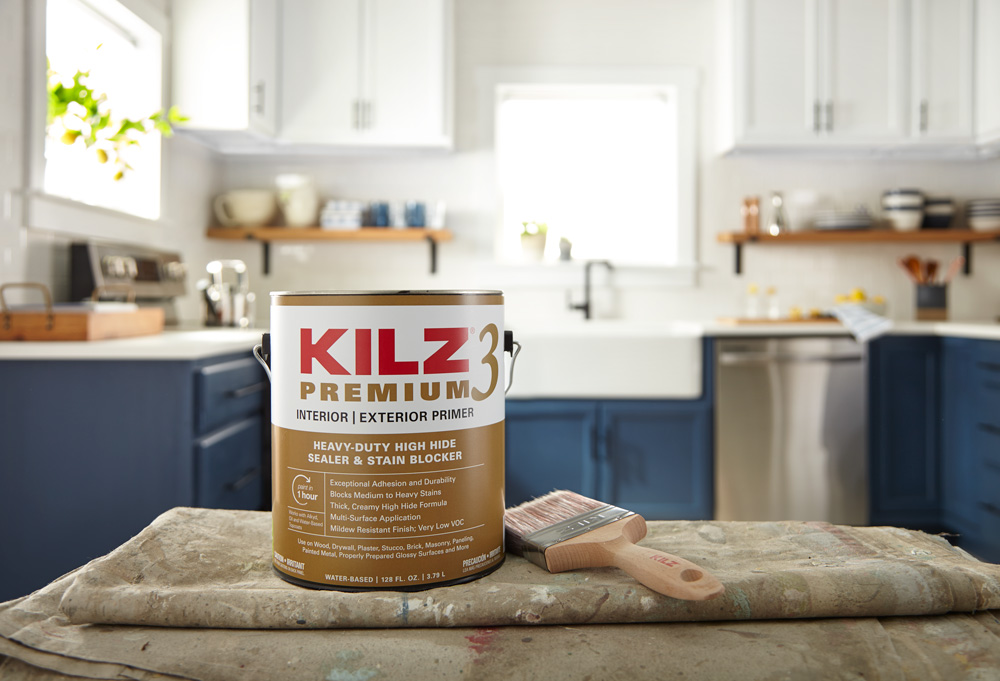
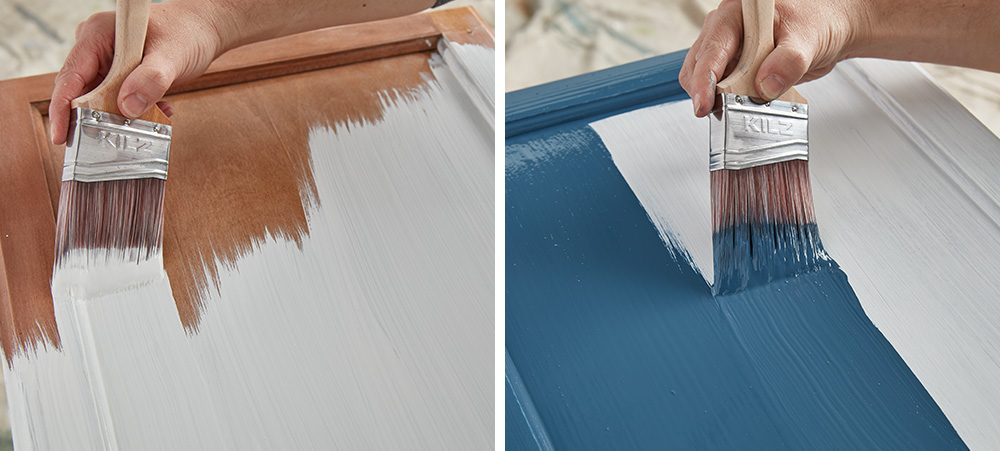
Priming is a crucial step in cabinet painting, especially in a high-traffic area like a kitchen. It makes all the difference between a job done and a job done correctly. I selected KILZ 3® PREMIUM Primer because it provides excellent adhesion to prevent any paint chipping or peeling in the future, and the mildew-resistant coating prevents any mildew growth in moisture-prone areas like a kitchen. There is nothing worse than fixing your old mistake; using a primer helps ensure that this job is done right the first time. KILZ 3® PREMIUM Primer was also the best choice for my project because it provides coverage for medium-to-heavy stains, which will ensure that the current dark color of my island doesn’t bleed through the paint.
Apply a uniform coat of KILZ 3® PREMIUM Primer to your cabinet frames and doors. The thicker formula fills in imperfections in the wood grain of your cabinets, creating a smooth surface for paint application.
I used a brush to get into corners and crevices and a mini foam roller on the rest of the surface and to cover any visible brush strokes. I find a mini foam roller gives the best and smoothest finish when painting cabinets or furniture without the use of a paint sprayer. I decided to use my paint sprayer on the cabinet doors, but you can definitely use a brush and roller for the doors as well.
Using a paint sprayer may seem intimidating, but it’s really quite easy to use. I like to use an airless sprayer, and it really is as simple as pulling the trigger and moving in a slow, even motion. I have used a few different kinds of sprayers at all different price points, and all have been easy to use and have given an impeccable finish.
Step 6: Sand and Wipe Down Again
KILZ 3® PREMIUM Primer is ready for paint in just one hour. After the primer has dried, lightly sand the surfaces once more to ensure a smooth finish. Be sure to remove any dust with a tack cloth or damp cloth.
Step 7: Paint Your Cabinets
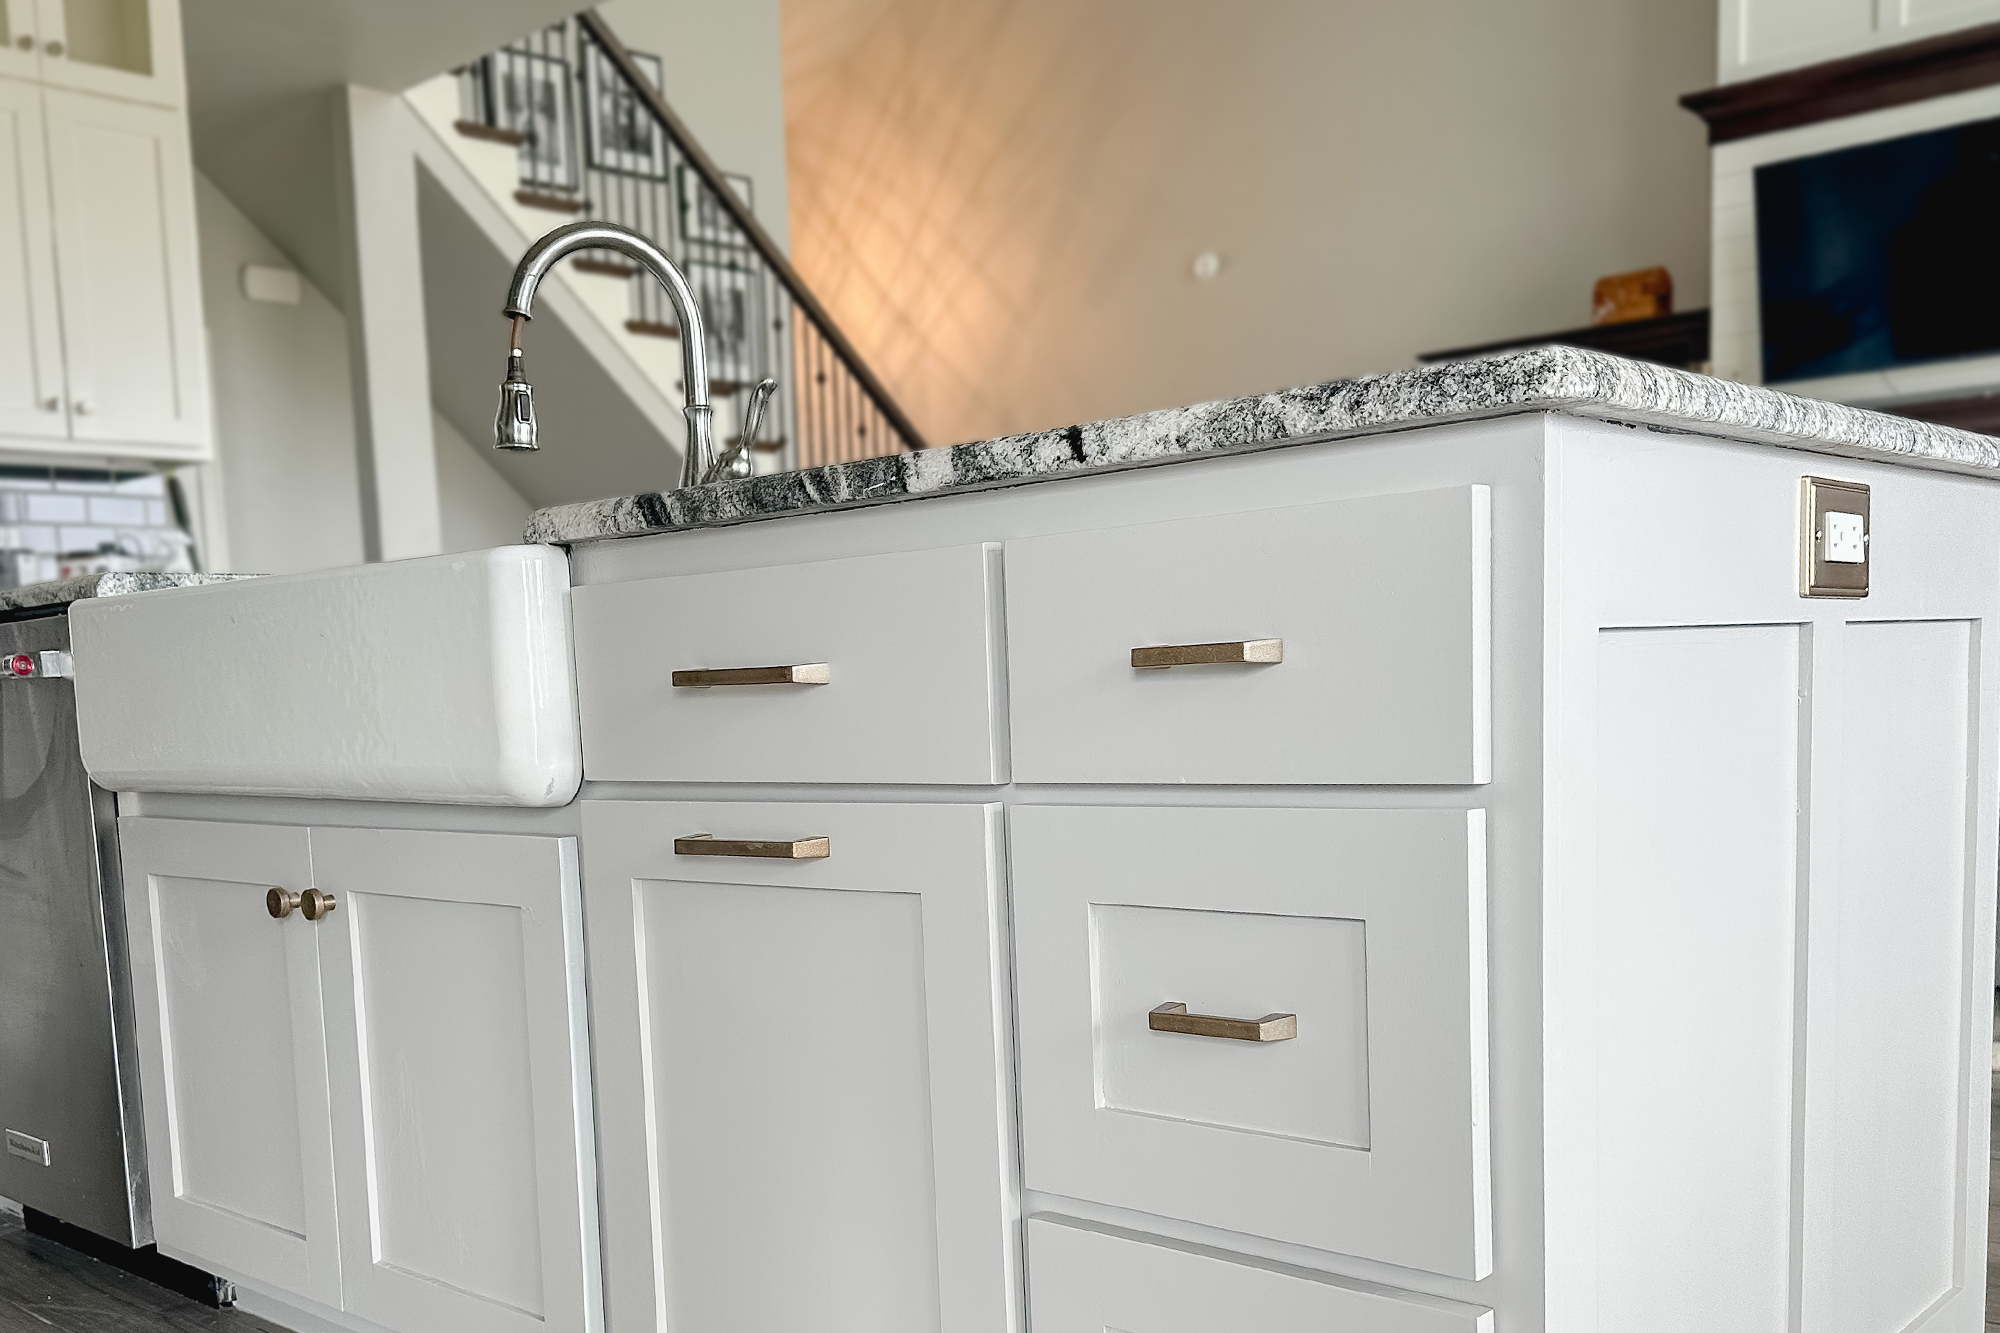
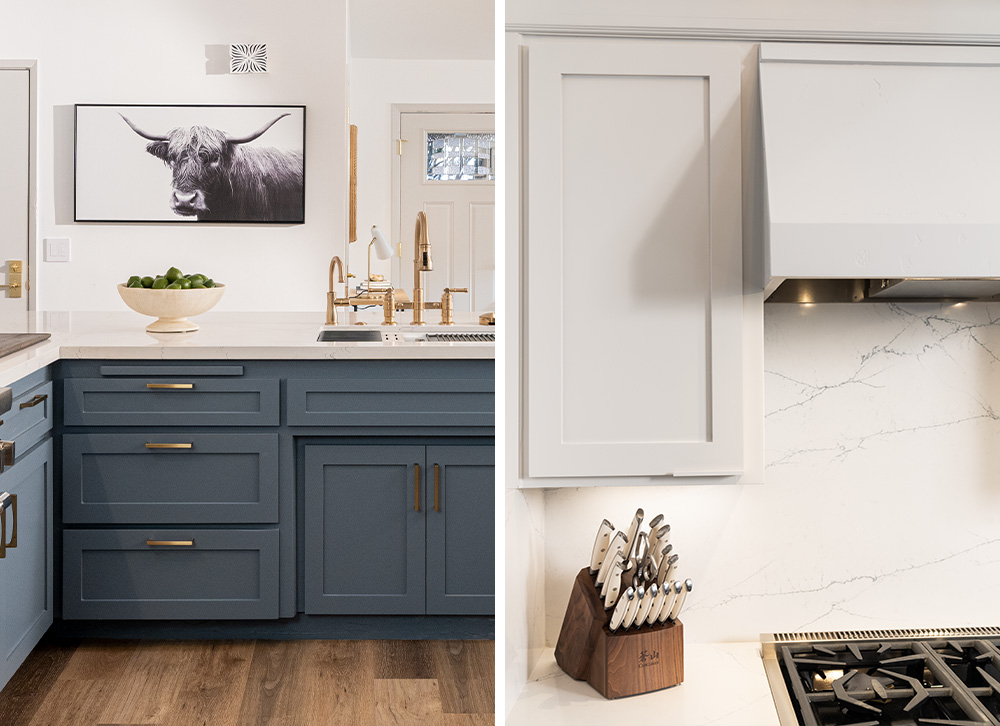
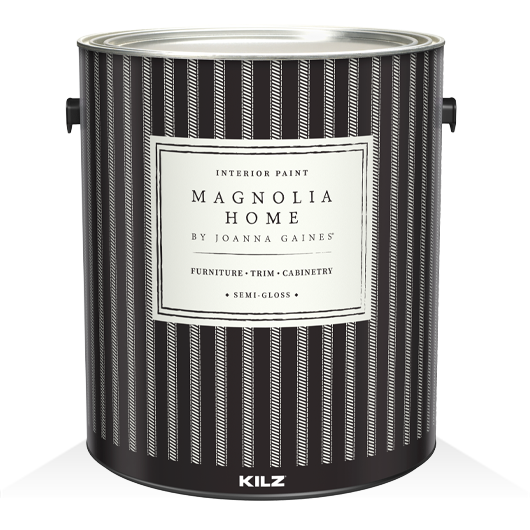
For the paint, I used Magnolia Home by Joanna Gaines® Cabinetry and Furniture Paint. Choose a color that suits your kitchen’s style. There are so many gorgeous colors to choose from in the Magnolia Home by Joanna Gaines® Paint line, but I decided on the color Anatolian, a perfect warm tan with gray undertones. I love this line of paint because of the perfectly curated color options and the superior durability and stain resistance. Their cabinetry and furniture paint offers superior flow and self-leveling which is crucial when painting cabinets to get a smooth and sleek finish.
Apply the paint in even, thin coats to achieve a sleek and professional finish. Be sure to allow each coat to dry thoroughly before applying the next. Once again, I used a brush for corners and crevices and then went over the surfaces with a mini foam roller.
Step 8: Sand and Wipe Down Between Coats
Between coats of paint, lightly sand the surfaces again and remove any dust with a tack cloth or damp rag. This step ensures a flawless finish.
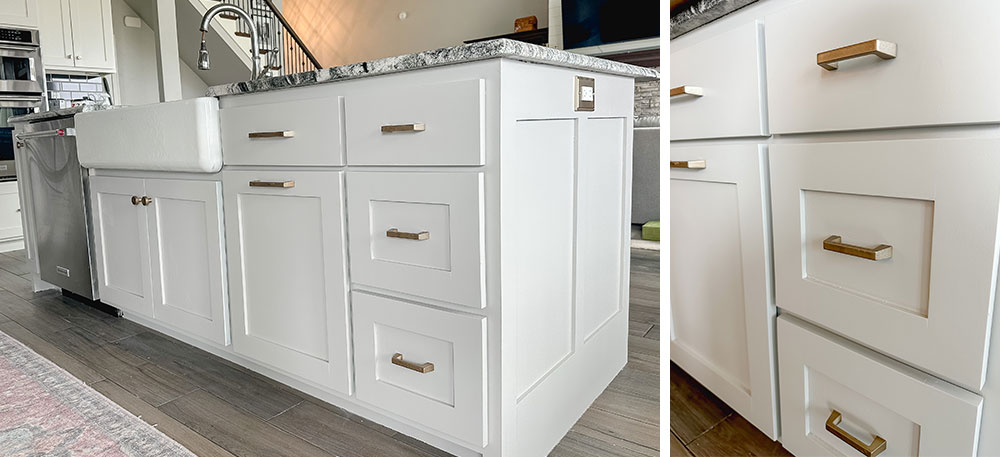
Step 9: Hardware Upgrade
After painting the cabinets, you might want to also update the hardware for a complete transformation. I used KILZ® ORIGINAL Aerosol to prime the metal hardware and then BEHR PREMIUM™ Metallic Spray Paint to give it a fresh, new look. This small change can make a significant impact on the overall look of your kitchen.

Step 10: Reinstall Hardware and Cabinet Doors
Once everything is dry, reinstall the hardware onto your newly painted cabinet doors, and then reinstall the doors to the cabinet frames. Painting your kitchen cabinets can be a rewarding DIY project that transforms your kitchen’s appearance. By following these steps and using KILZ 3® PREMIUM Primer and Magnolia Home by Joanna Gaines® Cabinetry and Furniture Paint, you’ll achieve a beautiful, durable finish that will make your kitchen feel like new. Enjoy your freshly updated space!
*This post is a paid partnership with Making It With Abby.
Always remember to refer to our website kilz.com or product back labels for additional information on which primer is right for your project and detailed instructions on how to apply our products. Check out our Coverage Calculator to understand your estimated paint needs for your upcoming project.
RELATED ARTICLES

get inspired:
FOLLOw us:
@kilzbrand
SHOP
PRODUCTS
What Are Paint Sheens and What’s the Difference?
June 29, 2023If you’re unfamiliar with the nuances of paint sheen, you’ve come to the right place. In the broadest terms, the higher the sheen a paint has, the higher the shine and the more durable it will be. Flat paint has no shine, while high-gloss paint is all shine, and the rest of the spectrum includes matte, eggshell, satin, and semi-gloss, which can be used for practical and decorative purposes alike.
What’s a Paint Sheen?
 The paint sheen tells you how much light the paint reflects. Paints with higher sheens are shinier, and paints with lower sheens reflect less light. Higher-sheen paints have more enamel in them, which makes them shinier, more durable, and easier to clean. Lower-sheen paints are easier to look at because they have little to no glare.
Why does it matter?
 If chosen incorrectly, sheen can amplify surface imperfections, make a surface shinier (or flatter) than intended, or not provide enough durability for the space. Some sheens are easier to clean than others and can provide a barrier against moisture, mildew, and other grime.
The darker and richer a paint color is, the more colorant it contains, which boosts sheen. If you’ve chosen a rich or dark paint, and you don’t want it to turn out super shiny, choose one with a lower sheen. In the same vein, if painting a large, sun-washed, or flawed surface, a lower sheen paint is best for hiding imperfections.
What Are the Different Paint Sheen Types?
• High Gloss: A highly reflective, glass-like finish that’s most durable and easiest to clean.
• Semi-Gloss: A sleek and luminous finish that is mildew, moisture, and wear resistant.
• Satin: A pearl-like finish that’s easy to clean and has moderate durability.
• Eggshell: A soft, velvety finish that covers imperfections while offering some durability.
• Matte: A low-luster finish that’s less durable, but easy to clean, touches up well, and hides minor surface imperfections.
• Flat: A non-reflective finish that touches up well and can hide minor surface imperfections.
Where to Use Common Types of Sheen
The type of sheen you choose for a particular room or surface is up to you, and many types can work well for the same area, but you may choose one over another depending on how much traffic the room sees (durability), how prone to dirt or moisture it is, or simply the decorative look you’re going for. Here are some recommendations to help get you started.
• Kitchens: A high or semi-gloss finish in the kitchen ensures your surfaces are more durable and easier to clean.
• Dining Rooms: For moderate-traffic areas like dining rooms, an eggshell finish will provide smooth, clean-looking walls.
• Bedrooms: A flat or matte finish is recommended as these absorb light, which can make those bright mornings more bearable.
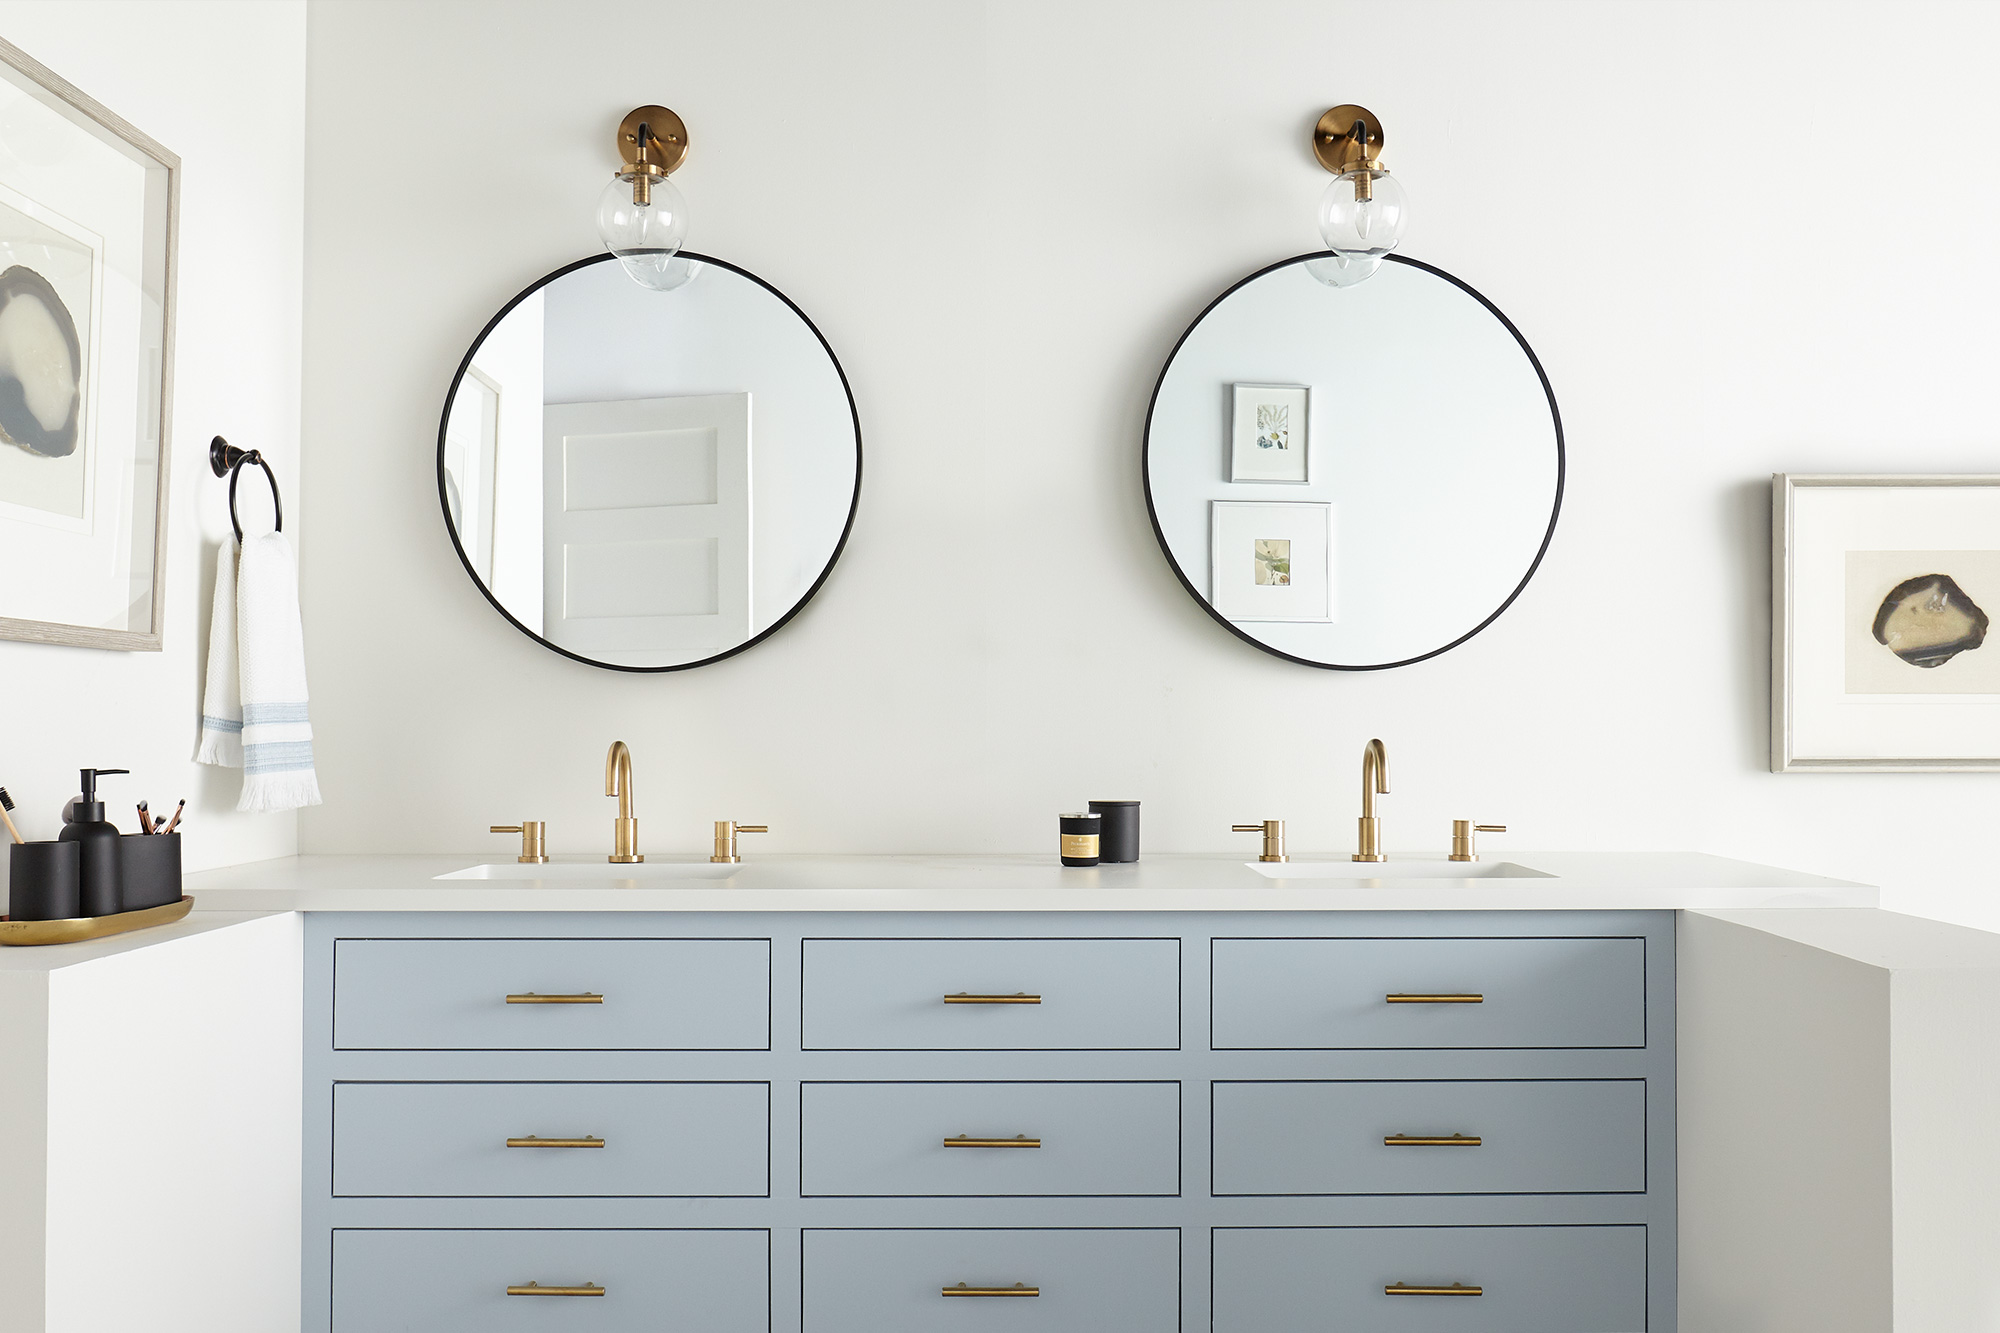
• Bathrooms: Semi-gloss is great at protecting surfaces without being too reflective.
• Living Rooms: A satin finish is your best bet. It’s easy to clean and can stand up to high traffic.
• Hallways: An eggshell finish that’s easy to clean and resists dirt and grime is perfect for these moderate-traffic areas.
• Ceilings: Ceiling flat sheens are designed for ceilings and are extra splatter resistant.
• Brick/Masonry: Satin or eggshell is perfect for highly textured surfaces like brick; a moderate shine can help to conceal imperfections while giving off a pleasing glow.
• Cabinets: The higher the gloss, the easier it will be to clean and care for your cabinets.

Always Prime Before You Paint
We always recommend using one of our professionally trusted primers to ensure your hard work turns out as beautifully as you intended. Primer provides adhesion for any paint you choose, covers stains, prevents chips, and blocks odors, and helps your topcoat perform its best while achieving the truest possible color. Our primers are made for every project, so choosing the best one for the job is easy.
Always remember to refer to our website kilz.com or product back labels for additional information on which primer is right for your project and detailed instructions on how to apply our products. Check out our Coverage Calculator to understand your estimated paint needs for your upcoming project.
RELATED ARTICLES
get inspired:
FOLLOw us:
@kilzbrand
SHOP
PRODUCTS

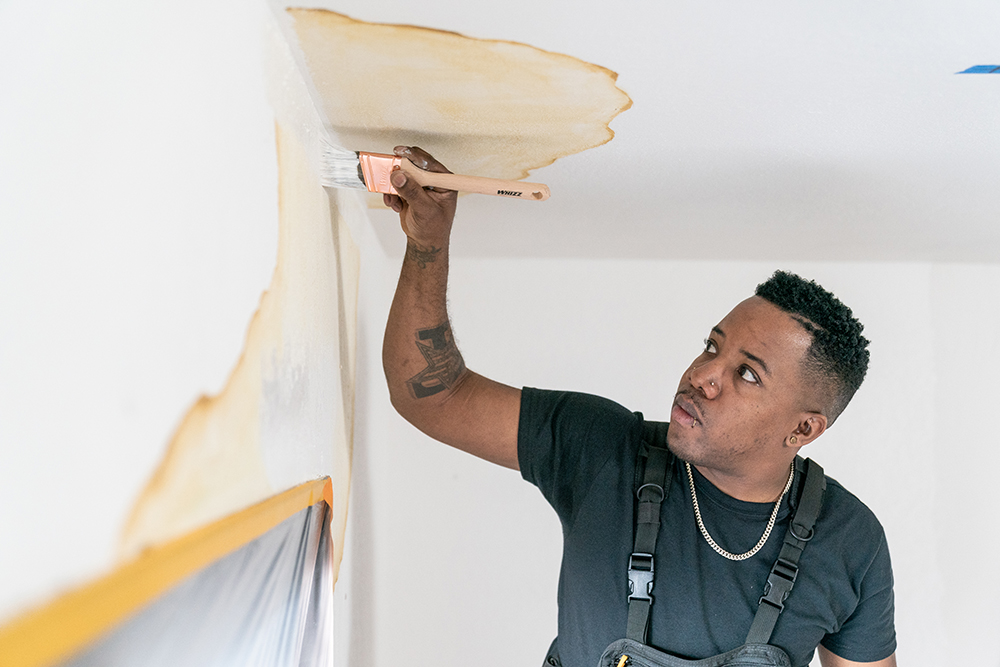
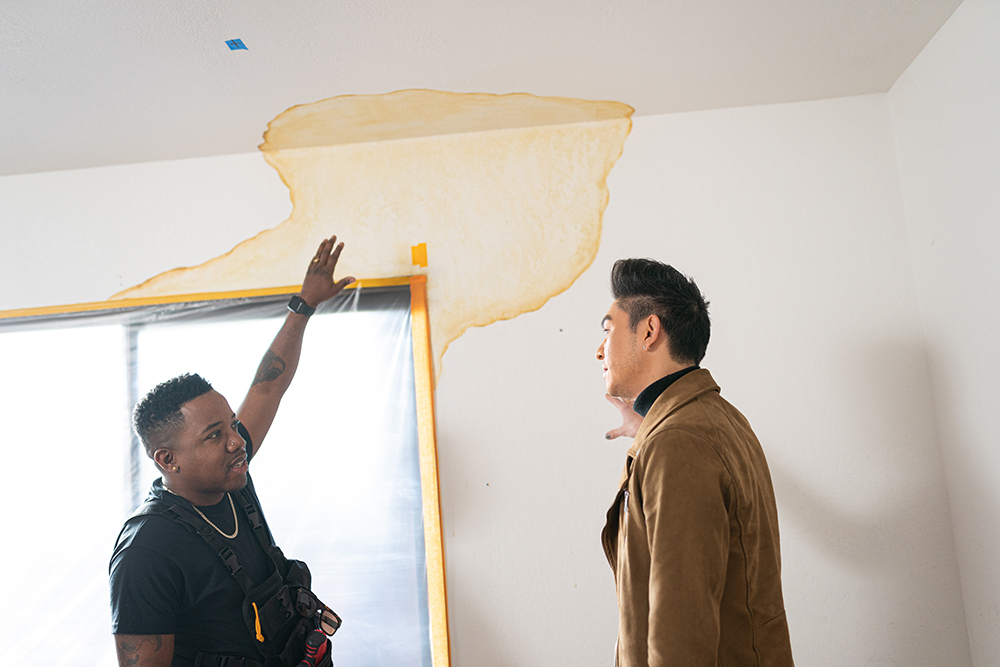
Meet Jared and Jason: The Pros of Destination Restoration
April 18, 2023Are you looking for inspiration for your next home renovation project? Look no further than Destination Restoration, a new mini-series from KILZ that celebrates the power of restoration. Meet the talented Pros, Jared Foster and Jason Lai, who bring their expertise in design and painting to restore a fourth-generation family home. With their unique blend of skills and passion for craftsmanship, they transform old and outdated spaces into something new and beautiful using primer and paint.
 Jared Foster is a master painter, builder, and business owner with over a decade of experience in the industry. He’s known for his attention to detail, his skilled craftsmanship, and his ability to turn even the most challenging of spaces into beautiful homes. Before finding his passion for home improvement, Jared was a Grammy-nominated singer-songwriter, traveling the country and touring with some of the biggest names in the music industry. Now, he channels his creativity into building projects that are both functional and beautiful.

Jason Lai has over 15 years of experience in the design industry and owns his own design firm. He’s worked on a wide range of projects, from contemporary homes to traditional spaces, and everything in between. Jason’s clients appreciate his adaptability, relatability, and humility while also acknowledging his confidence in standing by his recommendations. Having worked with such a variety of clients and spaces, Jason brings a unique perspective to each restoration project he’s a part of.
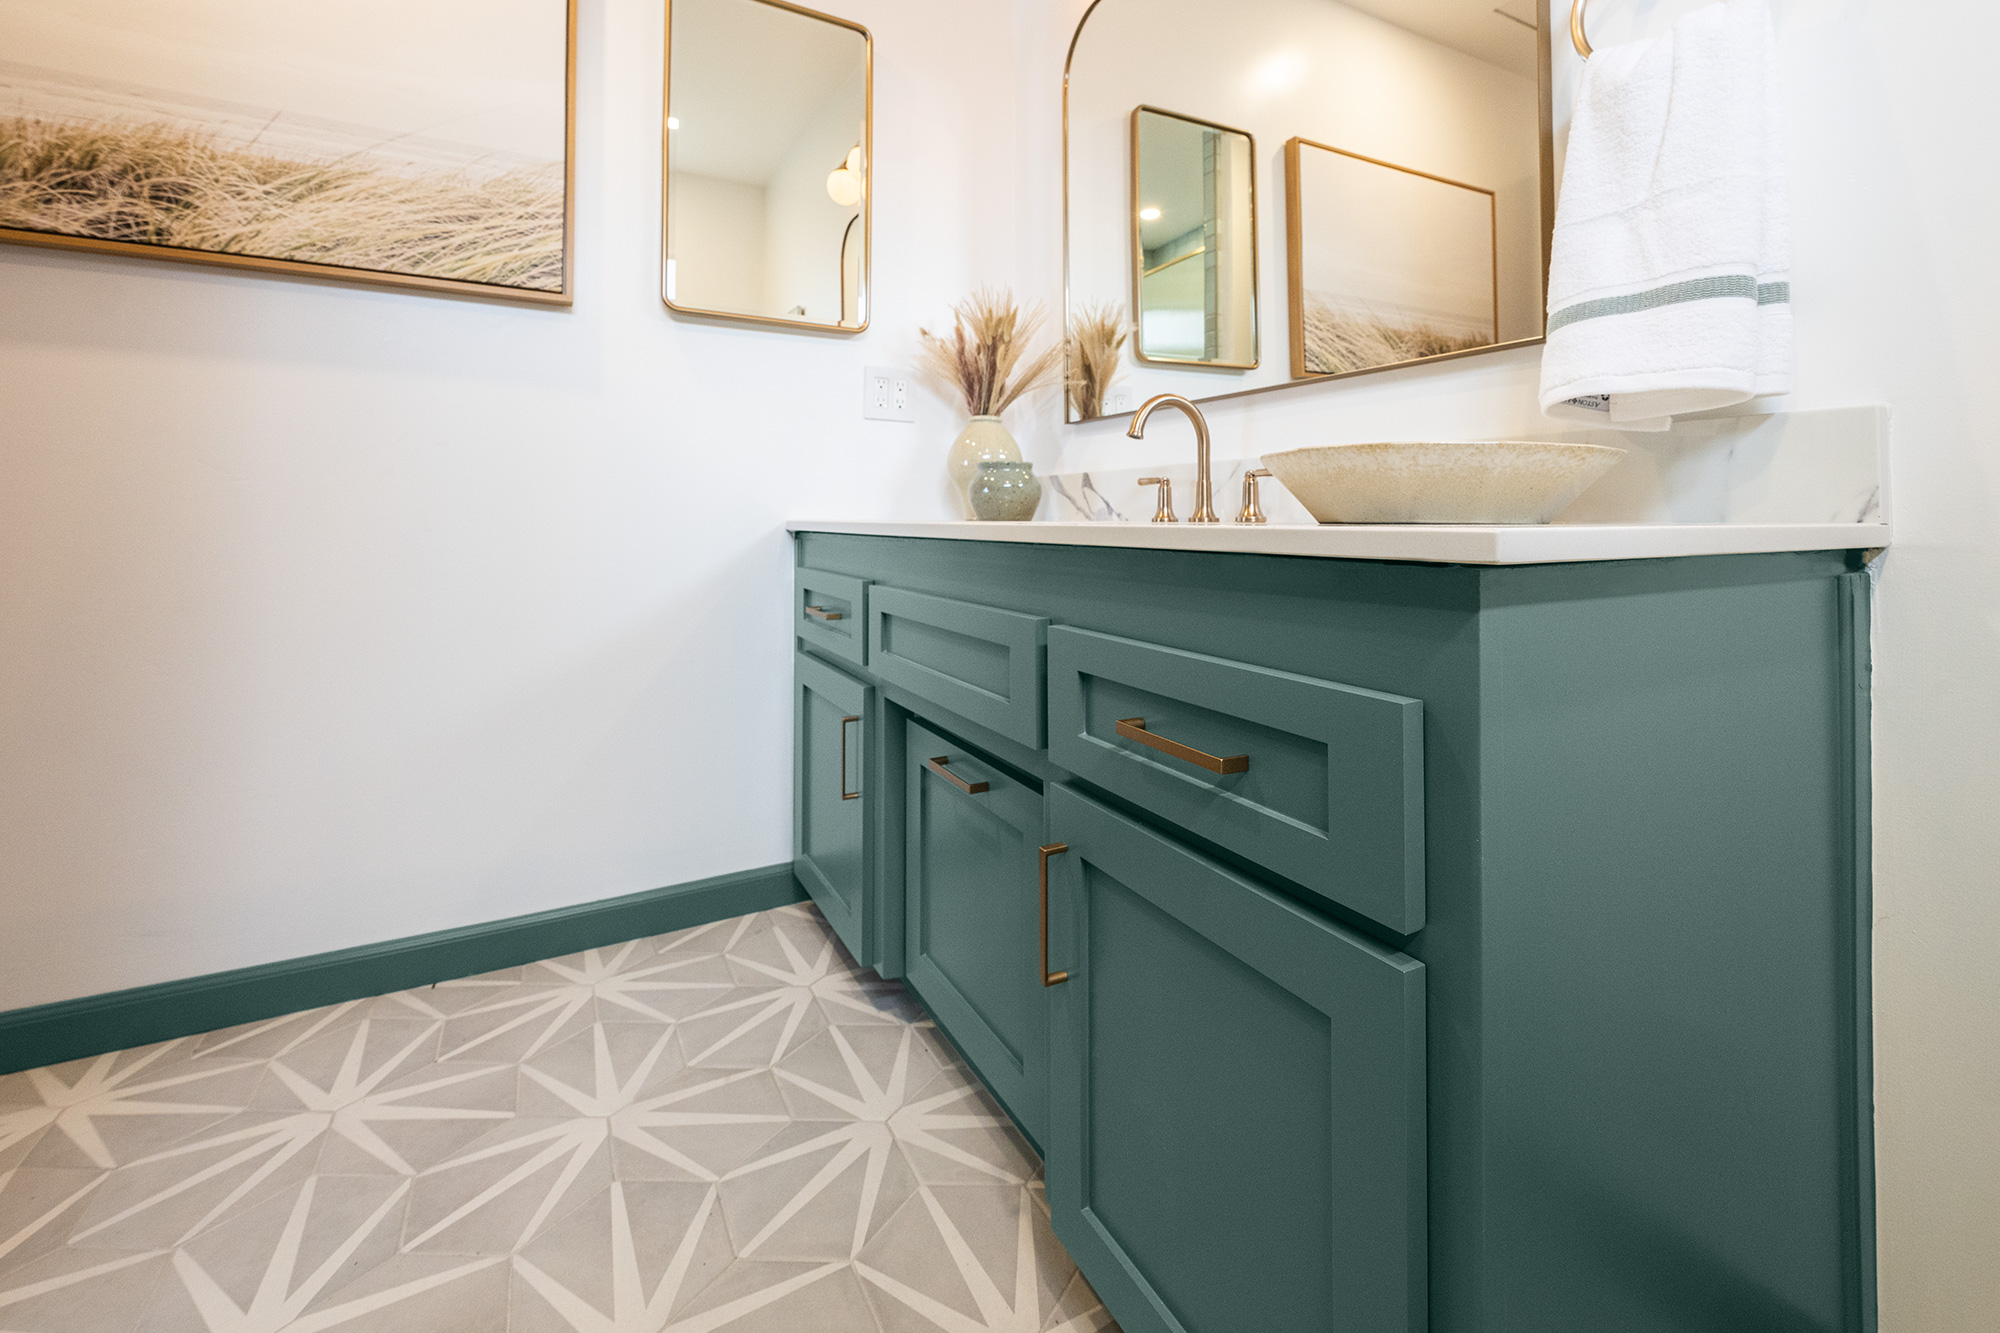
Together, Jared and Jason make an unstoppable duo, with skills that complement each other perfectly. Throughout the series, viewers get an immersive behind-the-scenes look at each restoration project, from painting over water stains to painting bathroom cabinets using KILZ primers.

Whether you’re a DIY enthusiast or simply looking for home inspiration, Destination Restoration is a must-watch series that showcases the beauty of home restoration. Jared and Jason bring their passion, expertise, and eye for design to each project, and show viewers how to transform old and outdated spaces into something incredible. Tune in to Destination Restoration and start your journey to creating your dream home today.
RELATED ARTICLES
get inspired:
FOLLOw us:
@kilzbrand
SHOP
PRODUCTS
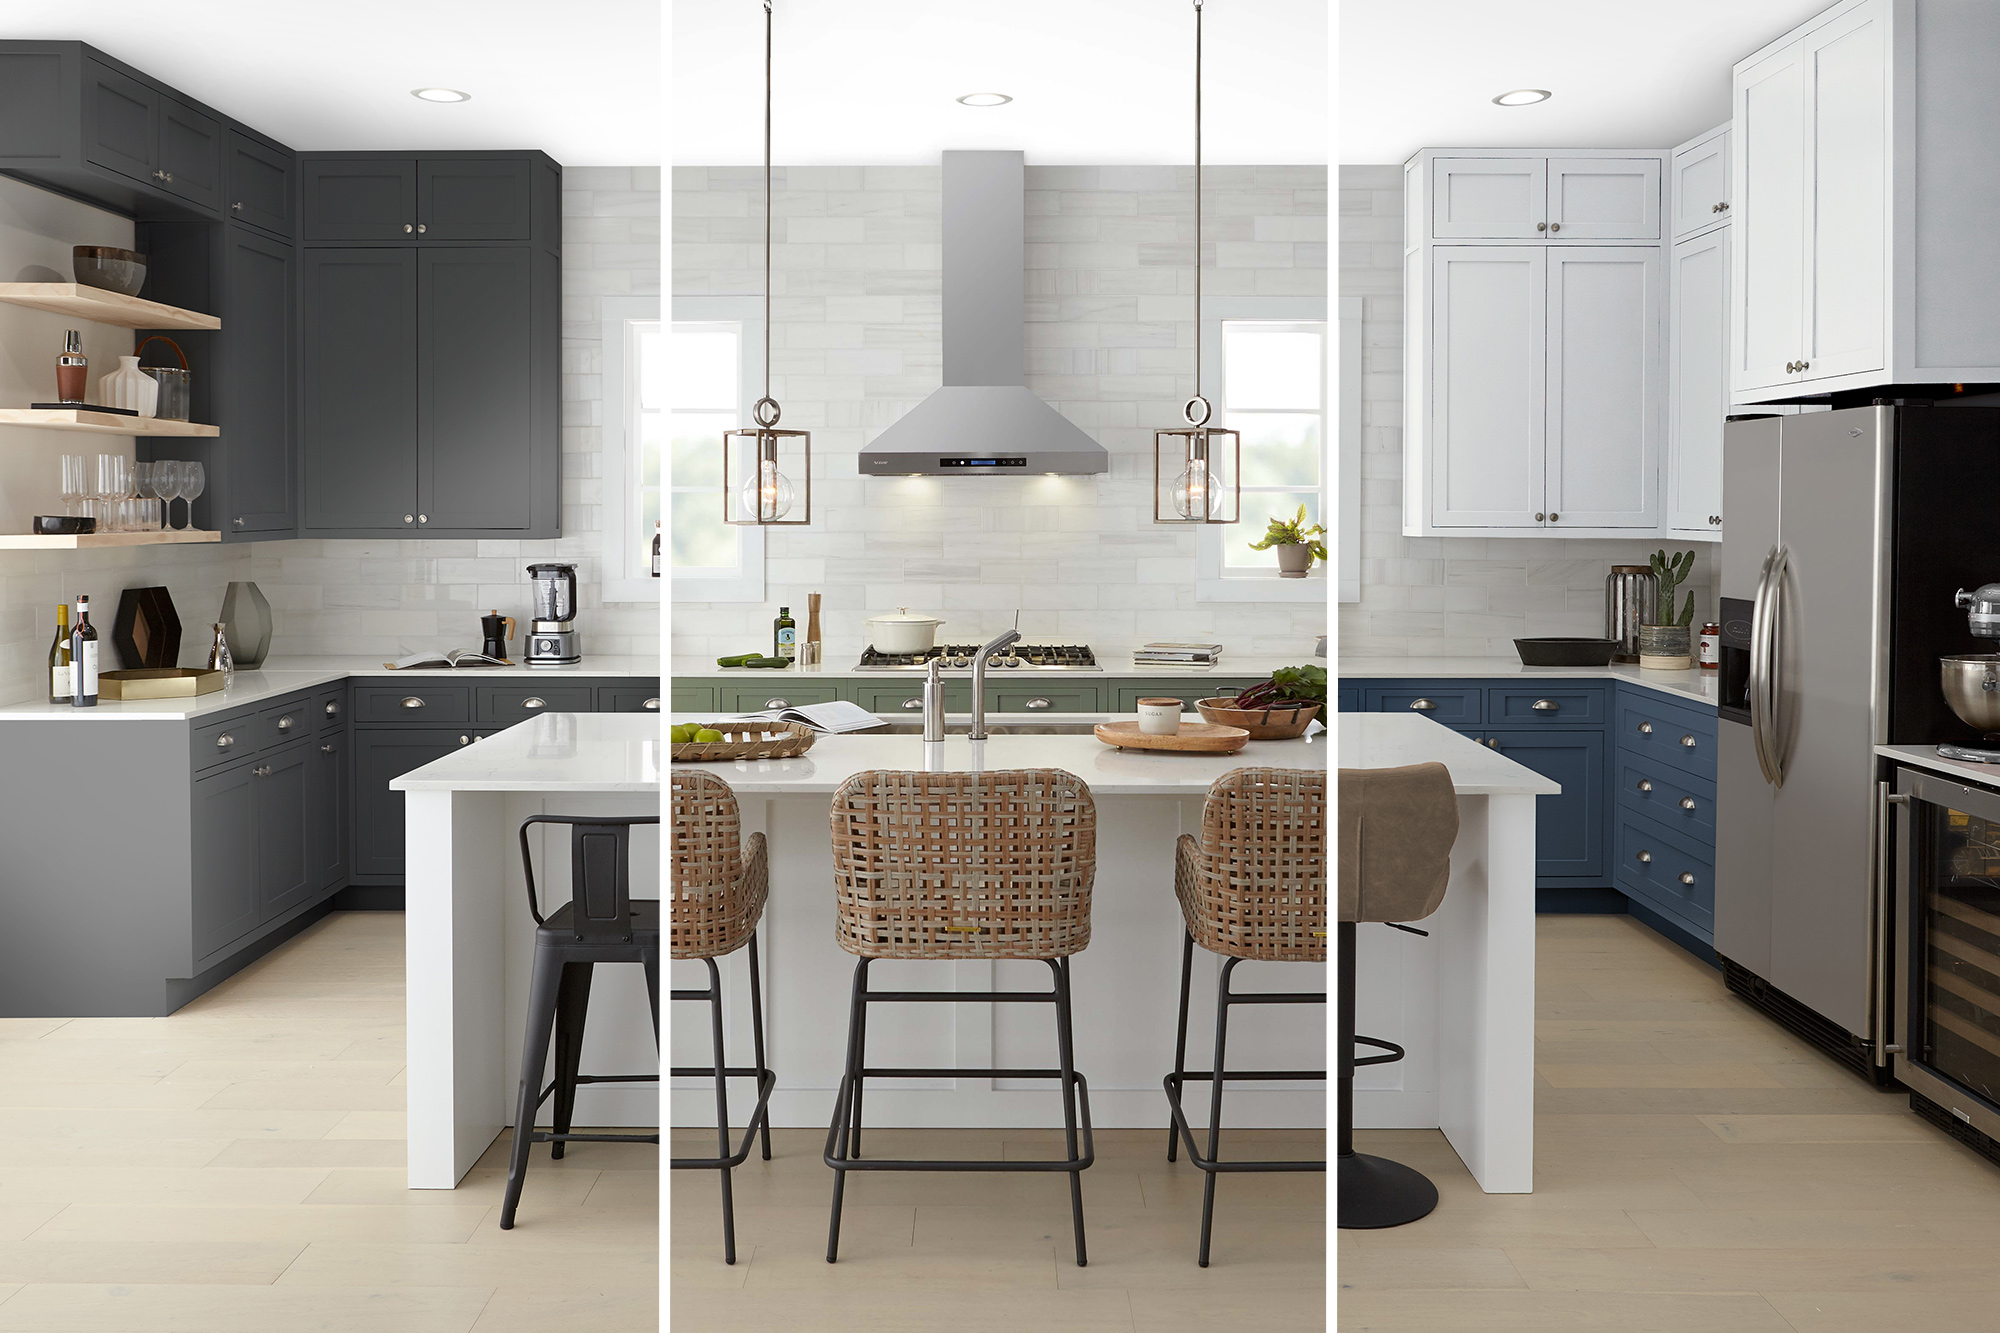
Updating a Kitchen for a New Generation
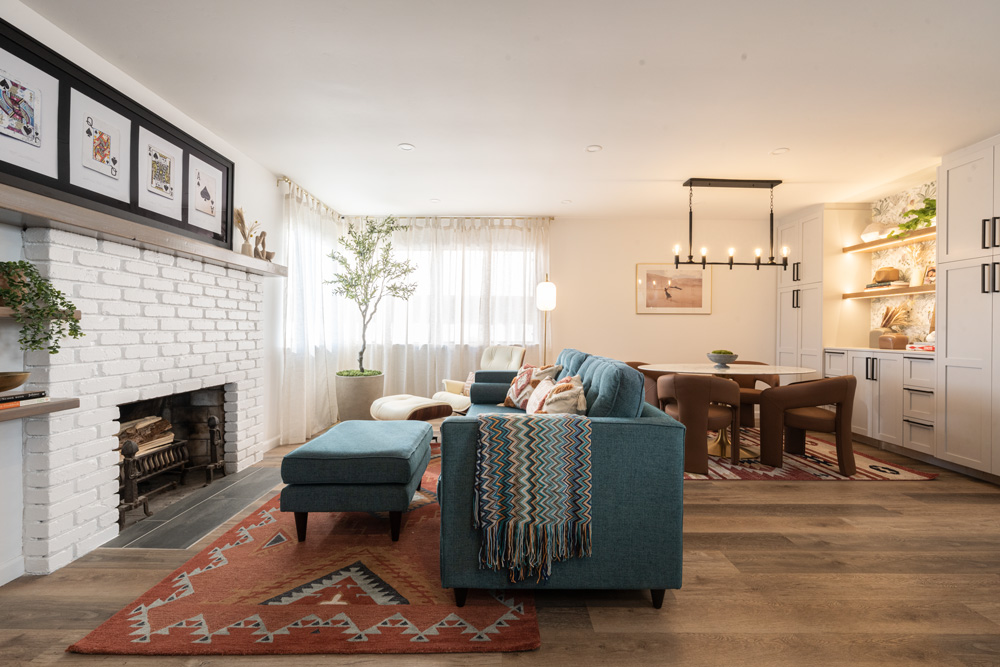
April 17, 2023We’re excited to share details from our Destination Restoration series with an inspired kitchen refresh that doesn’t require gutting the entire kitchen. This series demonstrates how you can breathe new life into an older home (in this case, a 4th generation family home), while keeping its structural integrity intact.
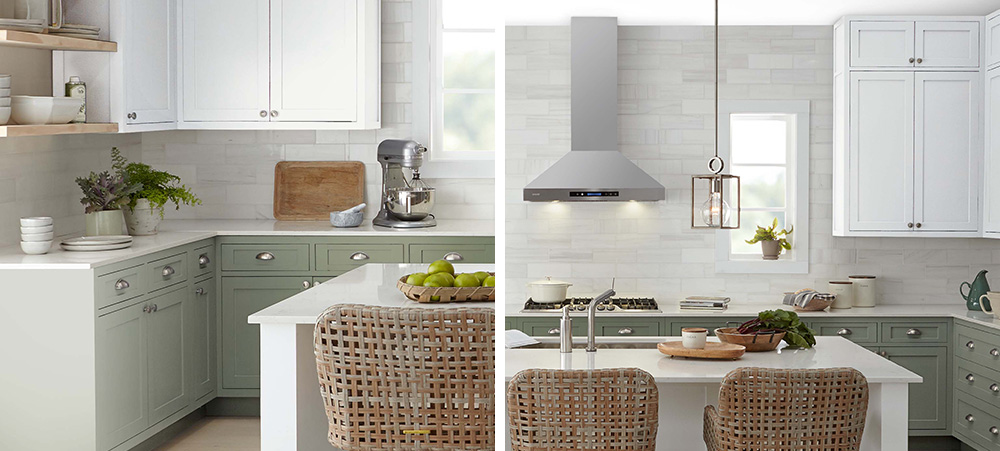
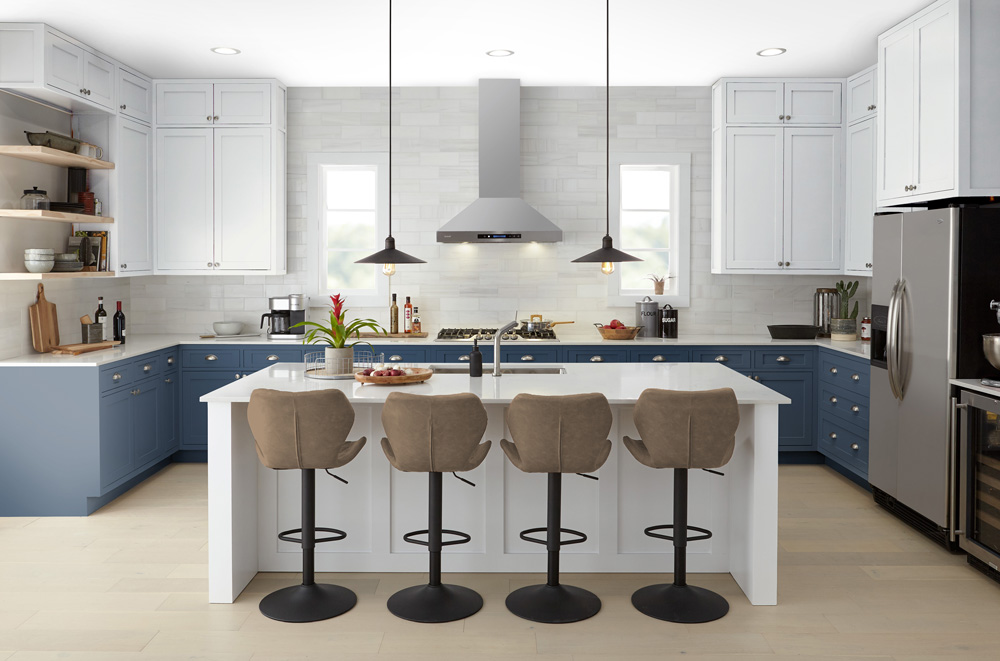
Our expert design and restoration team — Jason Lai (interior designer) and Jared Foster (contractor/pro painter) — worked together to transform a kitchen that was well past its prime. They first conceptualized which cosmetic changes would make the most impact, and then rather than gutting the entire room and starting from scratch, they repurposed and restored. By refreshing dull wooden cabinets, creating bar seating with a stunning new look, replacing heavy black appliances, and updating hardware, countertops, and backsplash, they transformed a dark and dated kitchen into a bright, airy, and modern one, renewing it for years to come.
If it’s your first time restoring a kitchen, it can feel like a big undertaking, which is why we broke down what we did below, so you can get a more detailed understanding of how we upgraded the heart of the home. We’ve also included a step-by-step guide on how to paint kitchen cabinets for a refresh.
Cabinetry
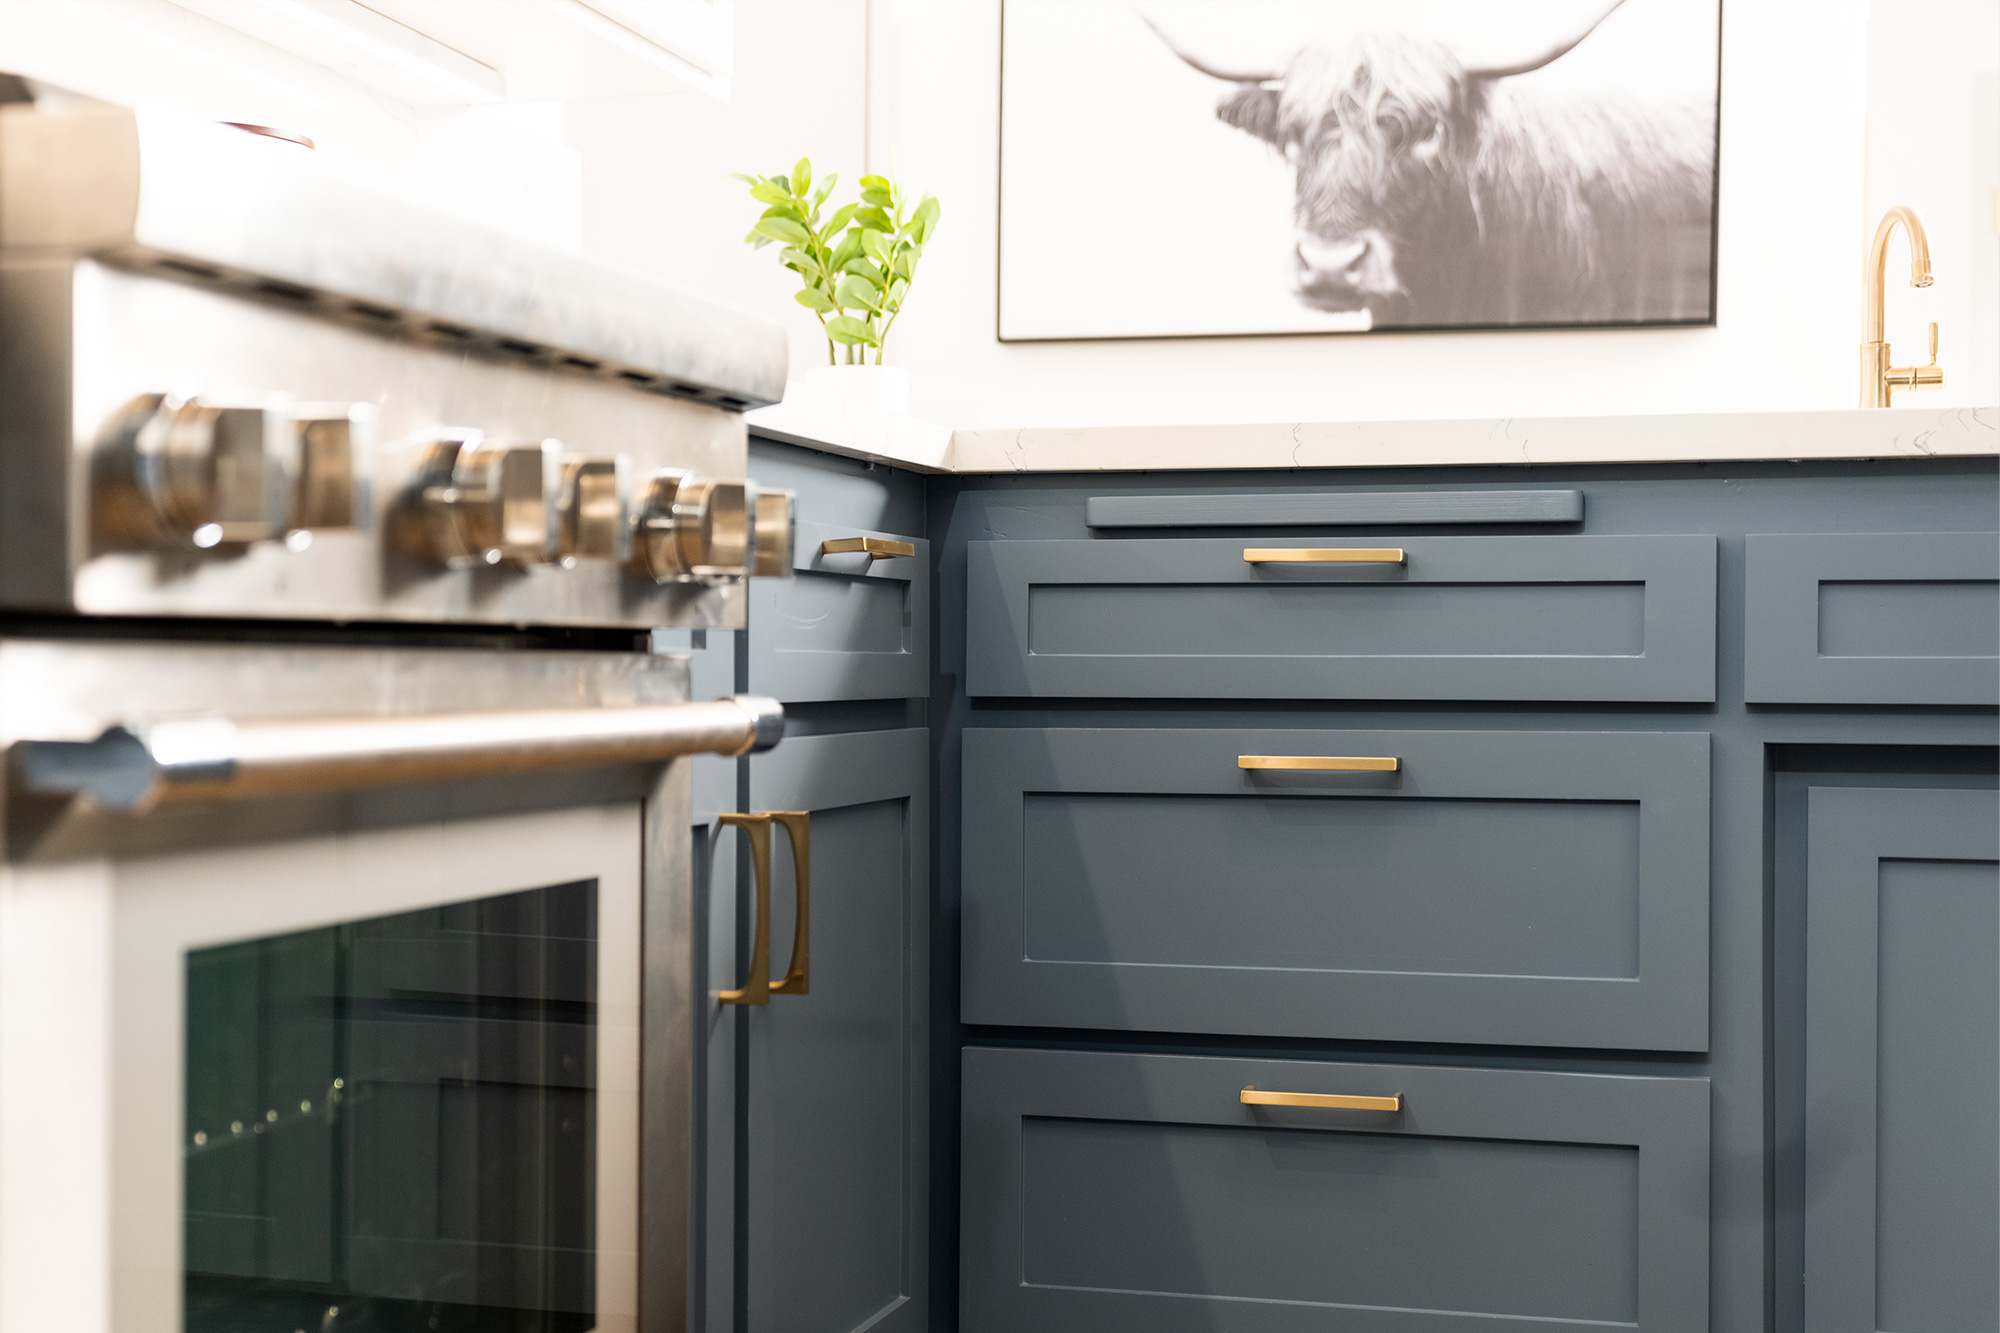
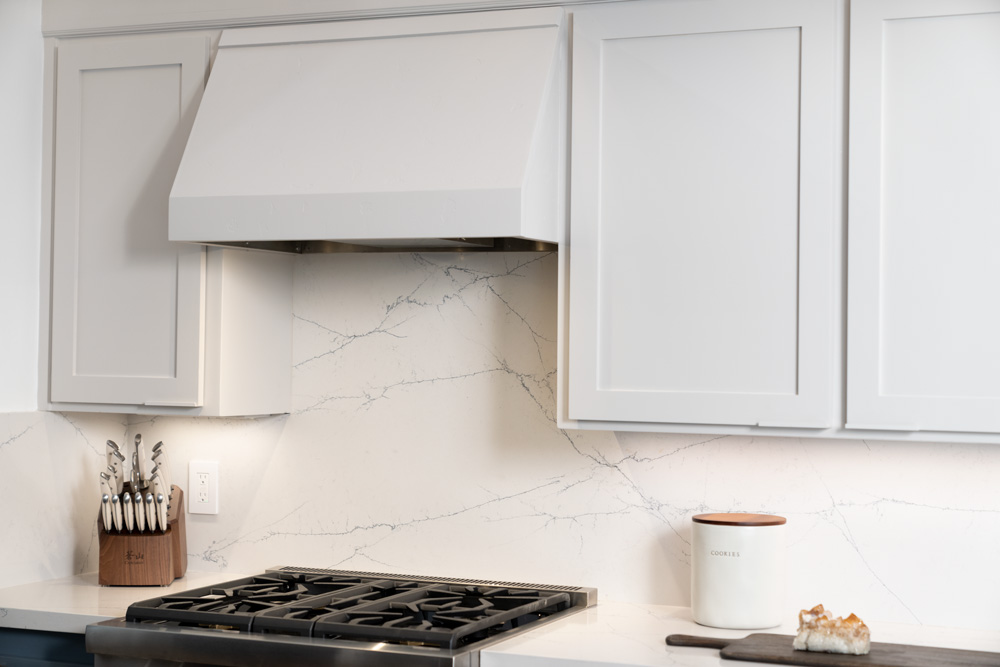
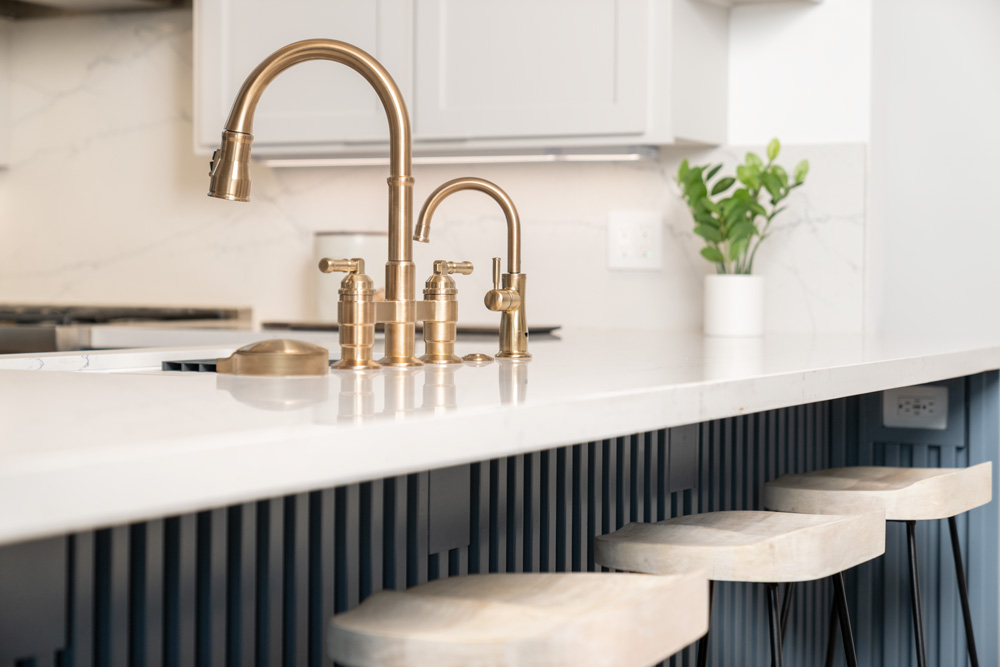
Rather than ripping out and replacing the cabinetry, which can be costly, we gave them a brand-new look and feel with a few simple updates. We removed some of the upper cabinets and modernized the rest by making them shaker style. Then we used KILZ 3® Premium Primer to prep them for a fresh coat of paint. To create some contrast and brightness in the room, we chose Charcoal Blue for the lower cabinets and Chic Grey for the upper, both colors by Behr Paint. Finally, we fitted them with all new hardware.
Ceiling
Because it wasn’t structural, we removed the center beam and stained the remaining beams to match the floors. (Check out the Living/Dining Room restoration to see where that center beam ended up!) We also installed recessed lighting by Kichler Lighting and rattan pendant lights.
Appliances & Additional Lighting
We updated the hood vent, oven, dishwasher, and refrigerator with stainless steel appliances for a sleeker, modern look. To ensure the hood vent matched the upper cabinets, we plastered, primed (again using KILZ 3 Premium Primer) and painted it using the same Chic Grey (a color by Behr). Finally, we installed under cabinet lighting by Kichler, added new electrical outlets throughout, and updated all electrical switches.
Other Changes
We updated the tile countertops and backsplash with a modern, white marble finish. To extend the bar, we added rounded lower cabinets and primed them (using KILZ 3 Premium Primer) for paint (Charcoal Blue by Behr) to match the others. Lastly, we added a 1×1 rail texture detail under the counter with hidden outlets. The sink, faucet, glass rinser, filtered water faucet, and hardware were all updated new products by Delta Faucet to complement the new look.
Why Do You Need to Prime?
Priming is essential for proper surface preparation for any paint project. It’s the difference between a job done and a job done right. Priming helps solve a wide range of problems, including highly porous surfaces, stains, odors, uneven surfaces, texture differences, and adhesion problems.
For this kitchen cabinet facelift we used, KILZ 3® Premium Primer, which is ideal for high-touch surfaces and humidity protection. It was perfect for our cabinet refresh thanks to its exceptional adhesion and ability to hide blemishes, stains, and other imperfections, which can accumulate over time, especially in older, generational homes like this one.
Step-By-Step Guide to Refinish Kitchen Cabinets:
Painting wood kitchen cabinets requires a few basic steps to get the smoothest finish and lasting results. Here’s an easy guide to follow for your next project:
1. Use a screwdriver to remove the cabinet doors and drawers from the cabinet frames and to remove all door handles and hardware.
2. Sand the surfaces of the doors, drawer faces, and cabinet frame to create a smooth surface for priming. Do a first pass with 100-150 grit sandpaper then finish with a second pass of 180-220 grit sandpaper. Remember, the higher the “grit” number, the smoother the finish.
3. When sanding, move the sandpaper in the same direction as the wood grain. If you go against the grain, you will end up with a lot of scratches that will show through your topcoat.
4. After sanding, wipe down the surface with a damp cloth to remove any dust or residue. Allow to dry.
5. Protect your floors and workspace from paint and primer by covering it with a drop cloth.
6. Now it’s time to prime! Using KILZ 3® Premium Primer, use a brush to make smooth strokes that go in the same direction as the wood grain.

• Pro-tip: To get better coverage along the sides of your door, raise it off your work surface with bricks.
7. Allow to dry for 2 hours.
8. Once the primer is dry, apply your kitchen cabinet paint of choice using the same application process at the primer.
• Pro-tip: For a really great result, apply primer and paint with a sprayer.

You Will Need:
• Screwdriver
• Dust mask
• 100-150 grit and 180-220 grit sandpaper
• Step ladder for hard-to-reach areas
• Rags to wipe dirty and dusty surfaces
• Painter’s tape
• Drop cloths, canvas, or other reusable material
• Paint roller, brush, and paint tray
• Paint of choice
We hope this episode of Destination Restoration inspires you to take on your own kitchen remodel this year. Be sure to keep KILZ® products in mind for your next project, and come back for more ideas, tips, and project inspiration.
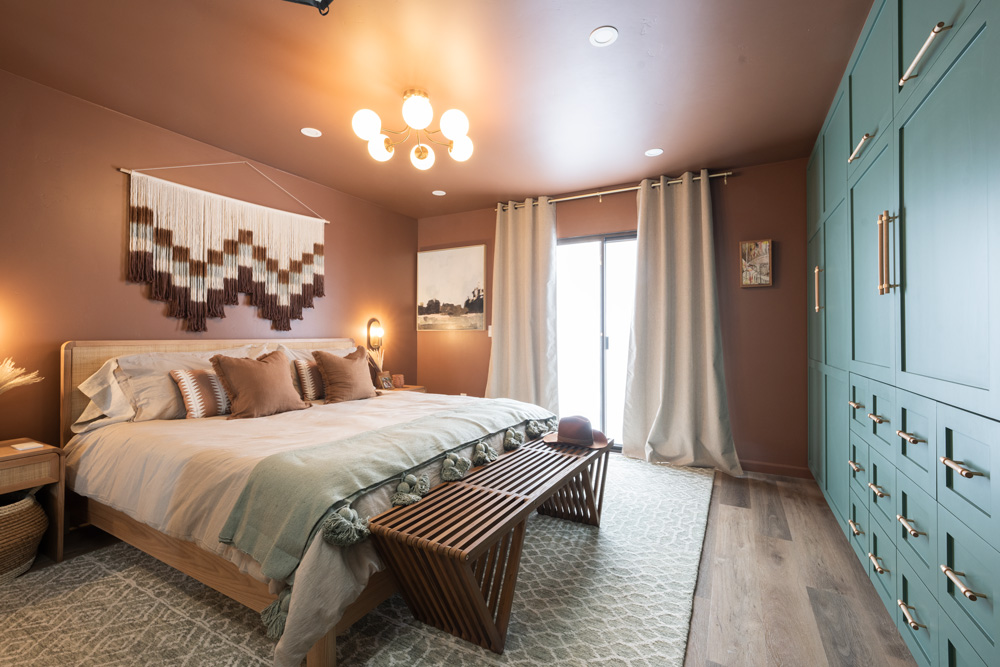
If you loved this restoration, be sure to check out the other episodes of Destination Restoration. Jason and Jared took on the Primary Bedroom, Primary Bathroom, and Living/Dining Room.
Always remember to refer to our website kilz.com or product back labels for additional information on which primer is right for your project and detailed instructions on how to apply our products. Check out our Coverage Calculator to understand your estimated paint needs for your upcoming project.
RELATED ARTICLES
get inspired:
FOLLOw us:
@kilzbrand
SHOP
PRODUCTS
MAGNOLIA HOME: ADDING STYLE WITH MODERN KITCHEN CABINETS
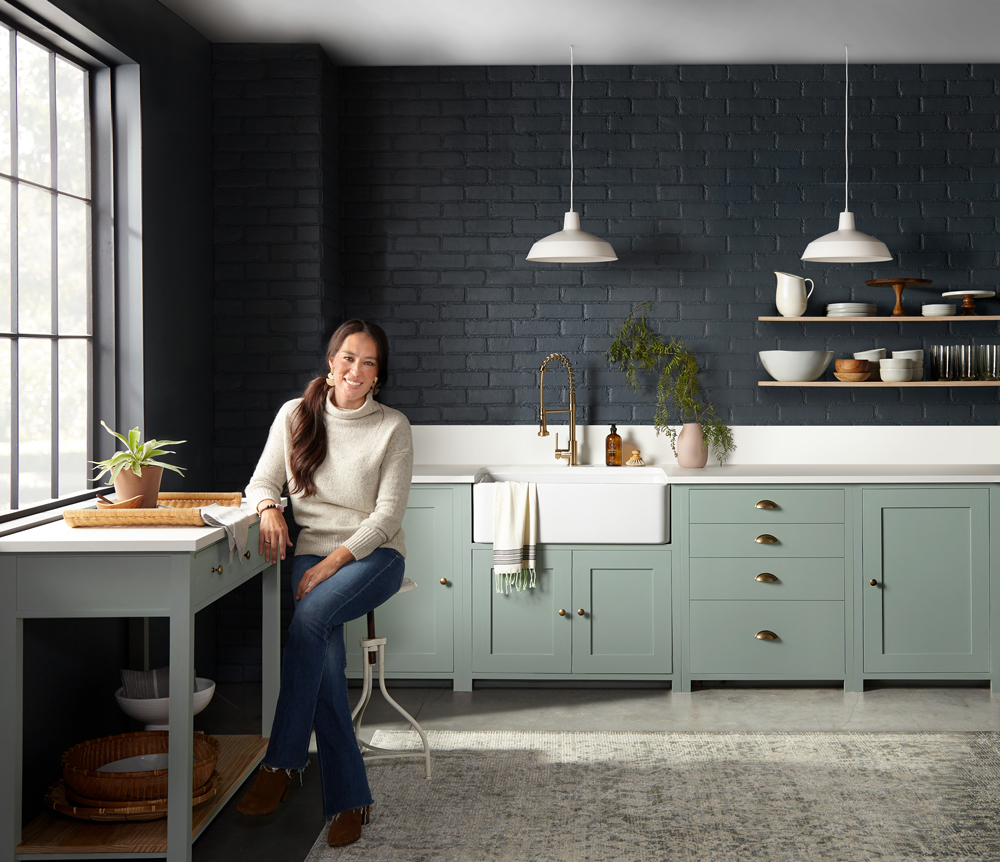
May 26, 2022Kitchens are so often the place that friends & family spend the most amount of time together. Whether it’s cooking, eating, sharing stories, or making new memories, the kitchen is truly the heart of any home. A distinctive and modern kitchen cabinet color is always a great way to create a stunning kitchen that all your guests will love.
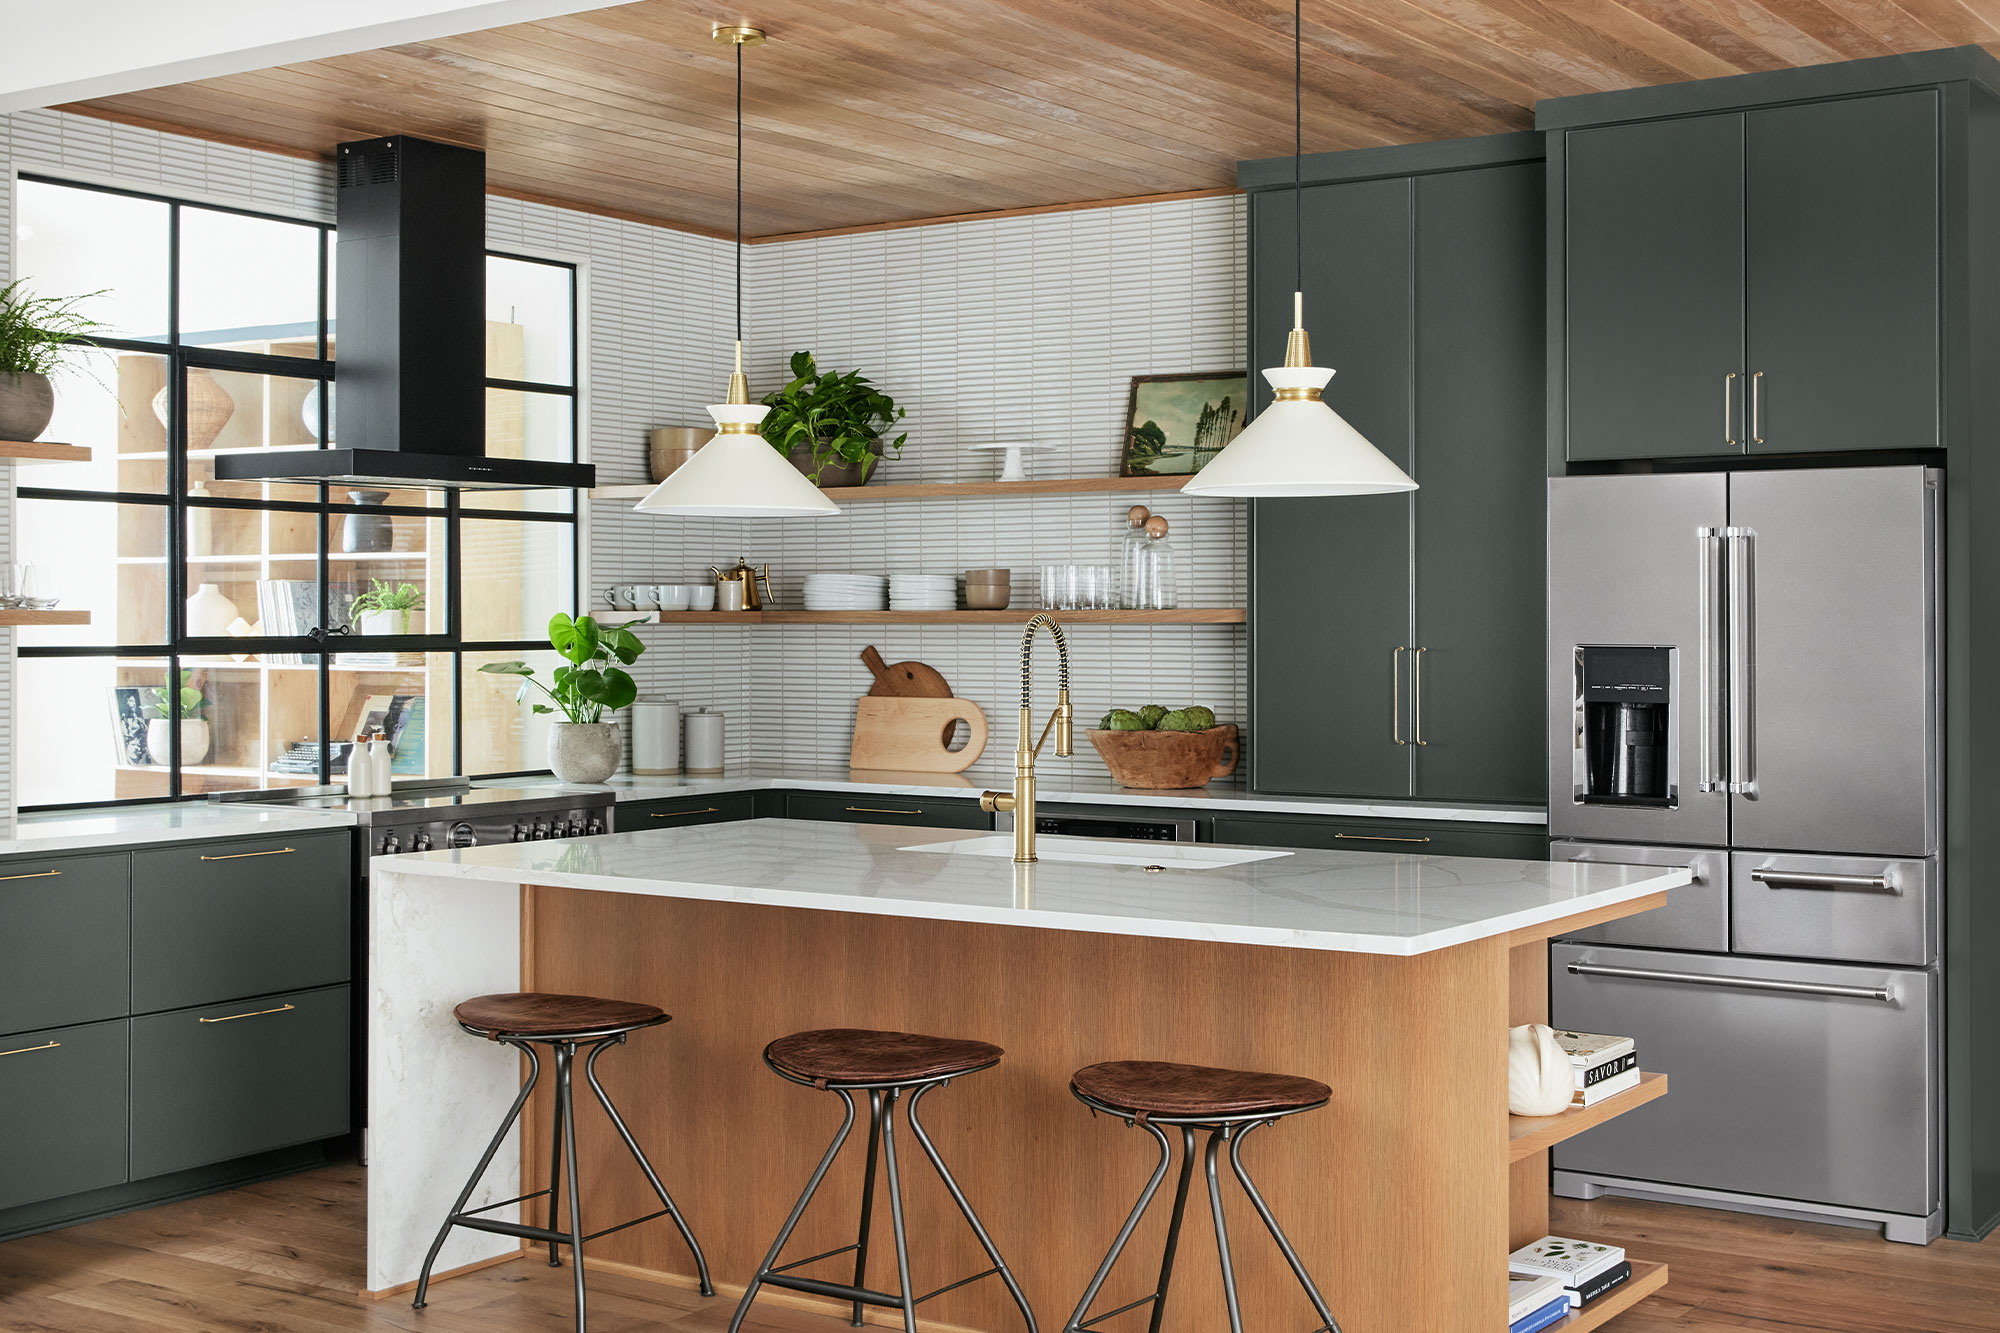
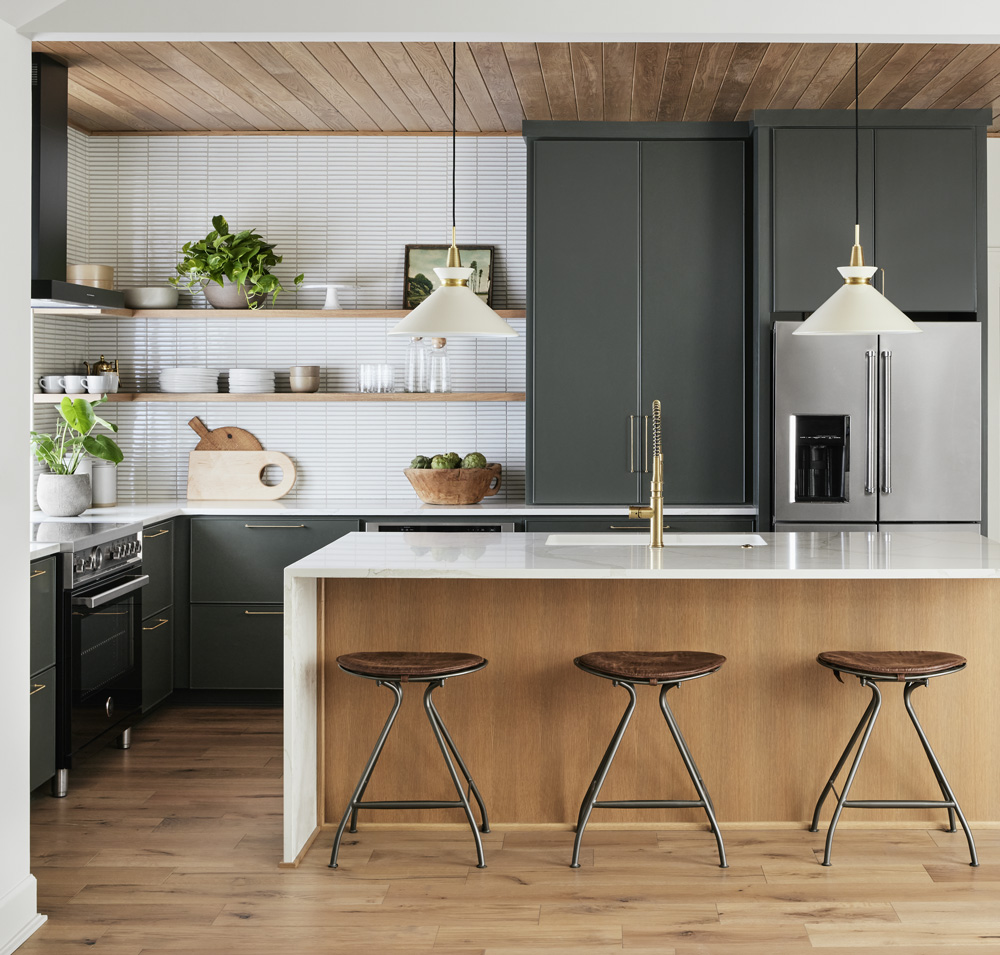
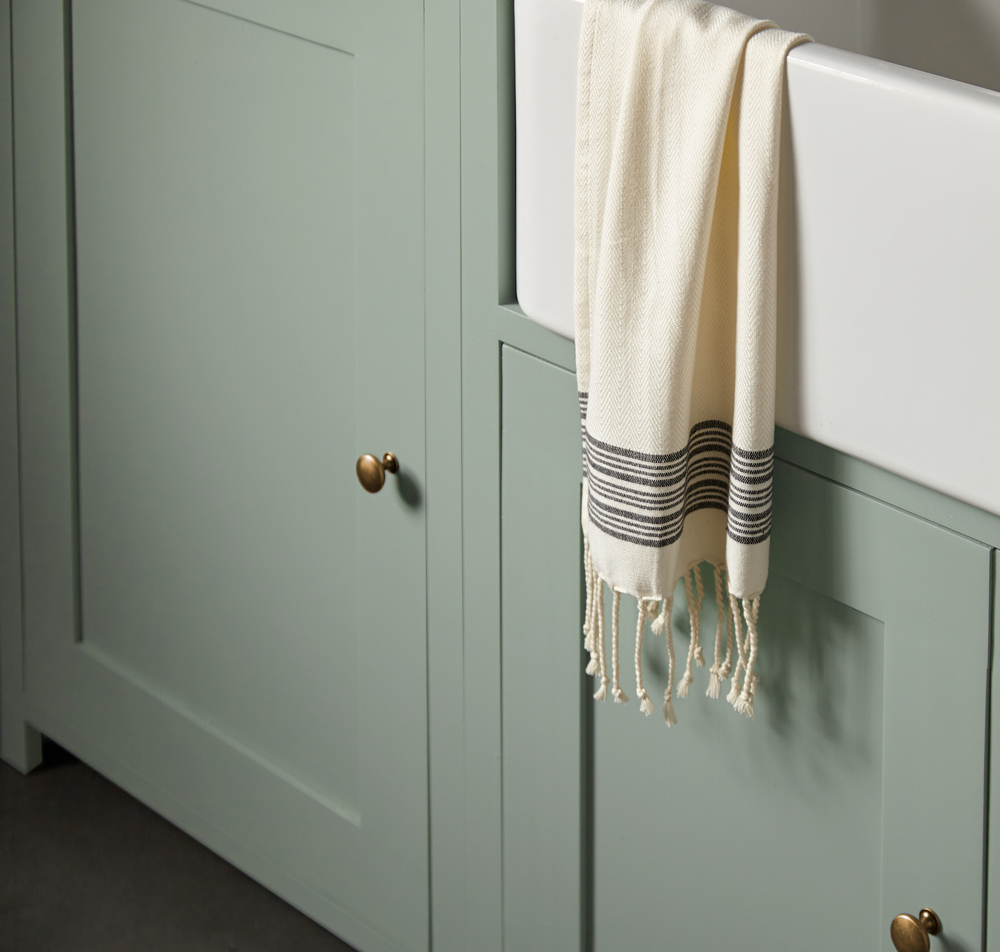
“I love the contrast of a sophisticated green paired with an off-white. These colors work together to give this kitchen depth and visual interest without it feeling overwhelming.” – Joanna Gaines

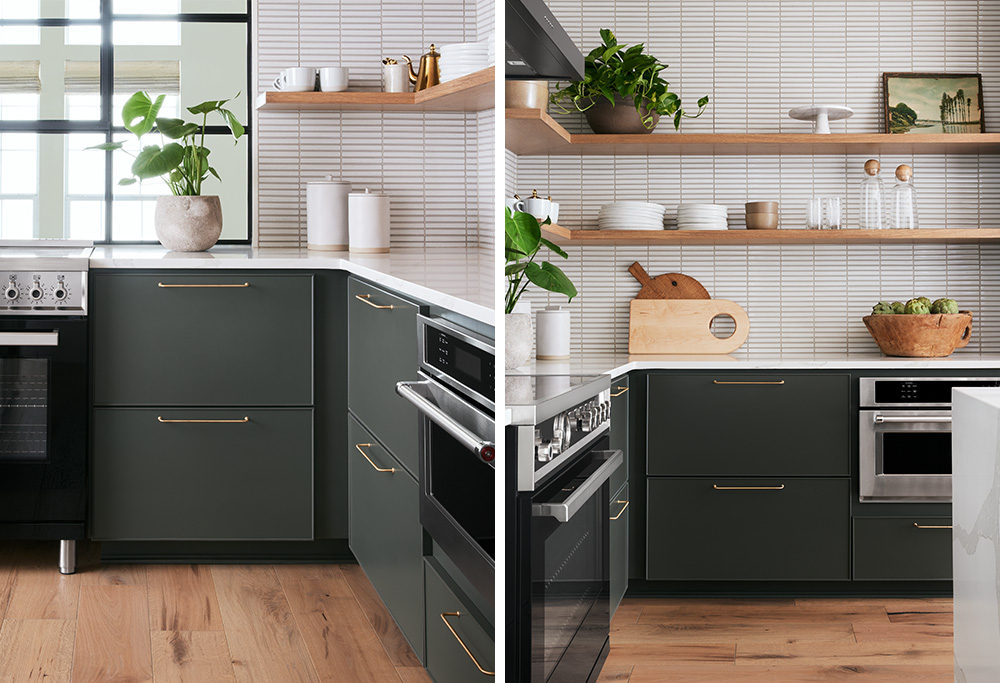
In this kitchen, the stylish monochromatic cabinets elevate the space while also providing a calming and sophisticated backdrop for any personalized decor. The cabinets are coated in a featured color from the Magnolia Home by Joanna Gaines® paint line, Locally Grown, which is a deep hunter green dusted with olive tones. When paired with metallic hardware, the darker undertones contrast beautifully and draw attention to the rich color.
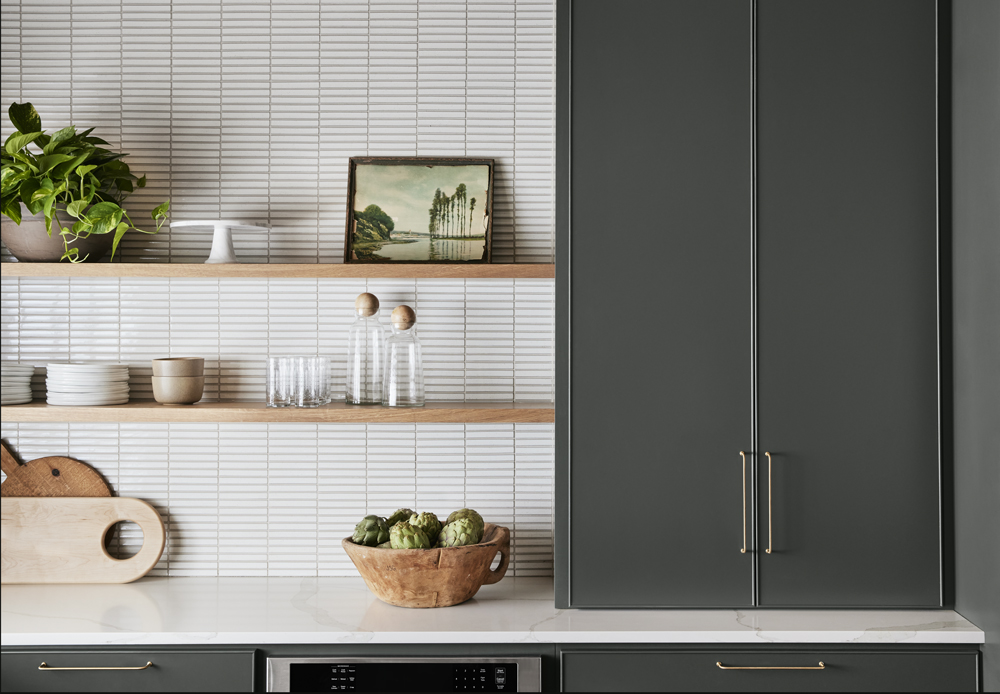
Adding in other modern features and textures can change the look and feel of your kitchen. The wooden open shelving provides a great space to display some of your favorite items and décor elements, such as ceramic dishes, glassware, and greenery. Natural wood materials and a simple stacked white tile backsplash offer an air of whimsy but simultaneously capture a modern style. These finishes will continue to highlight a chic kitchen cabinet color, like Locally Grown, and breathe life into your kitchen for years to come.
Other ways to bring in more natural tones are through your ceiling and flooring material selections. Choose a color or stain for your 5th and 6th walls (Floor & Ceiling) that complement your refreshed kitchen cabinets. Add a pop of white on your countertops and you will have a kitchen that is sure to stun.
Inspired by this modern kitchen and looking for complimentary colors for your own space? The curated palette below offers shades that complement and coordinate with Locally Grown.


RELATED ARTICLES
get inspired:
FOLLOw us:
@kilzbrand
SHOP
PRODUCTS

How to Prime Kitchen Cabinets for Color That Pops
February 25, 2022If you want to design a kitchen that makes a statement, we’ve got some great tips to help make it a breeze. KILZ® primers are the first step in making sure any color you choose really pops, and with the right inspiration, products, and guidance, you can achieve a beautiful focal point inside your home. Our featured kitchen inspirations start with KILZ 3® PREMIUM Interior and Exterior Primer and come together in three unique design concepts that elevate the space from bland to bold. See how to prime kitchen cabinets to ensure the paint colors pop.
As with any project requiring a fresh coat of paint, we started by priming our surfaces. As mentioned above, we chose KILZ 3® PREMIUM Interior and Exterior Primer for its superior adhesion and durability, multi-surface application, and mildew-resistant finish—critical for moisture-prone areas, such as your kitchen where steam, water, and other liquids are present. This primer helped us create the perfect foundation for color, as well as smooth out and cover prior stains, paint, and imperfections in the existing cabinetry.
For our first kitchen makeover, we used BEHR PREMIUM™ Cabinet & Trim Enamel in the color Ecological S380-6 on the lower cabinets and island, and White 52 on the upper cabinetry. While this shade of green is subtle, it appears clean and flawless thanks to our primer, which effectively prepped the surface and allowed for this neutral color to shine. The two-tone kitchen cabinets add some depth of color to the space. We further styled this space with complementary wicker bar chairs at the island, and open-framed light fixtures overhead for a cozy-casual vibe perfect for cooking, eating, and entertaining.
Keep in mind that painting without priming first—especially on porous surfaces like wood or brick where paint can easily become absorbed—can greatly affect the outcome. Without a solid coat of primer, paint can appear less vibrant, rich, or otherwise not as expected.
Opting for drama with our next kitchen makeover, we chose BEHR PREMIUM™ Cabinet & Trim Enamel in the color Limousine Leather MQ5-05. We painted the upper and lower cabinets in this charcoal-like shade, creating a refined frame around the island, which we painted with White 52. Because we primed thoroughly beforehand, we cut down on the number of topcoats and ensured our color came out as expected. The island becomes the focal point here, so we styled with black and gold mini pendant lights and contrasting bistro-style barstools for a chic and polished final look.
Our final kitchen makeover features BEHR PREMIUM™ Cabinet & Trim Enamel in the color Inked M510-7 on the lower cabinets and island, and White 52 on the overhead cabinetry for a light to dark look that really pops. White walls and countertops help achieve a clean look from the top down. The two-tone cabinets add an interesting juxtaposition to the room. To round out this concept, we chose leather barstools with black bases, and matching black lighting—small details that effortlessly tie the space together.
All three of our kitchen inspirations featured KILZ 3® PREMIUM Interior and Exterior Primer, which we chose for its surface versatility, among its many other benefits for a room of this kind. This fast-drying primer’s excellent adhesion makes it ideal for use on interior and exterior surfaces including wood, drywall, plaster, stucco, paneling, masonry, brick, and more. It works with oil and water-based paints, giving you plenty of color options for your kitchen or any future DIY project.
Always remember to refer to our website kilz.com or product back labels for additional information on which primer is right for your project and detailed instructions on how to apply our products. Check out our Coverage Calculator to understand your estimated paint needs for your upcoming project.
RELATED ARTICLES
get inspired:
FOLLOw us:
@kilzbrand
SHOP
PRODUCTS
A Fresh Kitchen Makeover
October 15, 2021A dated and uninspiring kitchen is transformed into a fresh cooking and entertaining space in this remarkable kitchen transformation. The original kitchen did little to encourage people to spend time in the space or inspire home-cooking or hosting. To liven up this kitchen and create a welcoming space, we focused our efforts on a simple yet powerful paint job and some key design upgrades.
For this makeover, we chose KILZ 3® Premium Primer because it offers adhesion and a mildew resistant finish on the primer film, ideal for moisture-prone areas like kitchens where water, steam, and even tough liquids like oils are commonplace. This primer is also high hide, meaning you can apply it directly over old colors (even darker ones!) and still be able to paint a bright white topcoat to finish.
Once the primer was applied and allowed to dry, we top coated with Magnolia Home by Joanna Gaines® paint in True White to add a fresh, renewing sense of cleanliness to the space. In providing a stark blank canvas, it allows everything else in the kitchen to shine. It is calm and mindful and creates a sense of renewal.
With the walls reset, our focus shifted to the overall color palette for the room. We chose a neutral combination of white, brown, and black. Dark colors were kept to a minimum, with a few mid-century modern accessories – including soft metallic pendant lights, low-rise barstools, a modern drink cart and simple white ceramic food canisters– providing welcoming aesthetic accents in key areas of the room. And to allow for more entertaining in the space, we brought in a larger dining table with additional seating.
This kitchen makeover is proof that a simple color change with primer and fresh coat of paint can be the perfect foundation for a stunning transformation.
Always remember to refer to our website kilz.com or product back labels for additional information on which primer is right for your project and detailed instructions on how to apply our products.
RELATED ARTICLES
get inspired:
FOLLOw us:
@kilzbrand

Pro Spotlight: Tom Kraeutler Talks Kitchen Cabinets
August 24, 2021 For this month’s Pro Spotlight, we are excited to share a post authored by Tom Kraeutler – Founder, Host and Chief Home Improvement Evangelist of The Money Pit. He is a hands-on home improvement broadcast journalist and the kind of guy homeowners want to call at midnight when their basement floods. He first earned his home improvement stripes as a professional home inspector, amassing over 20 years’ experience learning how houses are put together, and how they fall apart! Read on to learn Tom’s tips and tricks for one of our favorite projects, refinishing kitchen cabinets.
Refinishing Kitchen Cabinets: Simple Steps to a Colorful Makeover
Author: Tom Kraeutler
Kitchens are perhaps the busiest rooms in any home. Whether it’s meal preparation, homework space, or social gatherings, they serve as the hub of family life. And that means kitchen cabinets must stand up to years of heavy use. A constant cycle of opening and closing wears out their finish, pots and pans scratch them, and hinges and handles wear out. But while replacing kitchen cabinets can be a time-consuming, expensive, and difficult task, refinishing kitchen cabinets is not and can deliver stunningly colorful results.
Here’s what you need to know to get this project done.
Getting Ready: Prep Makes Perfect!
My earliest DIY inspiration came from my father who always said the “gettin’ ready” was the most important part of the project! Years later and no longer an impetuous teenager just looking to get my chores done quickly, I realized how right he was. Before popping the lid of the paint can, set yourself up for success by getting the space and cabinets ready.
First, clear out furniture and clean out the cabinets from top to bottom. Then, remove all the cabinet doors, shelves, and drawers, and take off the hardware.
Tip: Label the doors and drawers in an inconspicuous area so you’ll know where they belong when the project is complete. For drawers, mark the bottoms. For cabinet doors, the area behind the hinge works well.
Next, cabinet finishes can be magnets for dirt, dust and grease so wash them thoroughly with a solution of TSP (trisodium phosphate). Be sure to clean the top of the cabinets as well, as dust that gathers here can float down and stick to the finish as it dries.
Evaluate the cabinet surfaces. Applying a new finish on top of an old finish that’s not adhered to the original surface is a recipe for disaster. Any loose, chalking or cracked paint surfaces should be scraped smooth. For most surfaces, and especially those that are glossy, a light sanding will help improve adhesion between the old surface and the primer.
Primer Selection Drives Durability
Selecting the right primer for kitchen cabinet refinishing is critical. The primer helps assure the top-coat of paint adheres to the cabinet, provides durability and helps assure the final finish flows evenly with minimal brush strokes or roller marks.
KILZ 3® PREMIUM Primer is an excellent choice for this part of the project. The primer provides exceptional adhesion with a mildew-resistant finish, making it ideal for projects in moisture prone areas such as kitchens and bathrooms. I also like that KILZ 3 is what’s known as a “high build” finish. This means that it can fill in minor imperfections in a cabinet surface or minimize deep wood grain patterns when painting oak cabinets, for example. KILZ 3 is also water-based for easy clean-up, dries quickly, and has a low-odor, low-VOC finish.
KILZ 3 should be applied evenly using a brush, roller, or airless sprayer, as specified by the manufacturer. Only a single coat is needed. Set up a space to layout the doors and drawers for priming, and then prime the cabinets working from the top-down.
Top-Coat Counts
Just like primer selection is based on the product’s adhesion, moisture resistance and high-build formulation, equal care should be given to the selection of paint for the top coat. Over the course of your newly painted cabinet’s life cycle, doors and drawers will be opened and closed thousands of times. Moisture in the air will be a constant presence, as will oils and grease given off by years of cooking. Therefore, you’ll want to select a paint that has excellent durability and is very easy to clean.
Look for paints made specifically for kitchen cabinets. Magnolia Home by Joanna Gaines® Trim, Door + Cabinetry Paint dries quickly, leaving a hard finish that’s remarkably durable and it is water-based for easy cleanup. For most projects, plan to apply two-coats and follow the manufacturer’s directions for application.
Add Some Bling
Once the painting is complete, you’ll have the option to replace the original hardware or add new. Given the work it’s taken to get to this point in your kitchen cabinet refinishing project, installing new door and drawer pulls adds some bling and provides a nice finishing touch.
This part of the project is easiest if the new hardware fits the holes left by the original hardware. However, if you plan to go in a completely new direction, it’s easy enough to fill and sand the old holes before you get to the priming step above. Personally, I also like to replace the hinges as well. New spring-loaded hinges look good and close nicely. Finally, install bumpers to the drawers and doors for added durability.
Today, solid-color kitchen cabinets are more popular than ever making this an ideal time to take on a kitchen cabinet refinishing project. But the success of refinishing kitchen cabinets depends entirely on the details. With the right prep work, a high-quality primer, and a colorful, durable top coat, you can transform this space with a fresh finish that can last for years to come.
Always remember to refer to our website kilz.com or product back labels for additional information on which primer is right for your project and detailed instructions on how to apply our products.
RELATED ARTICLES
get inspired:
FOLLOw us:
@kilzbrand
SHOP
PRODUCTS
Magnolia Home: Bold Kitchen Colors
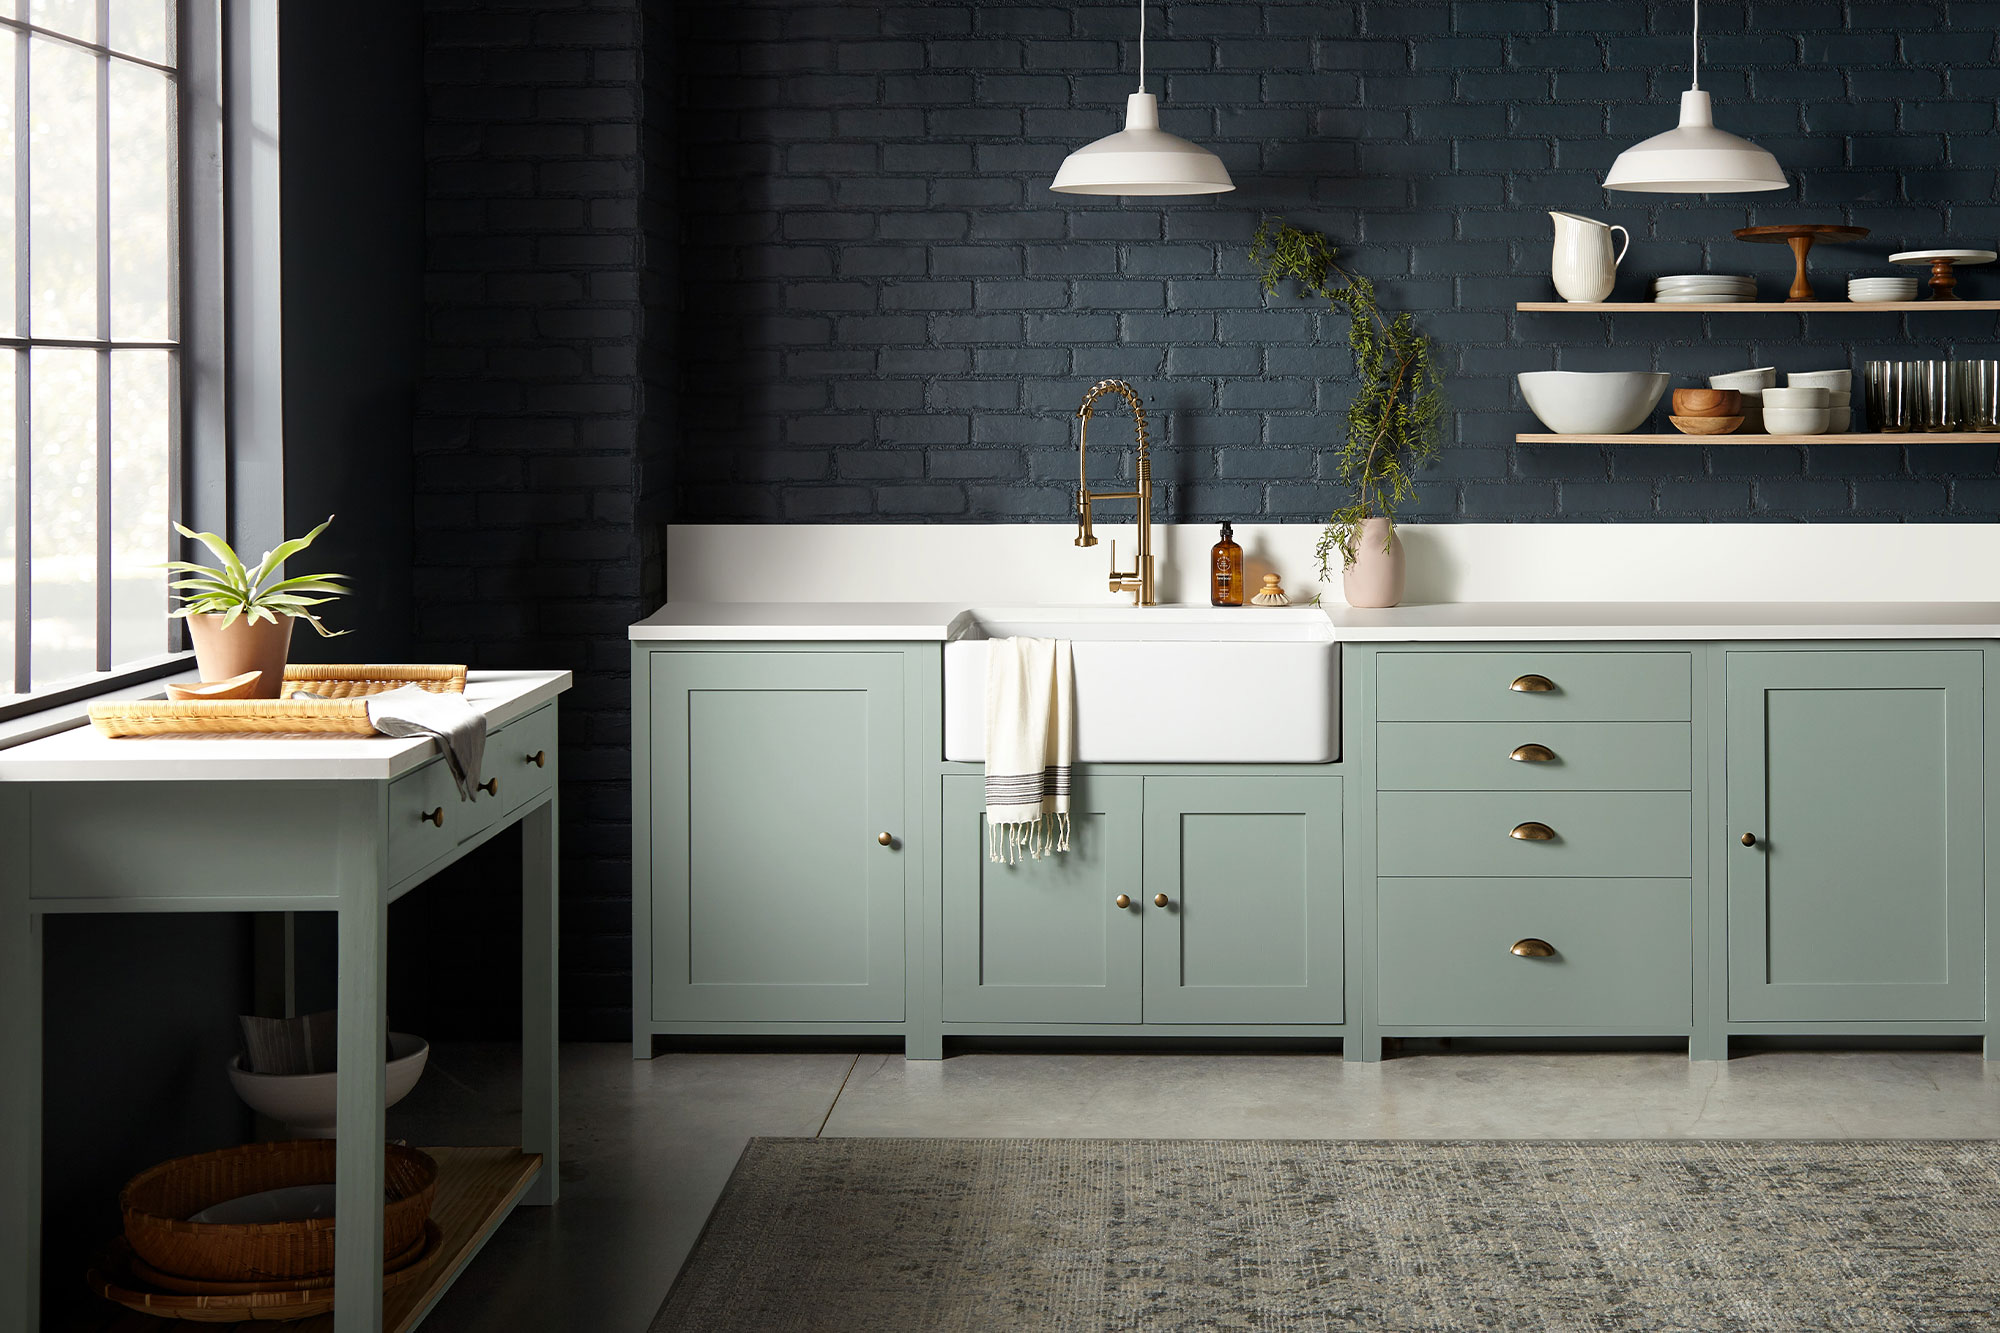
May 11, 2021While a bright white kitchen is a timeless and classic look, sometimes adding a dash of dark color in your space can be the secret ingredient to achieving an elevated design style. In this kitchen, the open and light-filled layout was ideal for a bold color choice on the walls or cabinets.
“Going with a dark paint color for a space might feel intimidating to some, but when you find deep, rich tones like these that beautifully elevate the space, the risk is worth it.” – Joanna Gaines
The brick walls in this kitchen had a beautiful natural texture that combined with the light pouring in from the large open window, made for an ideal surface to hold a darker paint shade. The chosen color, Magnolia Home by Joanna Gaines® paint in Coffee Nook, offered the depth desired (a dark, smoky gray) with a softness that comes through in the blue undertones.
To complement the deep and dark walls, the cabinets were coated in a paint color with a similar gray hue but in a much lighter shade. The chosen color, Clean Slate, brought together a perfect pairing of cement gray and blue undertones. A white farmhouse sink and bright white countertops added airiness to the space, while minimalist open wood shelves added interest to the dark, brick wall.
This resulting kitchen is a design and culinary masterpiece, and proof that bold and dark color choices can be just the thing to take a design from simple to decadent. If you’re looking to explore using bold colors in your space and aren’t sure what to pair them with, explore the palette below of shades that complement Coffee Nook and Clean Slate.


Magnolia Home by Joanna Gaines paint is available at select Ace Hardware store locations, and online at AceHardware.com and Magnolia.com.
RELATED ARTICLES
get inspired:
FOLLOw us:
@kilzbrand
join the conversation:
SHARE this post: