Author: Carmen Serrano

Pro Spotlight: Tom Kraeutler Talks Kitchen Cabinets
August 24, 2021 For this month’s Pro Spotlight, we are excited to share a post authored by Tom Kraeutler – Founder, Host and Chief Home Improvement Evangelist of The Money Pit. He is a hands-on home improvement broadcast journalist and the kind of guy homeowners want to call at midnight when their basement floods. He first earned his home improvement stripes as a professional home inspector, amassing over 20 years’ experience learning how houses are put together, and how they fall apart! Read on to learn Tom’s tips and tricks for one of our favorite projects, refinishing kitchen cabinets.
Refinishing Kitchen Cabinets: Simple Steps to a Colorful Makeover
Author: Tom Kraeutler
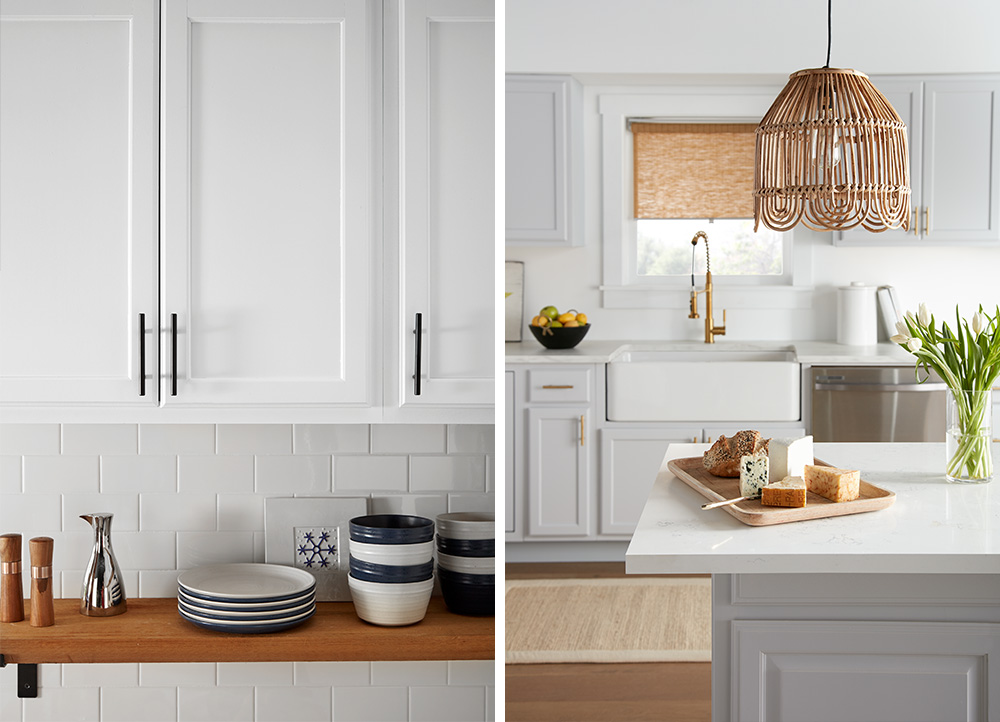
Kitchens are perhaps the busiest rooms in any home. Whether it’s meal preparation, homework space, or social gatherings, they serve as the hub of family life. And that means kitchen cabinets must stand up to years of heavy use. A constant cycle of opening and closing wears out their finish, pots and pans scratch them, and hinges and handles wear out. But while replacing kitchen cabinets can be a time-consuming, expensive, and difficult task, refinishing kitchen cabinets is not and can deliver stunningly colorful results.
Here’s what you need to know to get this project done.
Getting Ready: Prep Makes Perfect!
My earliest DIY inspiration came from my father who always said the “gettin’ ready” was the most important part of the project! Years later and no longer an impetuous teenager just looking to get my chores done quickly, I realized how right he was. Before popping the lid of the paint can, set yourself up for success by getting the space and cabinets ready.
First, clear out furniture and clean out the cabinets from top to bottom. Then, remove all the cabinet doors, shelves, and drawers, and take off the hardware.
Tip: Label the doors and drawers in an inconspicuous area so you’ll know where they belong when the project is complete. For drawers, mark the bottoms. For cabinet doors, the area behind the hinge works well.
Next, cabinet finishes can be magnets for dirt, dust and grease so wash them thoroughly with a solution of TSP (trisodium phosphate). Be sure to clean the top of the cabinets as well, as dust that gathers here can float down and stick to the finish as it dries.
Evaluate the cabinet surfaces. Applying a new finish on top of an old finish that’s not adhered to the original surface is a recipe for disaster. Any loose, chalking or cracked paint surfaces should be scraped smooth. For most surfaces, and especially those that are glossy, a light sanding will help improve adhesion between the old surface and the primer.
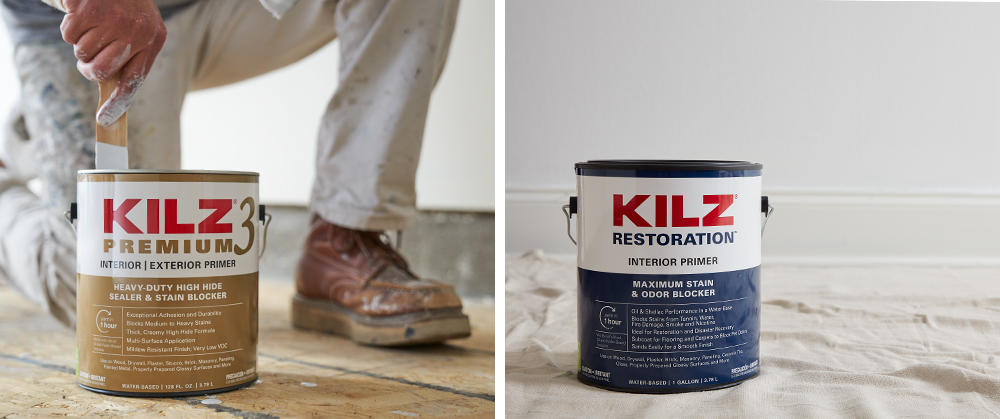
Primer Selection Drives Durability
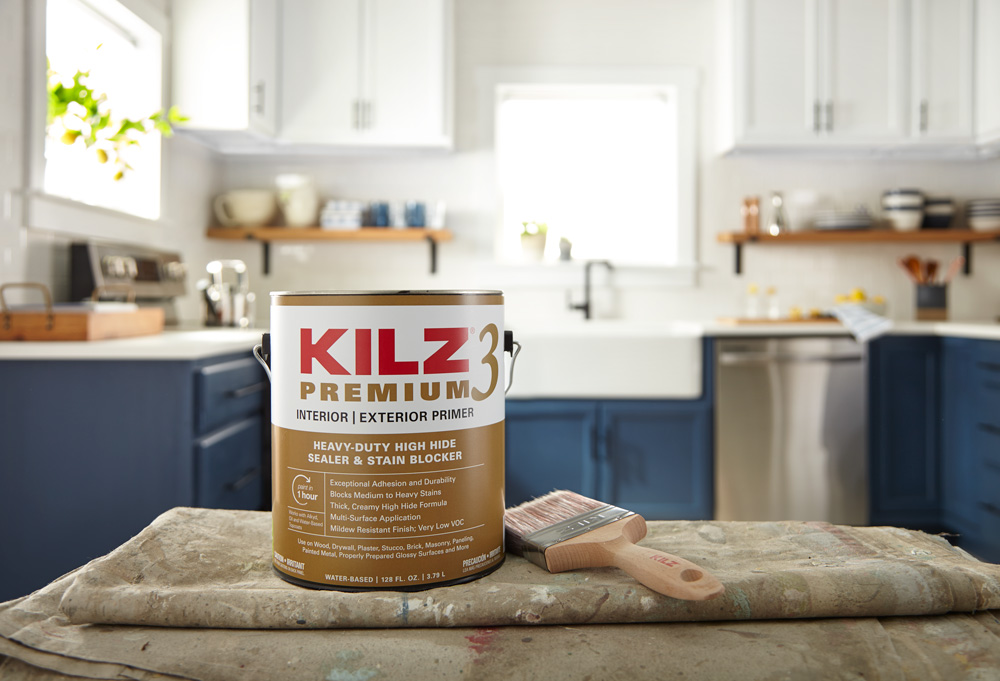
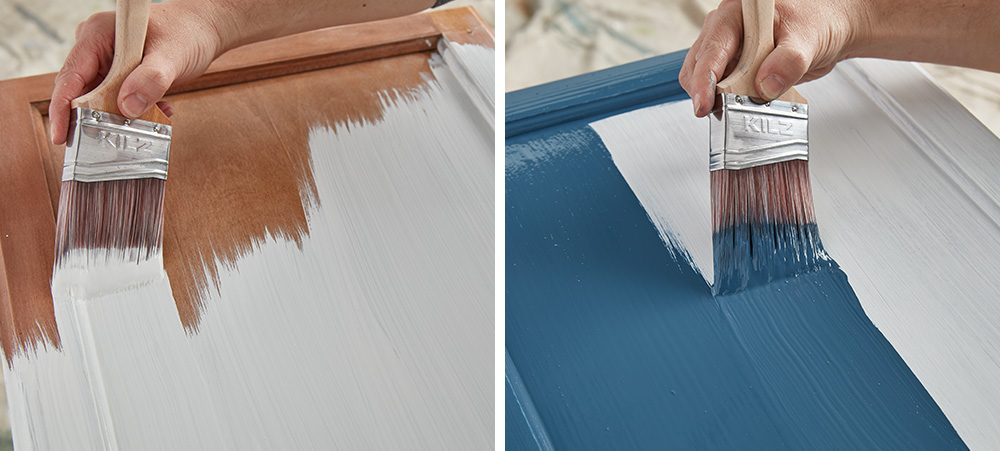
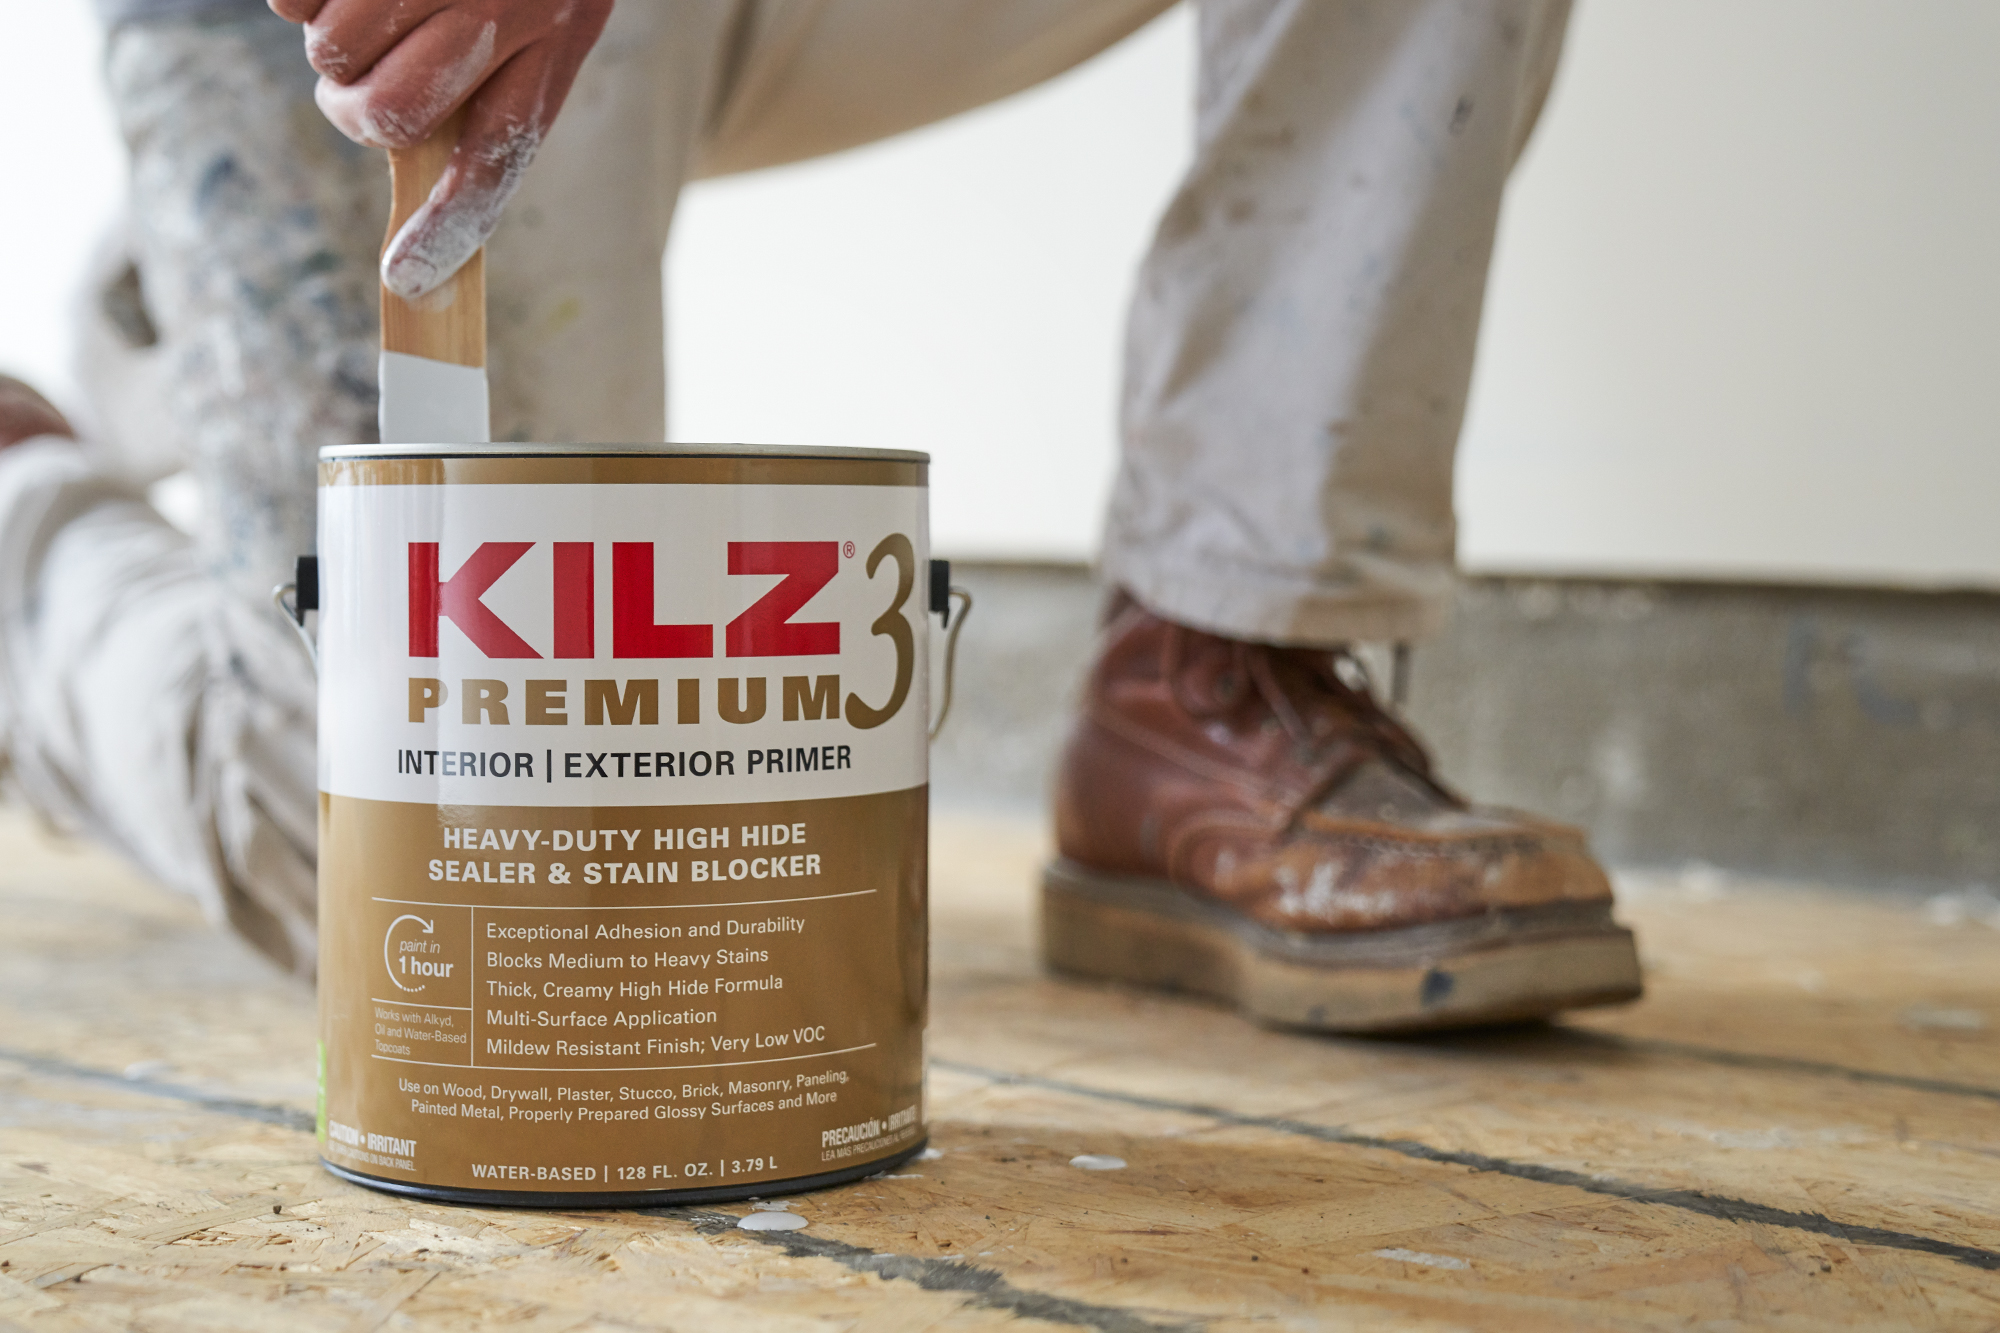
Selecting the right primer for kitchen cabinet refinishing is critical. The primer helps assure the top-coat of paint adheres to the cabinet, provides durability and helps assure the final finish flows evenly with minimal brush strokes or roller marks.
KILZ 3® PREMIUM Primer is an excellent choice for this part of the project. The primer provides exceptional adhesion with a mildew-resistant finish, making it ideal for projects in moisture prone areas such as kitchens and bathrooms. I also like that KILZ 3 is what’s known as a “high build” finish. This means that it can fill in minor imperfections in a cabinet surface or minimize deep wood grain patterns when painting oak cabinets, for example. KILZ 3 is also water-based for easy clean-up, dries quickly, and has a low-odor, low-VOC finish.
KILZ 3 should be applied evenly using a brush, roller, or airless sprayer, as specified by the manufacturer. Only a single coat is needed. Set up a space to layout the doors and drawers for priming, and then prime the cabinets working from the top-down.
Top-Coat Counts
Just like primer selection is based on the product’s adhesion, moisture resistance and high-build formulation, equal care should be given to the selection of paint for the top coat. Over the course of your newly painted cabinet’s life cycle, doors and drawers will be opened and closed thousands of times. Moisture in the air will be a constant presence, as will oils and grease given off by years of cooking. Therefore, you’ll want to select a paint that has excellent durability and is very easy to clean.
Look for paints made specifically for kitchen cabinets. Magnolia Home by Joanna Gaines® Trim, Door + Cabinetry Paint dries quickly, leaving a hard finish that’s remarkably durable and it is water-based for easy cleanup. For most projects, plan to apply two-coats and follow the manufacturer’s directions for application.
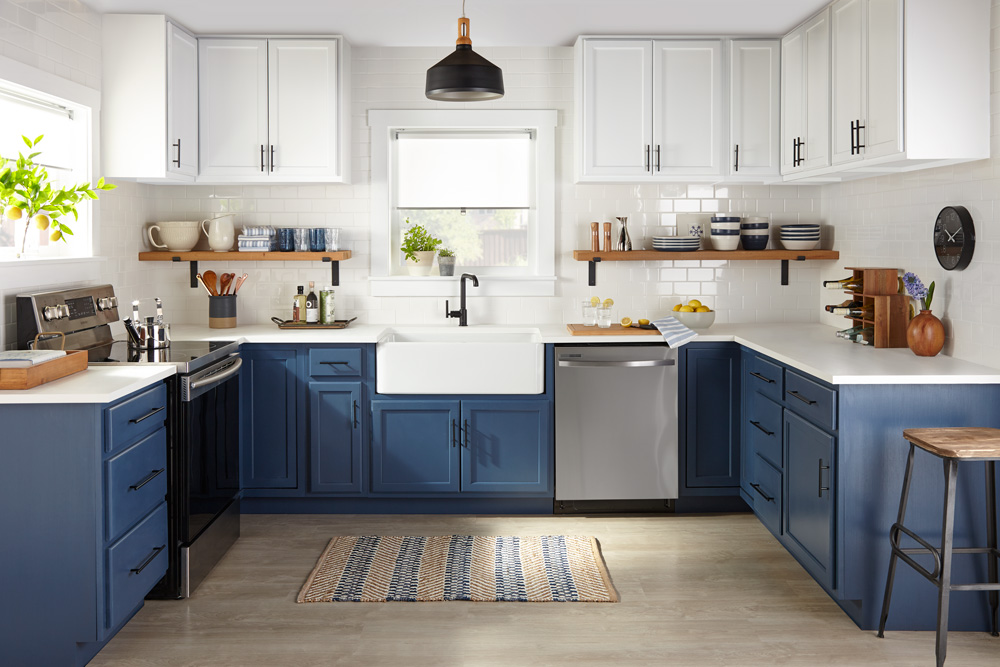
Add Some Bling
Once the painting is complete, you’ll have the option to replace the original hardware or add new. Given the work it’s taken to get to this point in your kitchen cabinet refinishing project, installing new door and drawer pulls adds some bling and provides a nice finishing touch.
This part of the project is easiest if the new hardware fits the holes left by the original hardware. However, if you plan to go in a completely new direction, it’s easy enough to fill and sand the old holes before you get to the priming step above. Personally, I also like to replace the hinges as well. New spring-loaded hinges look good and close nicely. Finally, install bumpers to the drawers and doors for added durability.
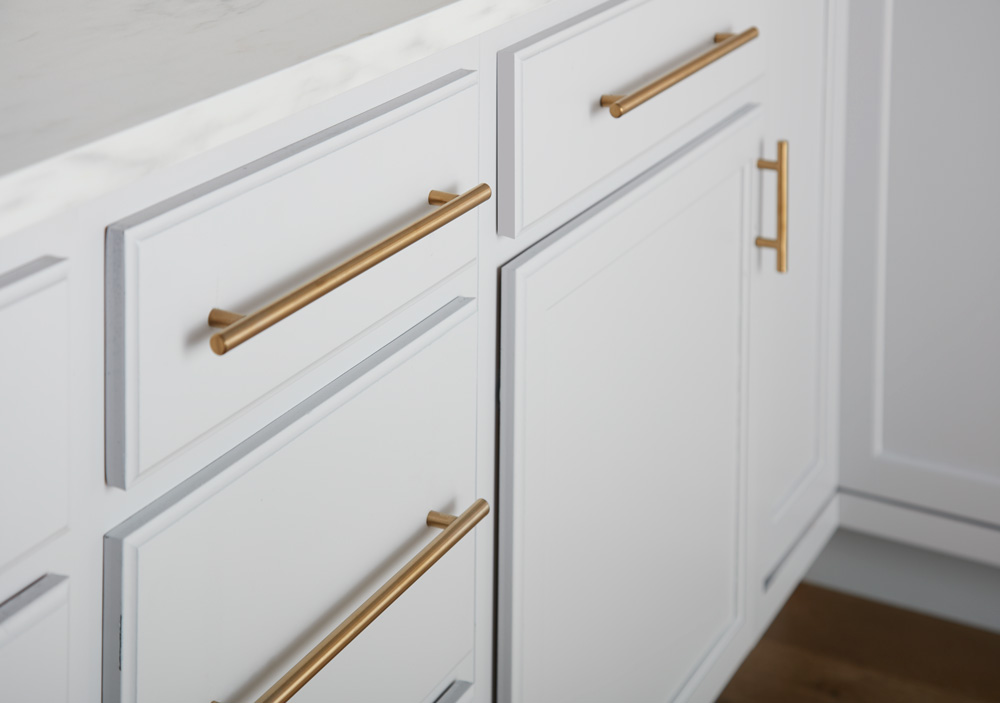
Today, solid-color kitchen cabinets are more popular than ever making this an ideal time to take on a kitchen cabinet refinishing project. But the success of refinishing kitchen cabinets depends entirely on the details. With the right prep work, a high-quality primer, and a colorful, durable top coat, you can transform this space with a fresh finish that can last for years to come.
Always remember to refer to our website kilz.com or product back labels for additional information on which primer is right for your project and detailed instructions on how to apply our products.
RELATED ARTICLES
get inspired:
FOLLOw us:
@kilzbrand
SHOP
PRODUCTS
Pro Spotlight: Ryka Builders
June 21, 2021 This month on The Perfect Finish we’re spotlighting Ryan from Ryka Builders. A veteran contractor with experience in both commercial and residential construction, Ryan recently completed a bathroom remodel with the help of KILZ® Mold & Mildew Primer and we are excited to share it here. Read on to hear from Ryan on why he chose KILZ primer for this job and get a glimpse into how he completed this stunning remodel.
Upscale Your Throne Room
By: Ryan, Ryka Builders
In this day and age, between social media, magazines, and television, beautiful home renovations are everywhere to be seen! The magnificent end results are truly inspiring, however there are proper steps that need to take place in order to get these reno jobs done efficiently and effectively. One of these important steps is the use of primer – KILZ® brand has multi-surface and specially engineered primers suited to take on any type of issue and best prepare surfaces before painting. Whether you’re a DIY’er or are planning to hire a contractor, you must be sure that the right steps are taken to keep your newly renovated home looking great for years to come.
I’m Ryan with Ryka Builders, and I’m a licensed general contractor with over 30 years of experience. Ryka Builders is a family-owned business that has been developing close, trustworthy relationships with our commercial and residential clients for many years. We are passionate about our jobs and care that they are done to the upmost standards. If you are looking to update your bathroom, I’m here to help share the proper steps and to make sure you have a quality finished product.
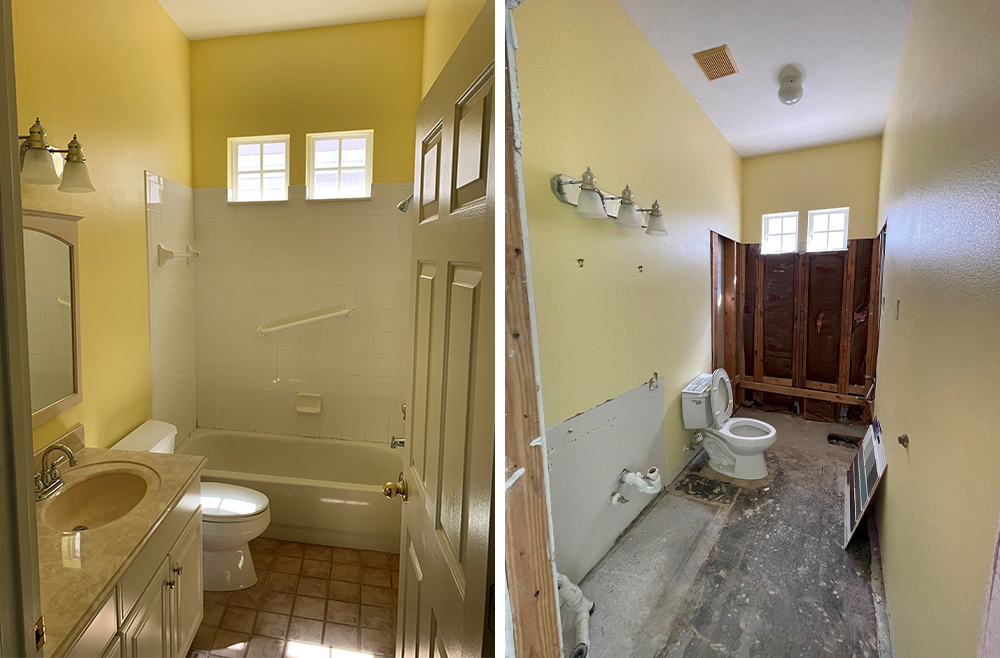
A recent client of ours bought a house sight unseen in Florida while residing in New York. She researched contractors in the Central Florida area and was impressed with our reviews and referrals from previous customers. After a video call with the owner, we were able to provide design guidance and expertise to help the client achieve her dream home makeover, and she awarded us the opportunity to do some major renovations on her entire home including this bathroom.
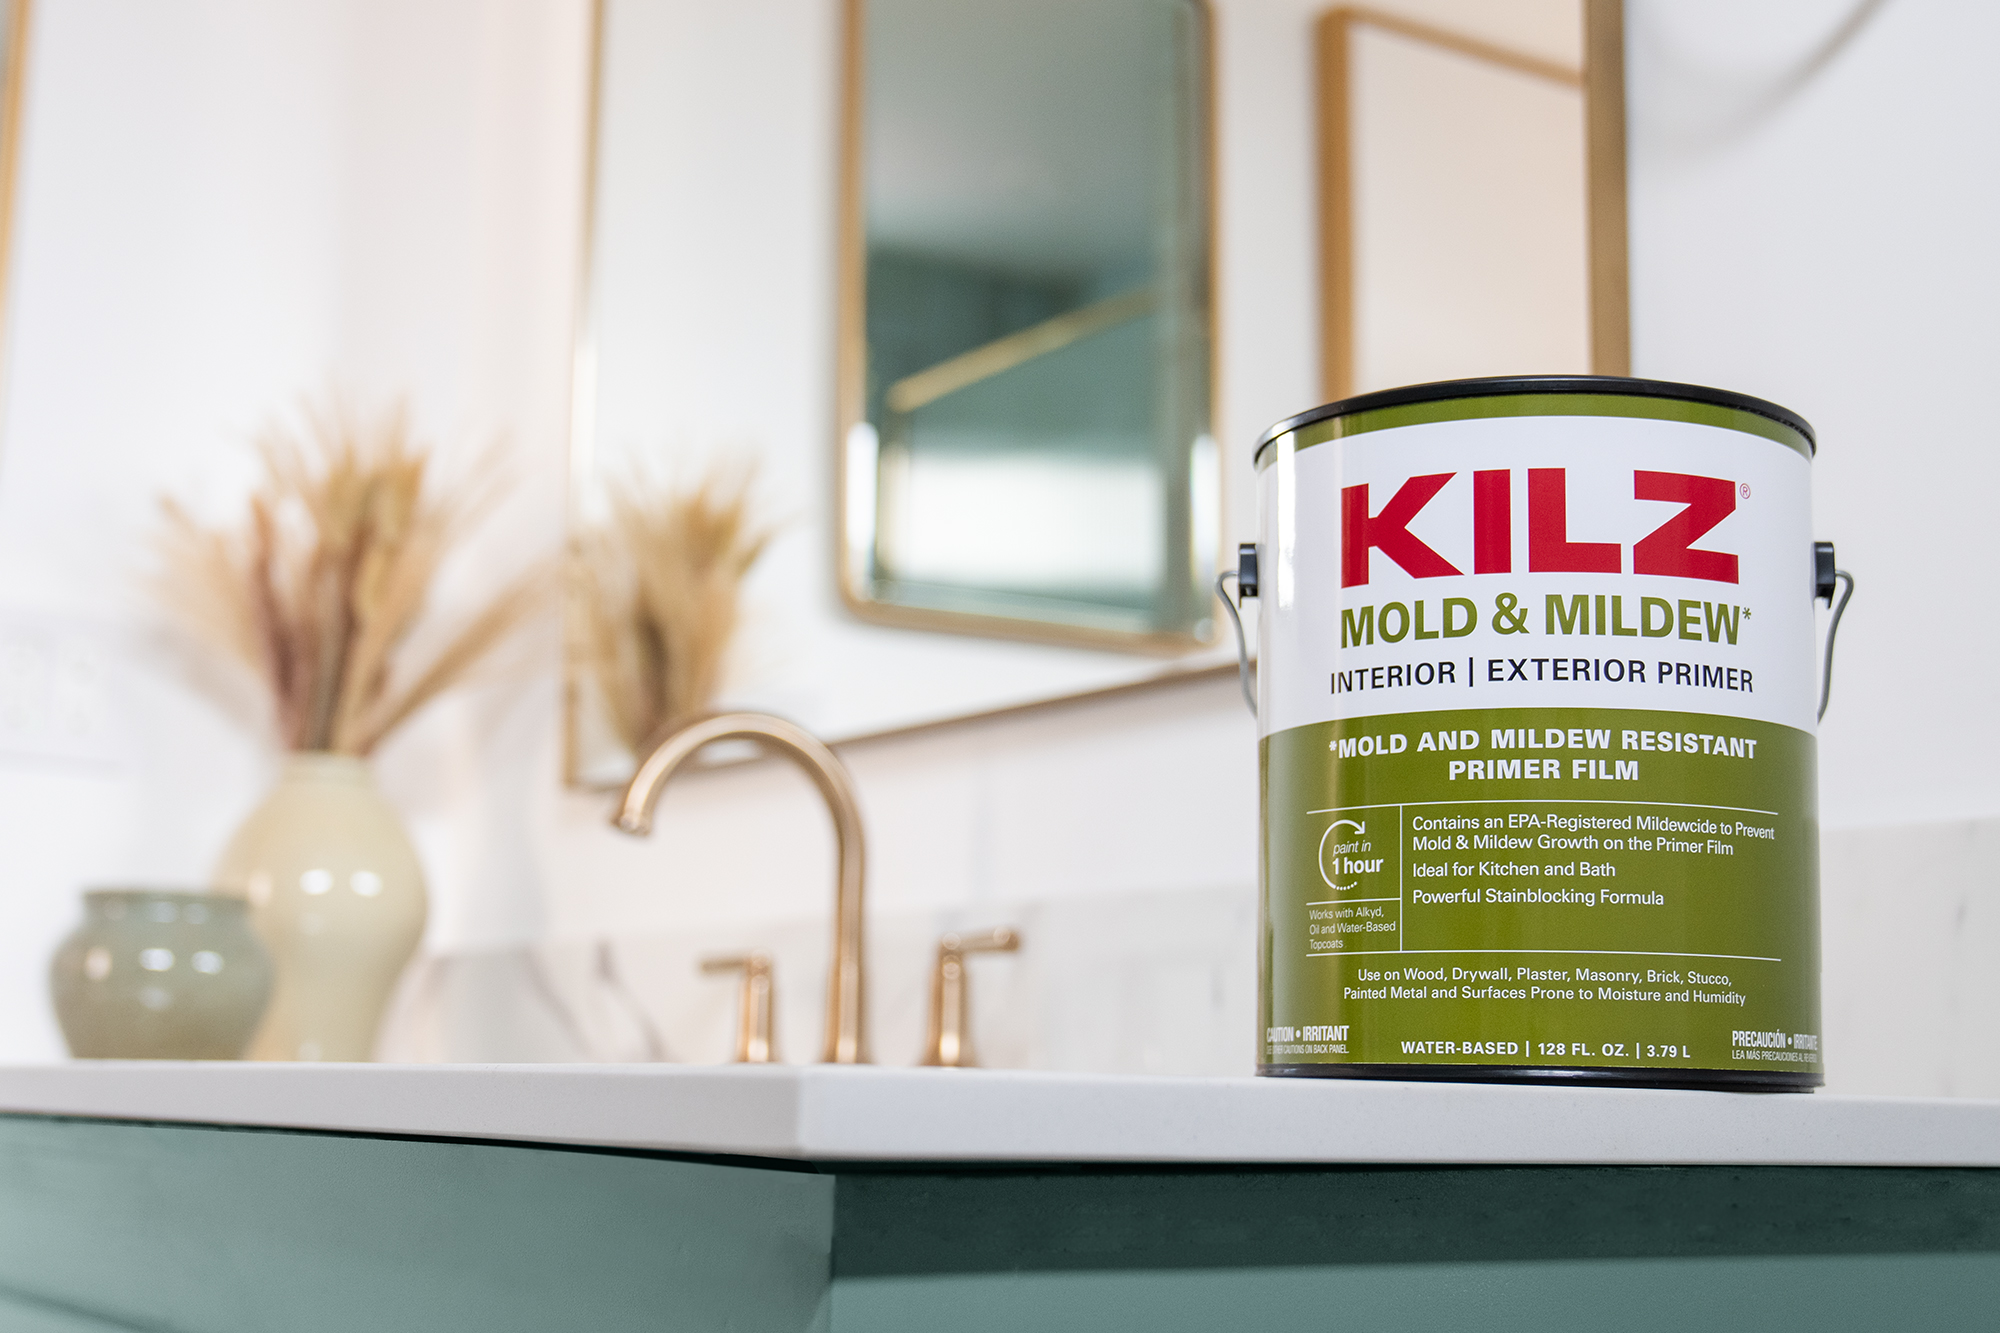
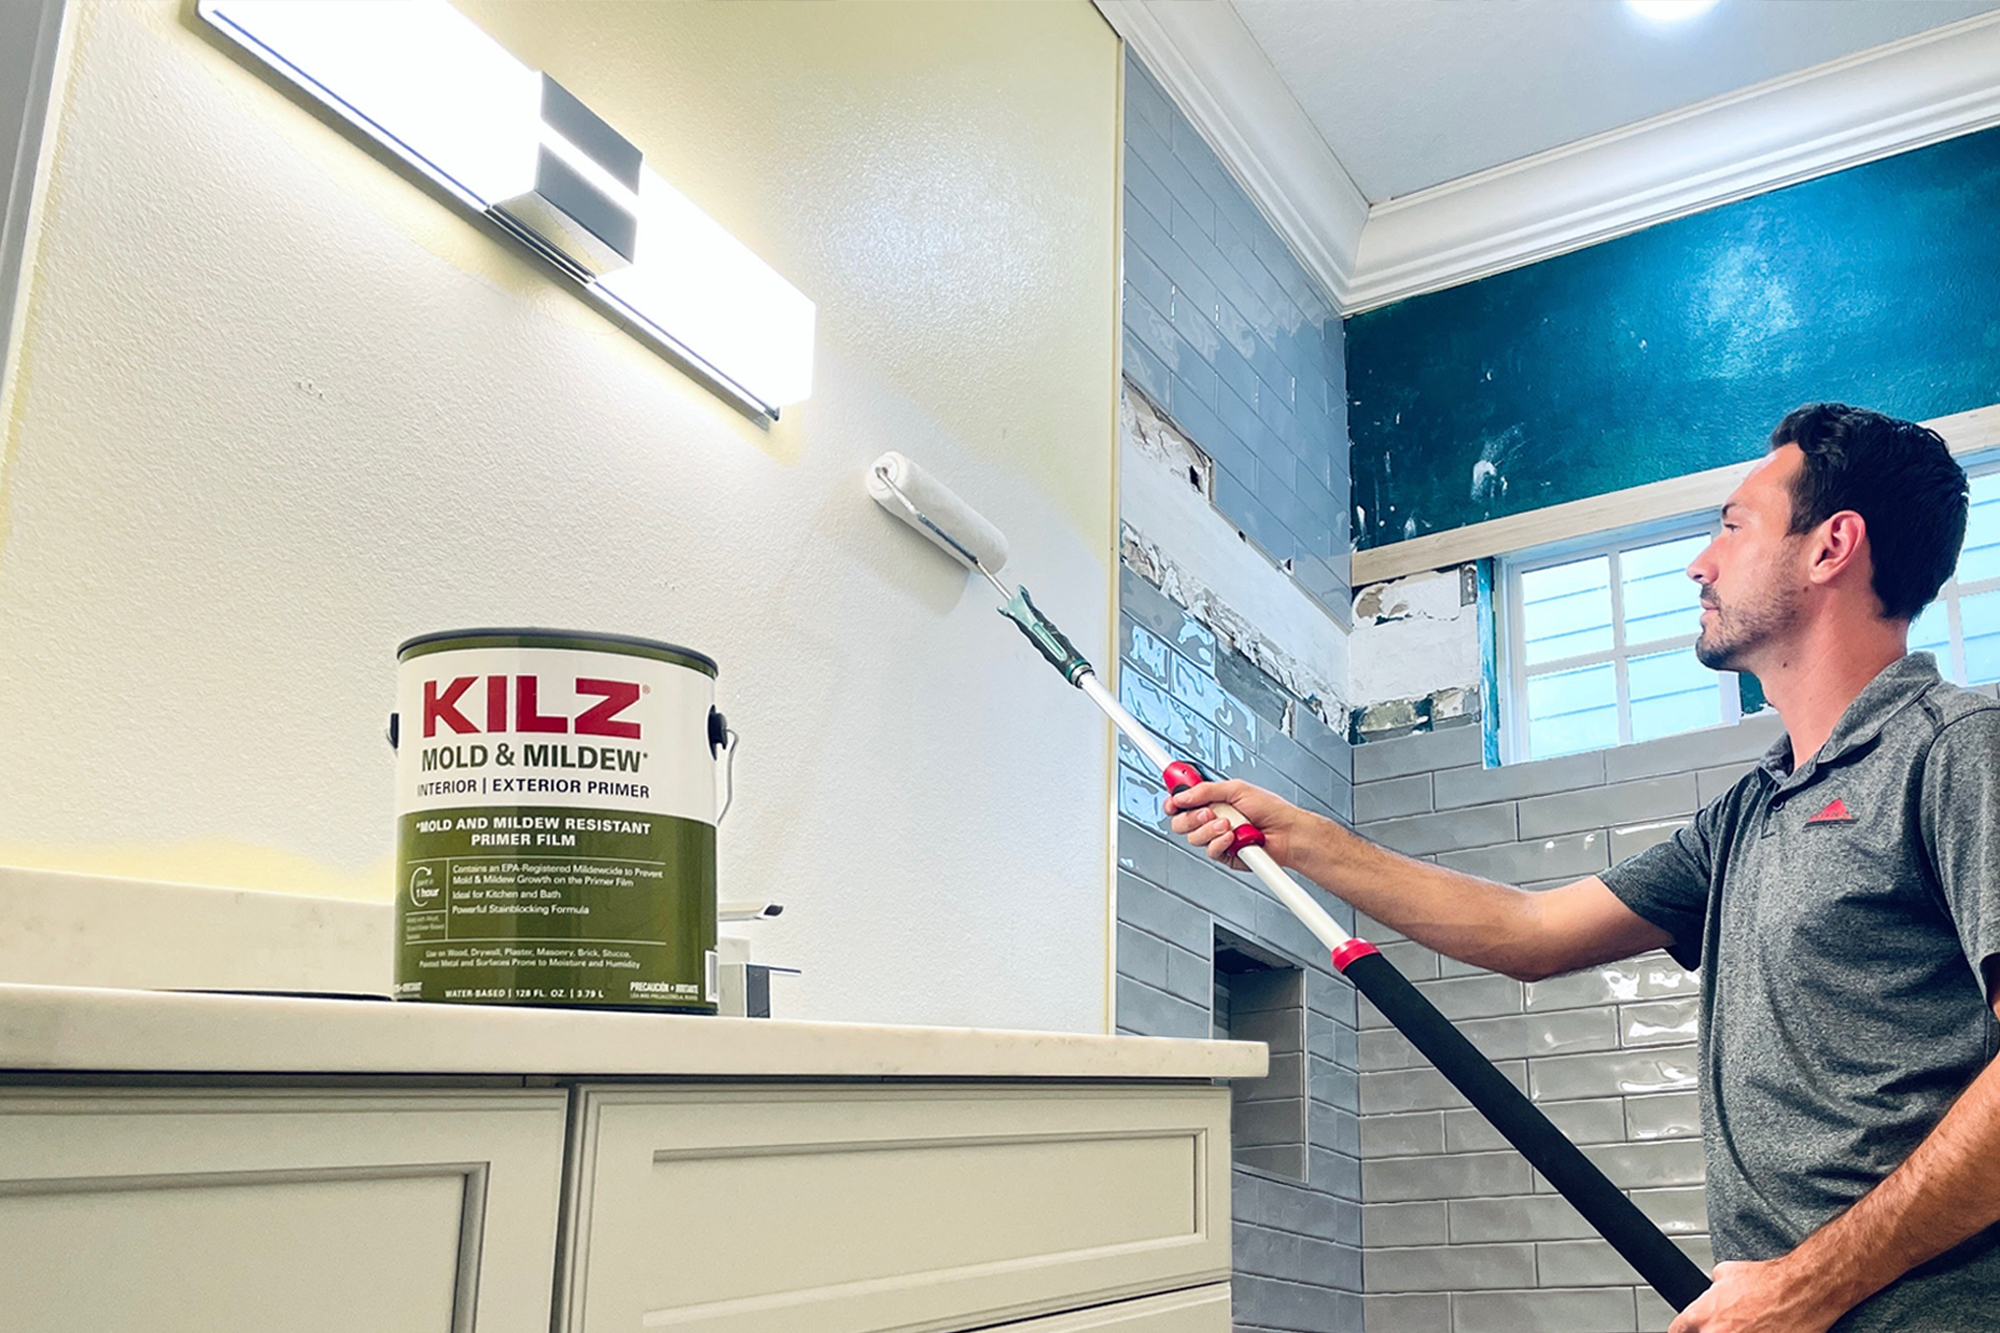
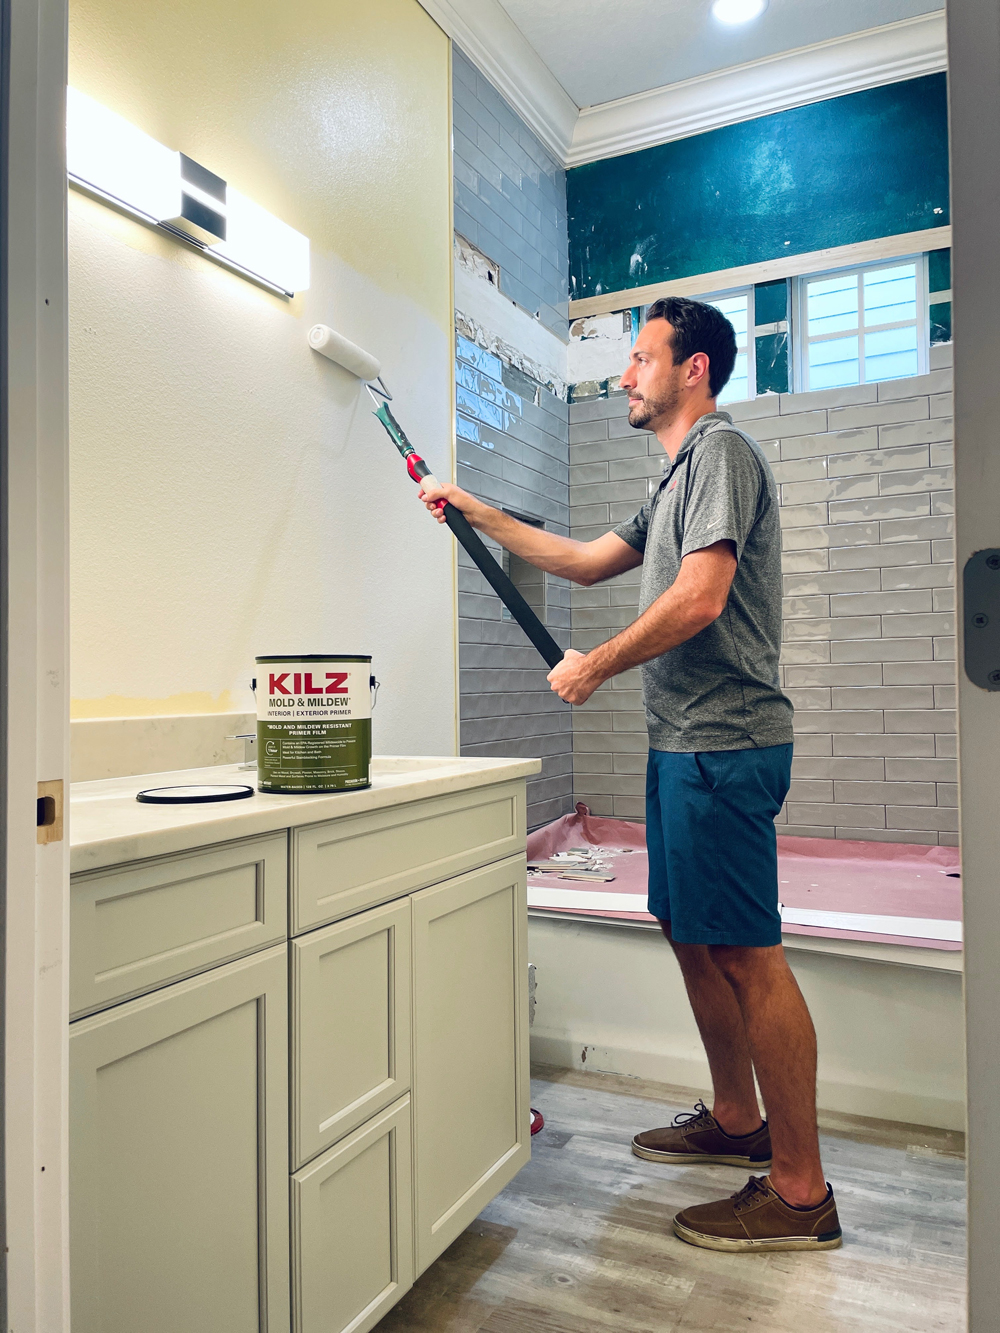
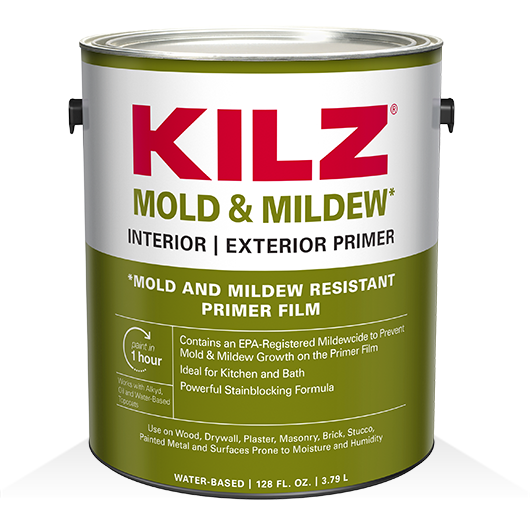
Once we started demolition, we discovered a great deal of mold present on the drywall, behind the old cabinets and on the baseboards. We knew right away that a mold and mildew remediation was a necessity; safety first. We brought in our licensed remediation specialist to do the necessary repairs. It is critical that whenever there is any sign of mold or mildew, it is always effectively removed from the surface and that the water damage that caused the mold or mildew damage is appropriately remediated as well. After this step was taken care of, we decided to go in and apply KILZ® Mold & Mildew Interior & Exterior Primer. This primer contains an EPA-Registered Mildewcide to prevent mold and mildew growth on the primer film, ideal for spaces like bathrooms and kitchens.
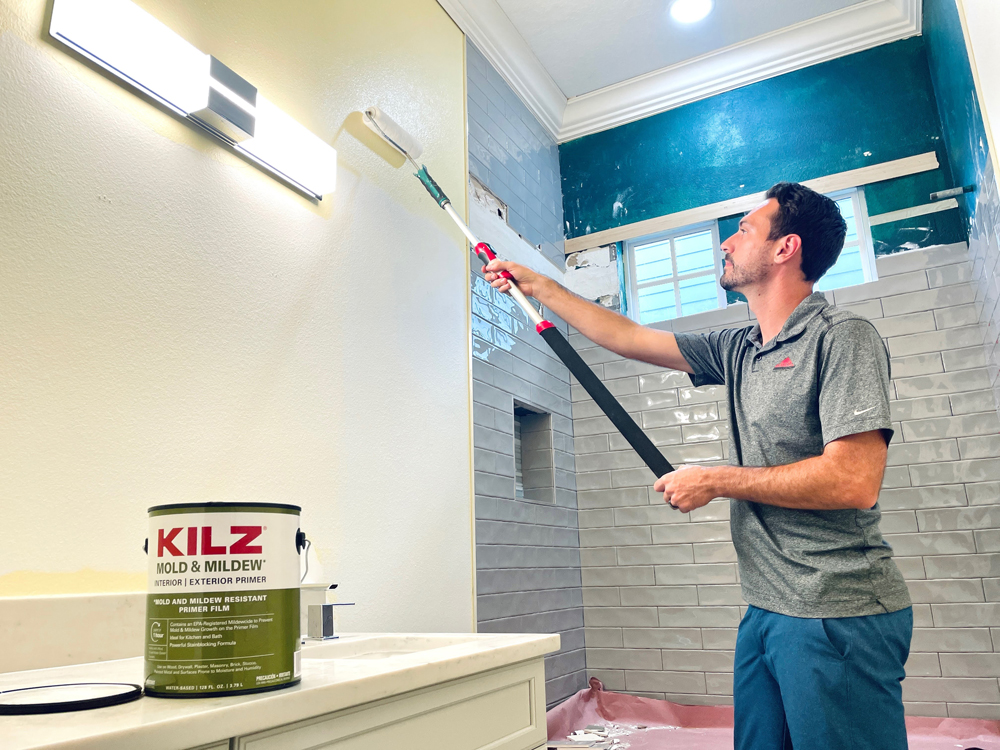
Using KILZ Mold & Mildew primer on all of the new drywall, as well as affected areas on the studs in the bathroom, sets a great base to start any bathroom remodel. For a bathroom paint project, not all primers are appropriate for the moisture and humidity that occur daily in this type of space. Bathrooms can be a breeding ground for mildew, if the proper products aren’t used. As a bonus, this amazing product also has a fast-drying agent with low odor, a very low VOC and has a water-based formula, making clean up a breeze with just soap and water. One of the many positive advantages of KILZ Mold & Mildew primer is that it is a water-based primer-sealer-stain blocker specifically designed for residential surfaces in high humidity, moisture and temperature environments such as bathrooms, powder rooms, kitchens and laundry rooms.
“KILZ primer products have been around for more than 40 years and is a brand we trust. We always look to them for products, because we know they have been tested and built for the challenges we come across in the industry.”
We also used KILZ Mold & Mildew primer on the ceiling of the bathroom where there was an old water stain from a previous roof leak that was repaired. The stain blocking agent in the primer worked wonders. With only one coat, the stain was eliminated. In fact, KILZ Mold & Mildew primer will also block medium to heavy stains such as felt marker, grease, ink, pencil and tannin as well. KILZ primer products have been around for more than 40 years and is a brand we trust. We always look to them for products, because we know they have been tested and built for the challenges we come across in the industry.
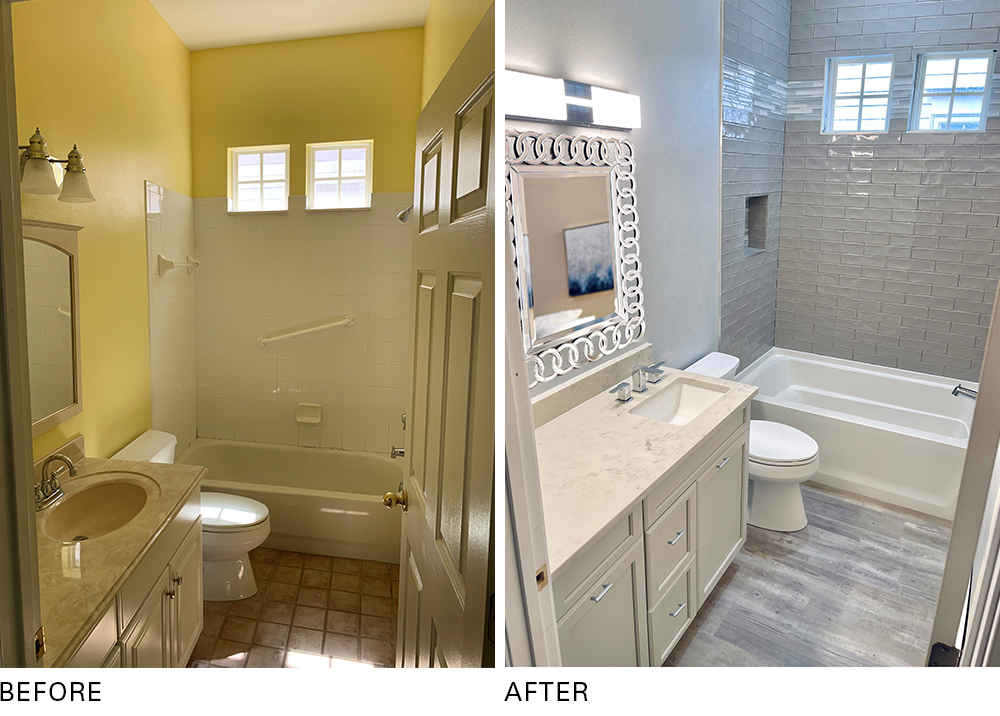 After we are confident that we have a great foundation and clean slate with the KILZ products, it’s time for the fun part – selecting tile, paint colors, hardware and plumbing fixtures, so that the client can see their vision come to life. Our client chose a very simple and sleek grey subway tile for the tub area and a beautiful complimenting shaker style vanity with chrome finishes and fixtures. For the walls, we went with a very appealing grey paint color (Silver Bullet N520-2 by BEHR®). For the flooring, the client decided on a waterproof, wood plank look, luxury vinyl that we used throughout the rest of the home as well.
Our client loves the end result, and this bathroom is ready to be made homey with plush towels and her favorite scented candles and possibly a cute little Pinterest-y bathroom sign. In the end, we’re confident that she will love it for years to come, because we took zero shortcuts to make this bathroom a success.
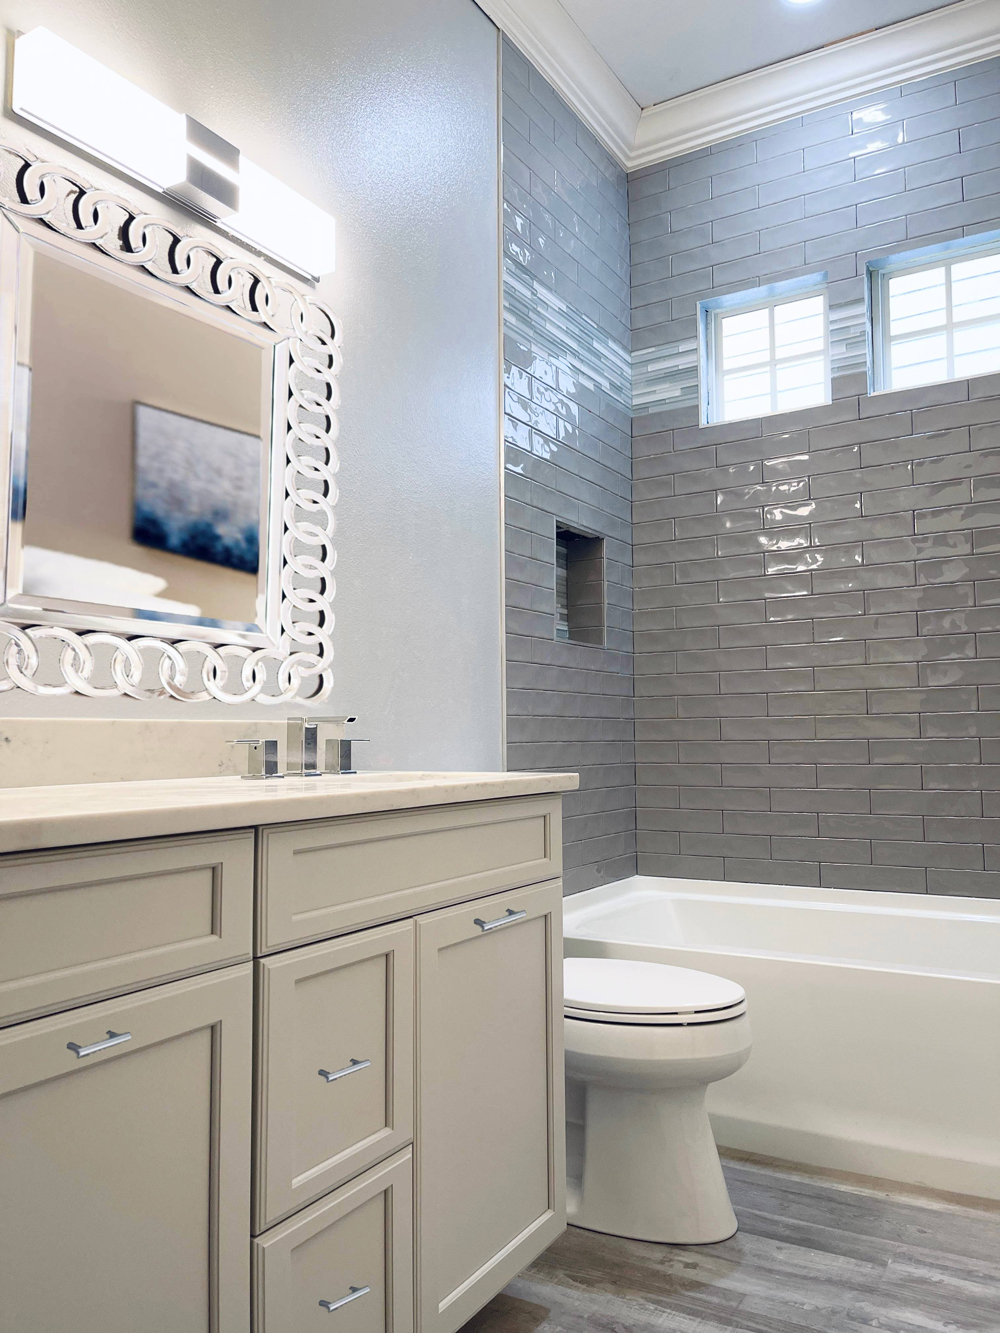
As you can see the finished product came out just how we wanted, and we feel good knowing that we took the additional steps to provide a better built product for our client. Many contractors just try to get through the job quickly, however, we know that if we exceed our client’s expectations and provide additional customer service and quality control elements, we will build strong and lasting relationships. This has helped us grow our business over the last 30+ years with many returning customers and strong referrals. A big thanks to KILZ for helping us get this bathroom project completed. Now, on to the next one!
Always remember to refer to our website kilz.com or product back labels for additional information on which primer is right for your project and detailed instructions on how to apply our products.
RELATED ARTICLES
get inspired:
FOLLOw us:
@kilzbrand
SHOP
PRODUCTS
Turn a Bland Bathroom into a Serene Spa
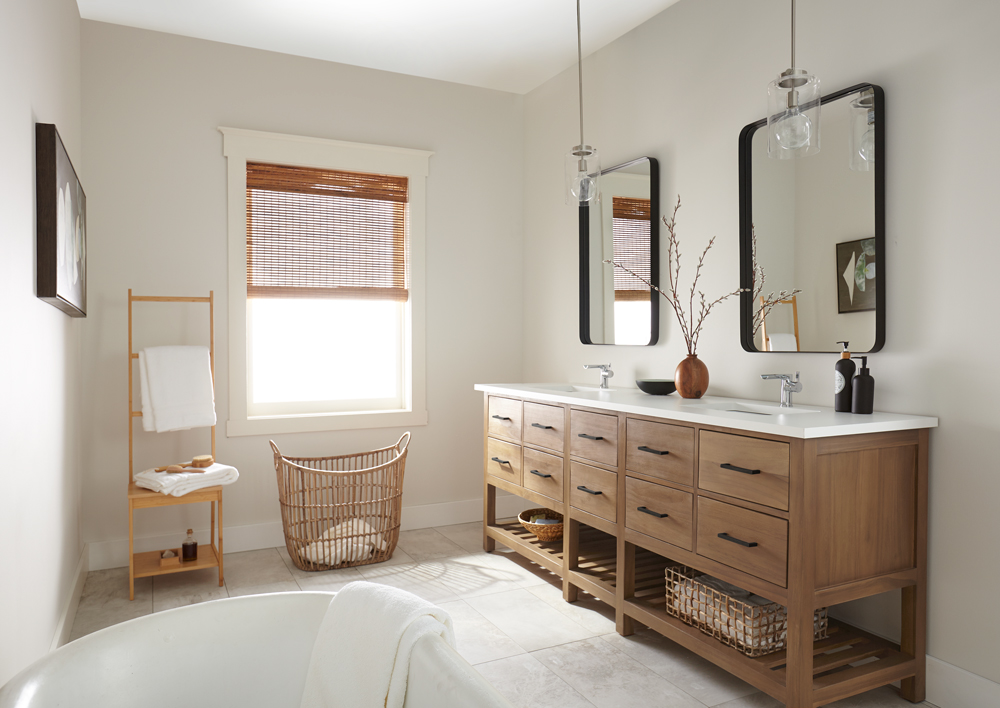
May 11, 2021Who wouldn’t love to have an elegant, relaxing spa in their own home? If you’re in need of a little extra rest and relaxation these days, we hope you’ll be inspired by this next transformation – where we took an outdated and sad-looking bathroom and transformed it into a bright and spa-like retreat. The essential first step? You guessed it, primer and a fresh coat of paint!
We decided upon a modern Scandinavian-meets-coastal theme to evoke the perfect spa setting and started with the walls, because color is the single component that makes the biggest impact in one’s perception of a room. The right colors can relax the mind while stimulating the senses, and that’s what we were aiming for — the sensation of being relaxed and refreshed, exactly the way you should feel after a spa treatment.
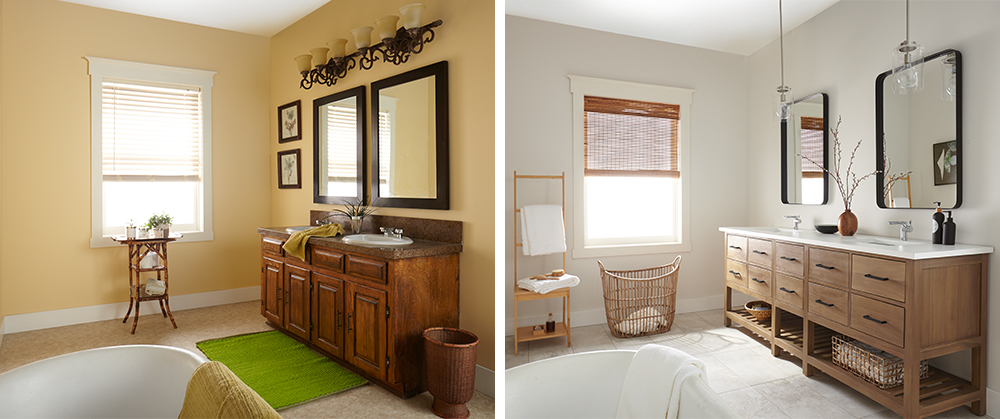
The first step was a coat of quality primer. Our choice, KILZ® Mold & Mildew Primer, has an EPA registered active ingredient that creates a mold and mildew-resistant film that protects the primer film from mold and mildew growth. KILZ Mold & Mildew Primer also provides complete coverage that hides old paint, ensuring the previous butter yellow paint color would be a thing of the past. In addition, it helps the new paint adhere beautifully, so your paintbrush or roller will glide with ease.
After the primer dried it was time for the topcoat paint. We opted for a classic – Magnolia Home by Joanna Gaines® paint in Shiplap, which is a creamy weathered white. There’s not a hint of harshness in this white, with the creamy undertones softening the color throughout, even when sunlight fills the room.
We were going for a total overall in this project, so we didn’t stop at the walls. For the flooring, we replaced the outdated laminate with gleaming white marbled tiles flecked with gray. Fortunately, we were able to keep the existing bathtub, because its elongated oval contours provided an elegant counterpoint to the rest of the room.
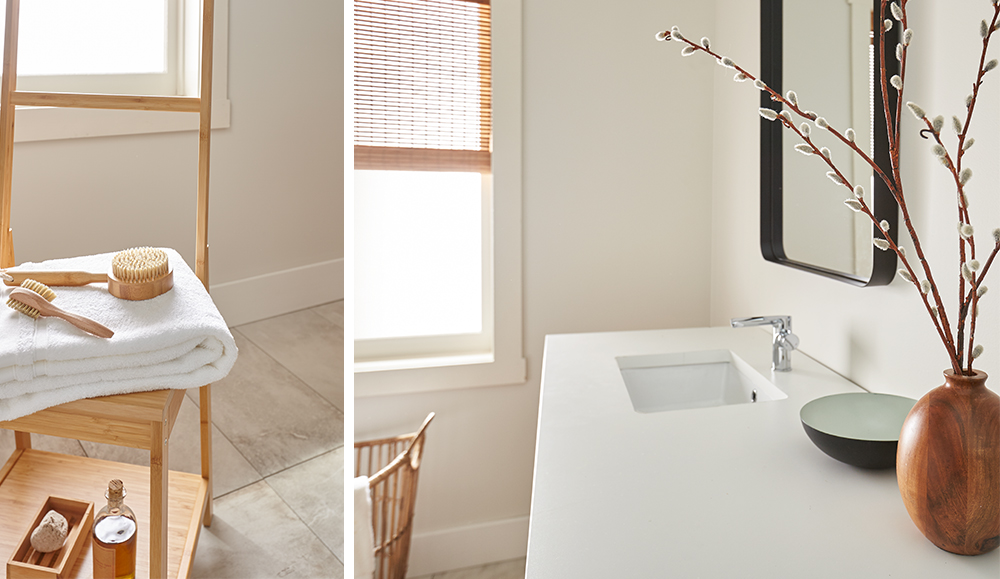
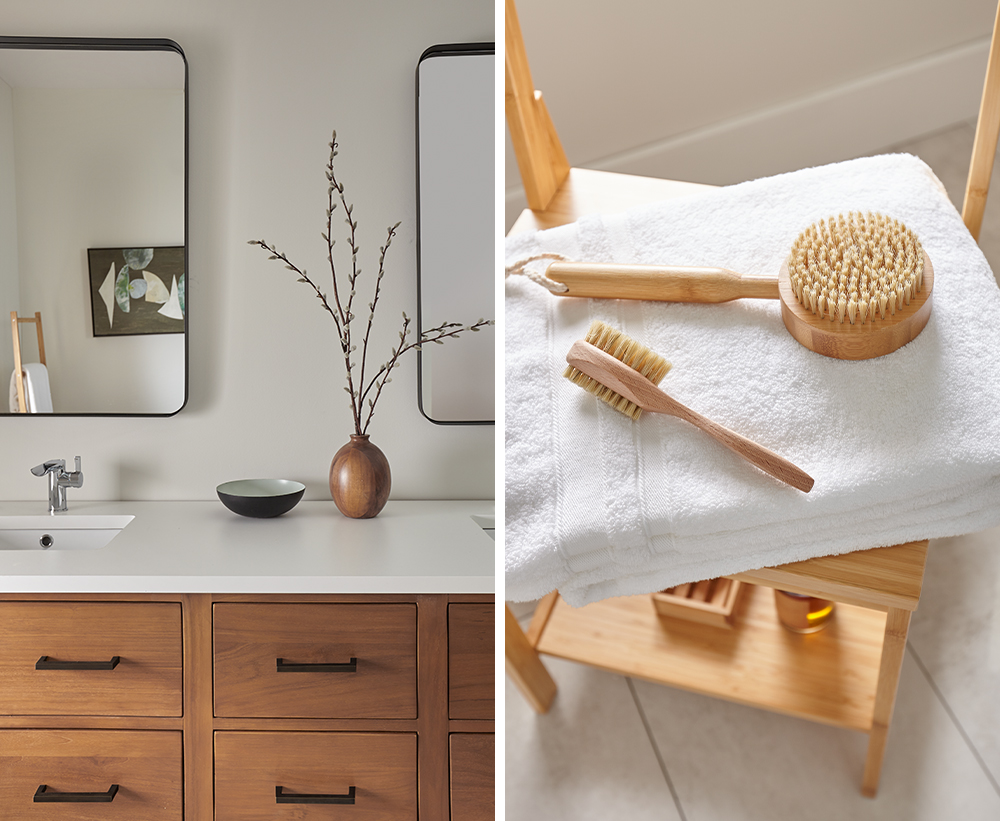
To enhance our spa look, we choose natural wood furnishings that evoked the Scandinavian theme. For the focal point, we installed a heavy farmhouse-style sink cabinet in warm natural wood with a white countertop, brushed silver faucets and brushed black drawer pulls.
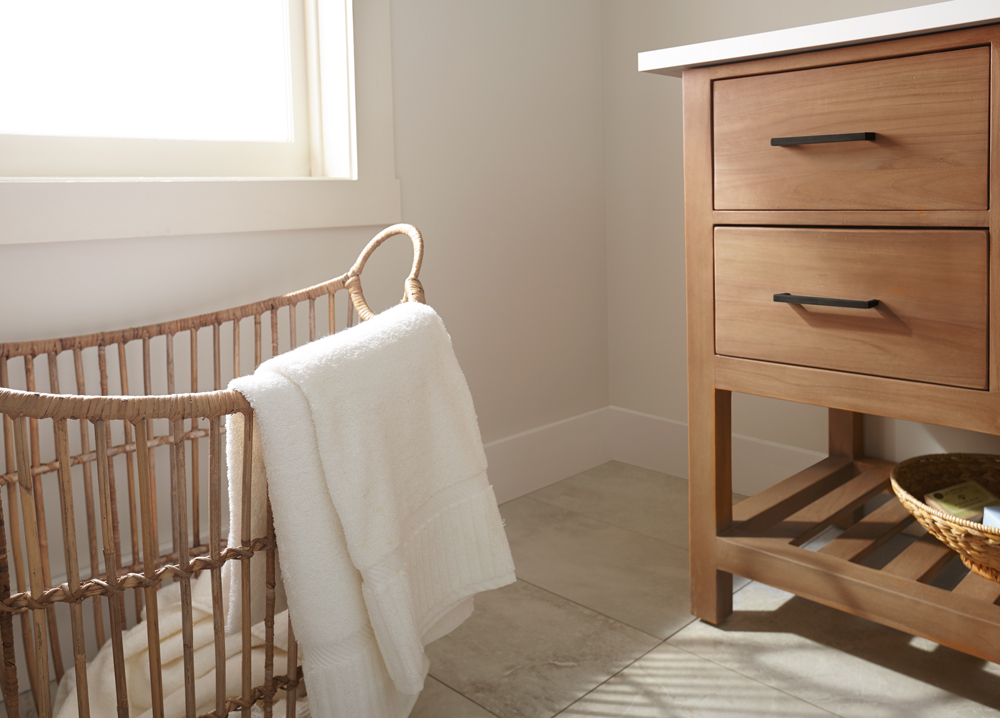
To add to the authenticity, we brought in a natural wood towel stand (complete with spa brushes) and a large seagrass laundry basket. For a touch of Danish Modern, we included a set of handsome mirrors with thin black frames and added a few modern cabinet accessories in black and gold. To complete our spa transformation, we fitted the window with a vintage-style wooden blind that filters the light beautifully and keeps it from overwhelming the room on sunny days.
As you can see from the photos, the airy, creamy white colors, combined with natural wood furnishings and matching accessories, perfectly create the look of a high-end spa, while evoking feelings of calm and relaxation. Decorative touches such as the wooden blinds and towel rack give the room a sauna-like feel, while the retro curved tub and heavy farmhouse-style cabinetry create the ambience of a luxurious bathroom in an expensive resort.
Most importantly, we managed to achieve our design scheme while also paying close attention to important essentials. In particular, we chose a high quality primer that has an EPA registered active ingredient that creates a mold and mildew-resistant film that protects the primer film from mold and mildew growth.
By starting with primer and a coat of paint, you can transform a dreary room into an interior design masterpiece. Just identify the design scheme you want to follow — vintage, retro, contemporary or eclectic — and choose the right colors to reflect the mood you are hoping to create. After that, just add a few pieces of furniture and accessories within your budget — and voila! A DIY room transformation, in sparkling colors that will raise your spirits every time you enter the room.
Always remember to refer to our website kilz.com or product back labels for additional information on which primer is right for your project and detailed instructions on how to apply our products.
RELATED ARTICLES
get inspired:
FOLLOw us:
@kilzbrand

Pro Spotlight: Nick Slavik
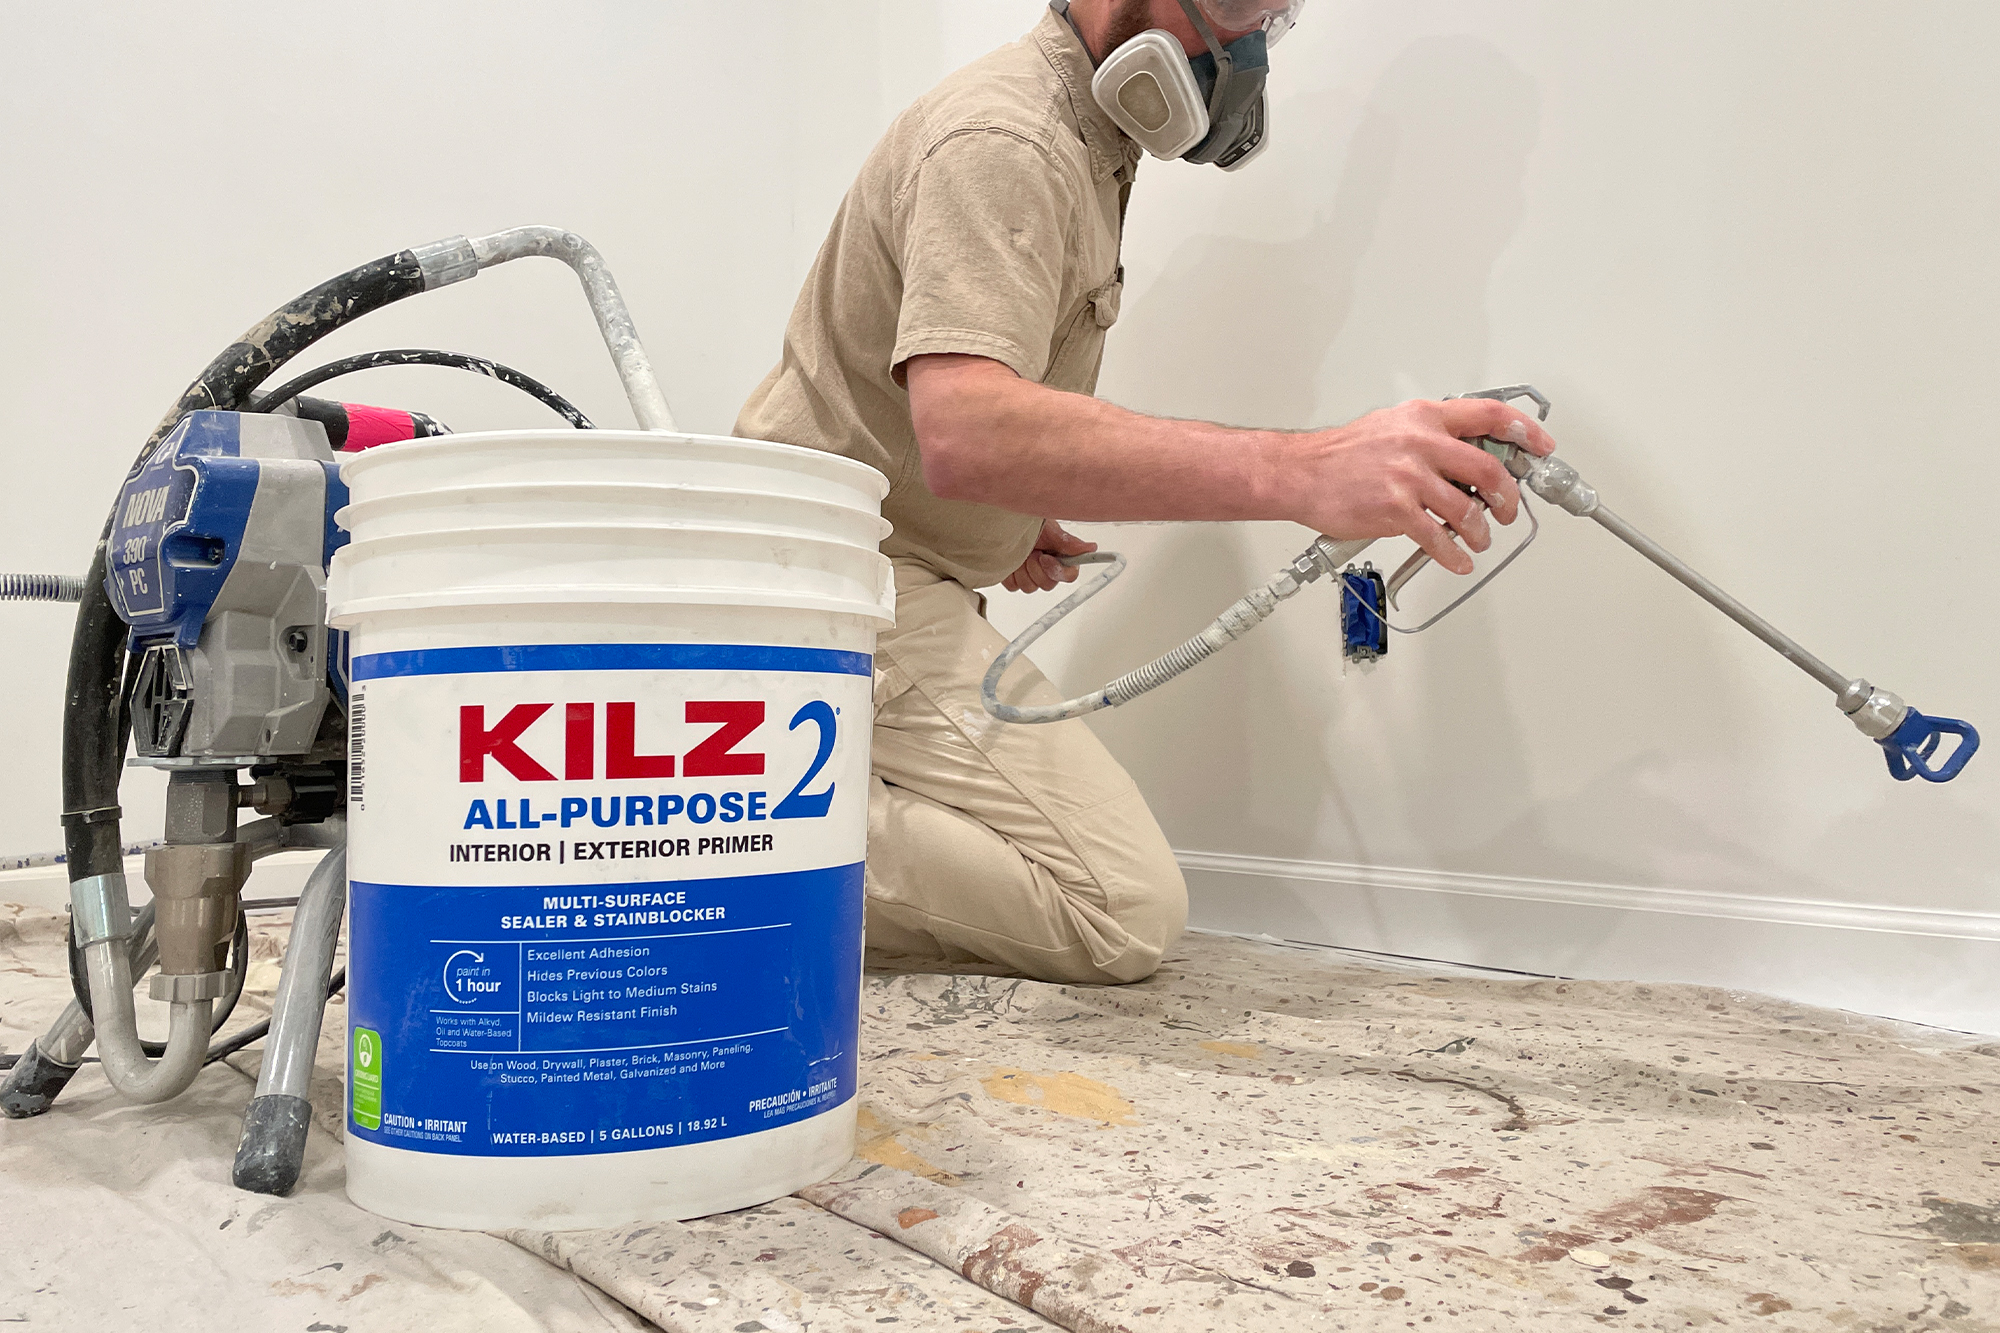
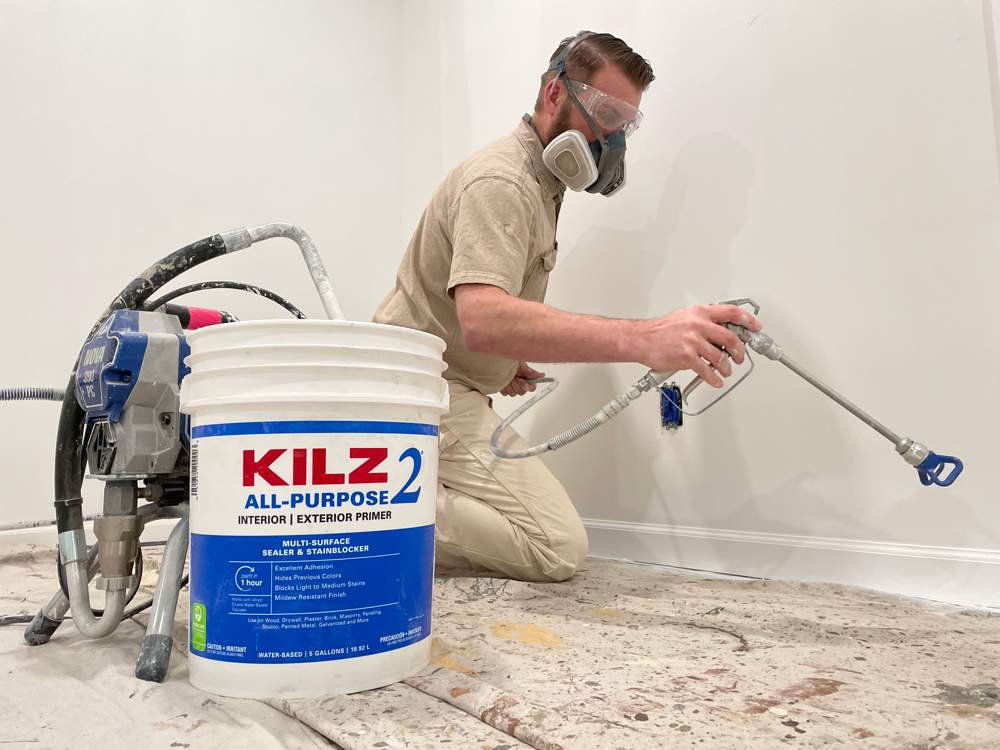
May 11, 2021KILZ® Brand products have been trusted by professional painters for over 40 years to deliver quality, long-lasting results. But you don’t have to just take our word for it! Today on The Perfect Finish, we’re excited to share a Q&A with professional painter Nick Slavik. He’s been in the business from a young age and if anyone knows about how to properly prep for and complete a paint job, it’s Nick. Born into a painting family, Nick is on a mission to improve the industry one painter at a time. His company is built on mentoring new painters with five core beliefs: Trust, Constant Improvement, Putting Forth Effort, Discipline Equals Freedom, and Quality Always Wins.
Novice painting professionals and DIYers alike, get ready to up your painting knowledge with this primer-focused interview. Let’s get rolling!

Why is KILZ your go-to primer brand?
It’s one of those things, if it doesn’t fail, keep using it. And it’s been 13 years of my own business. We just don’t stop using it. The only thing I need to think about is, “Will they have enough at the store?”
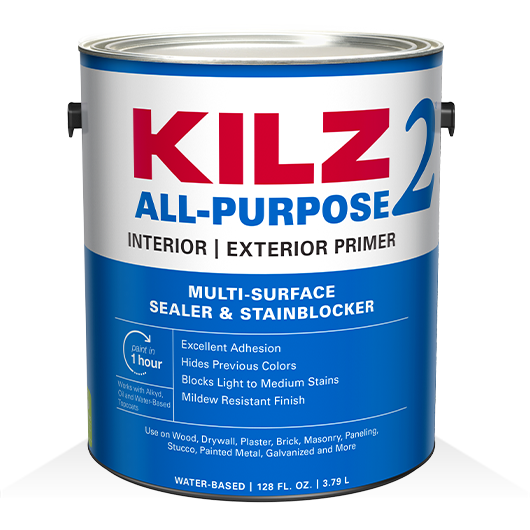
Where do you use KILZ 2® All-Purpose Primer the most?
Exterior on barns and some historic homes that are wood. It almost feels like it amalgamates the wood and goes deeper than a super heavy-bodied primer. For interiors, one of the best uses is for breaking color, going from a deep color to a light color or vice versa.
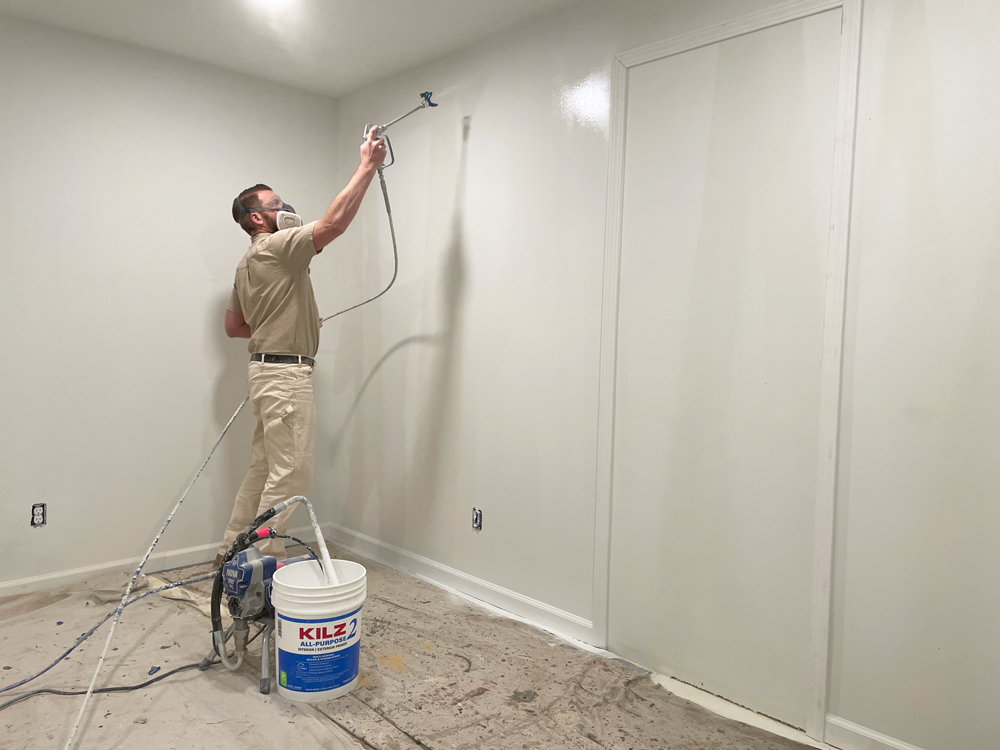
How does KILZ 2 All-Purpose Primer spray?
So, because of its consistency, very well. Honestly, I would be perfectly comfortable with buying a five-gallon bucket, putting a sprayer in it and just spraying without straining, just because the chance of it clogging is going to be very, very small. But as a standard operating procedure, we strain all our coatings before spraying anyway.
How fast or slow should you move with a sprayer?
Spraying is filled with variables that are personal preferences. Knowing that nobody is going to use a wet mil thickness gauge: don’t get a sag and make sure you cover the surface. Somewhere in there lies the truth.
What sprayer settings would you recommend for KILZ 2 All-Purpose Primer?
The two main tips that we use are sort of double tipped tips where it goes through one orifice, atomizes it, and then hits another and atomizes it again. And those are magic tips. They produce the best efficiency, the least overspray, the best finishes you’ve ever seen in your life. Everybody always asks, what pressure do you put your sprayer? And the answer is super unsatisfying, most of my sprayers don’t have a dial indicator on them, so we actually don’t know what pressure it’s at, but if you spray and you get those kinds of little tails, or arms, or feet on the outside edges, you just bump the pressure up until they come in [to the main line] and you get a nice fan. And that’s it.
*This post is a paid partnership with Nick Slavik.
Always remember to refer to our website kilz.com or product back labels for additional information on which primer is right for your project and detailed instructions on how to apply our products.
RELATED ARTICLES
get inspired:
FOLLOw us:
@kilzbrand
SHOP
PRODUCTS
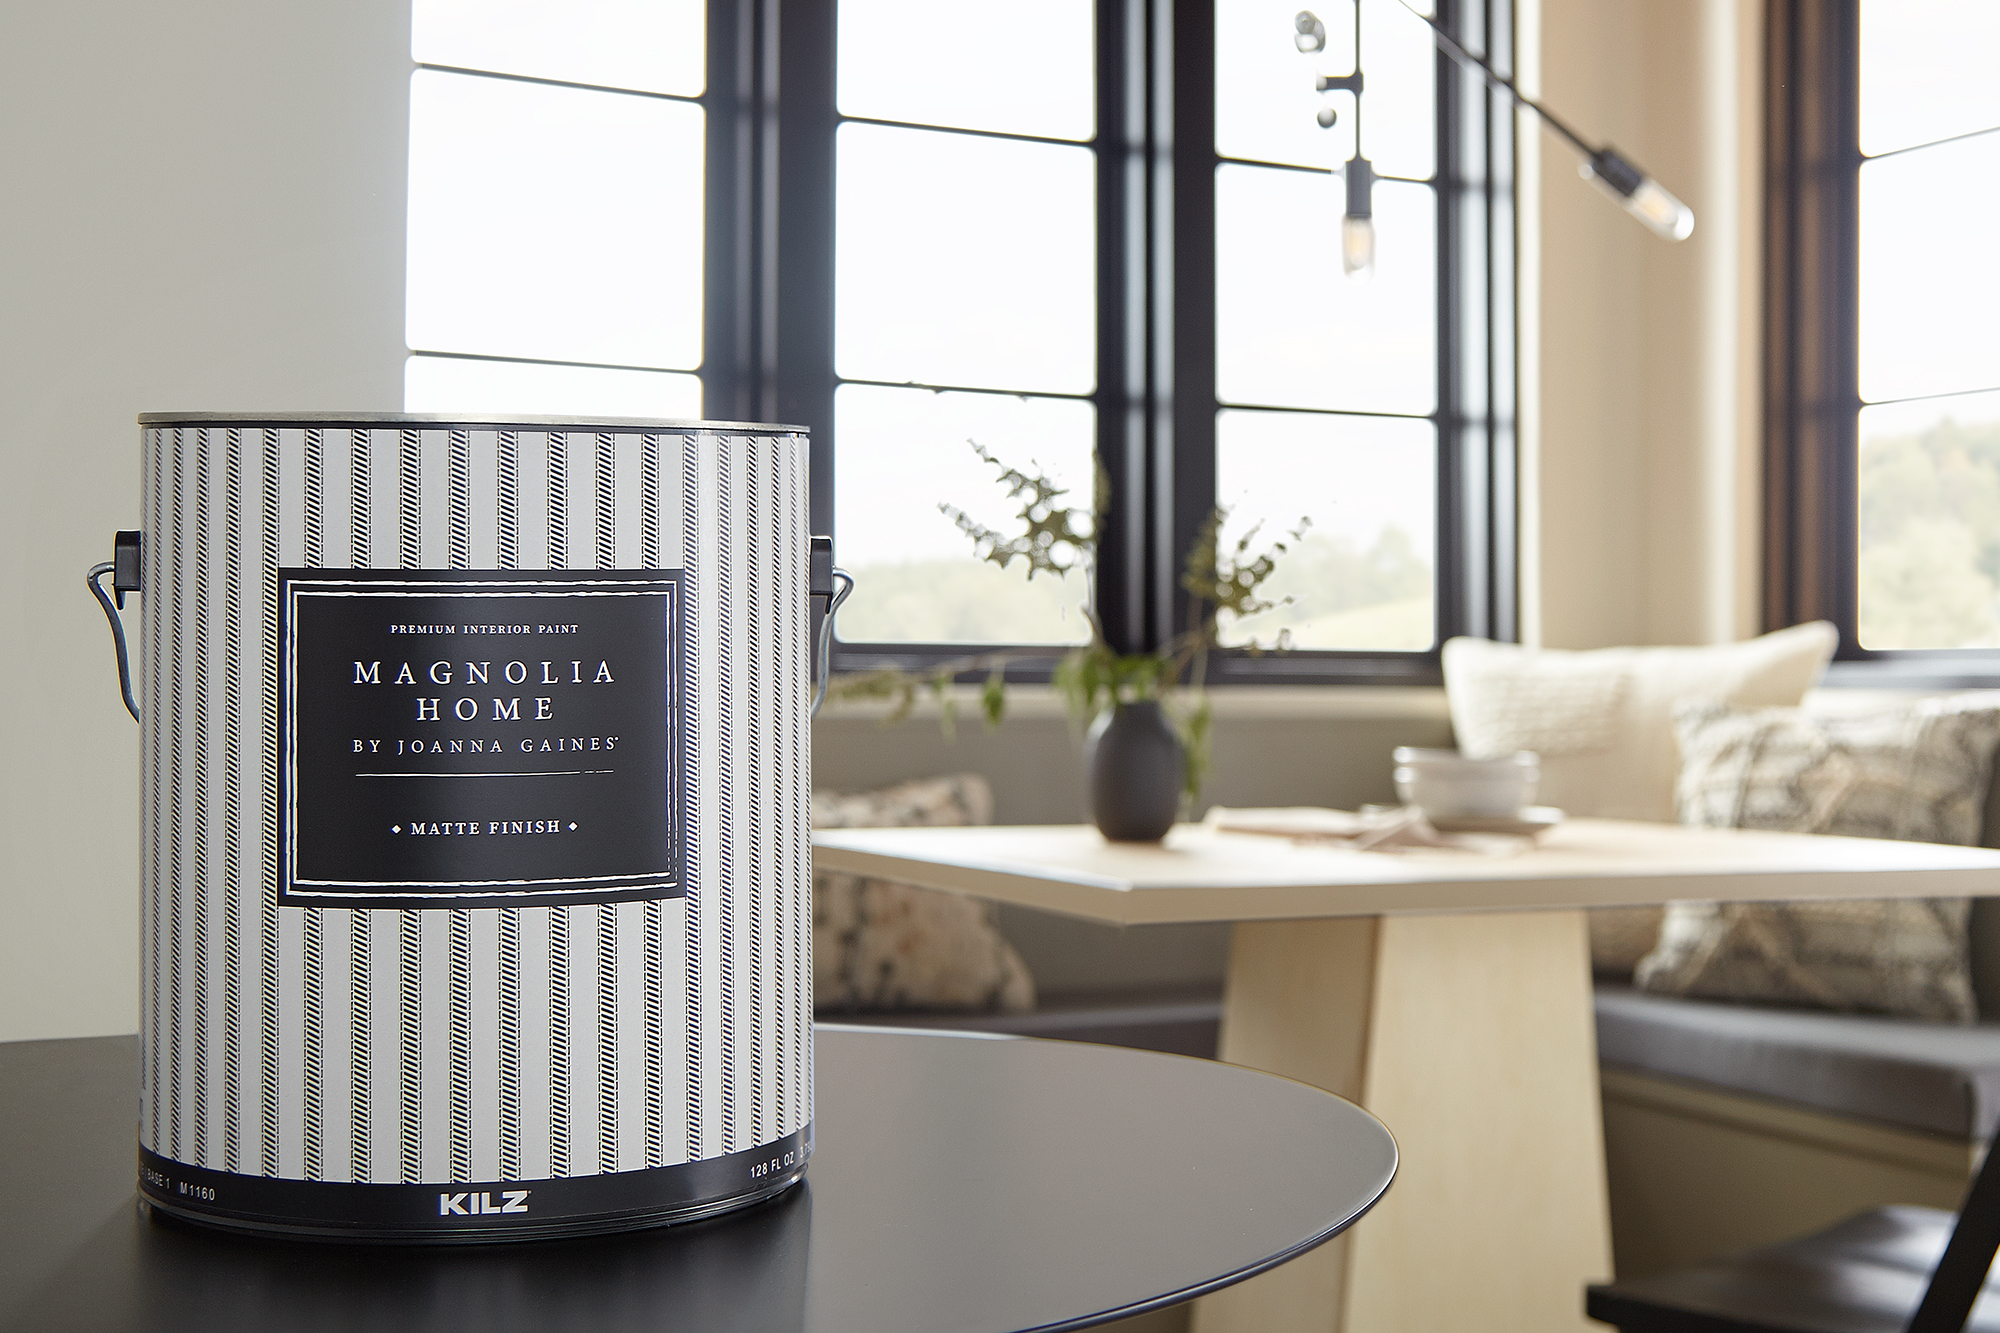
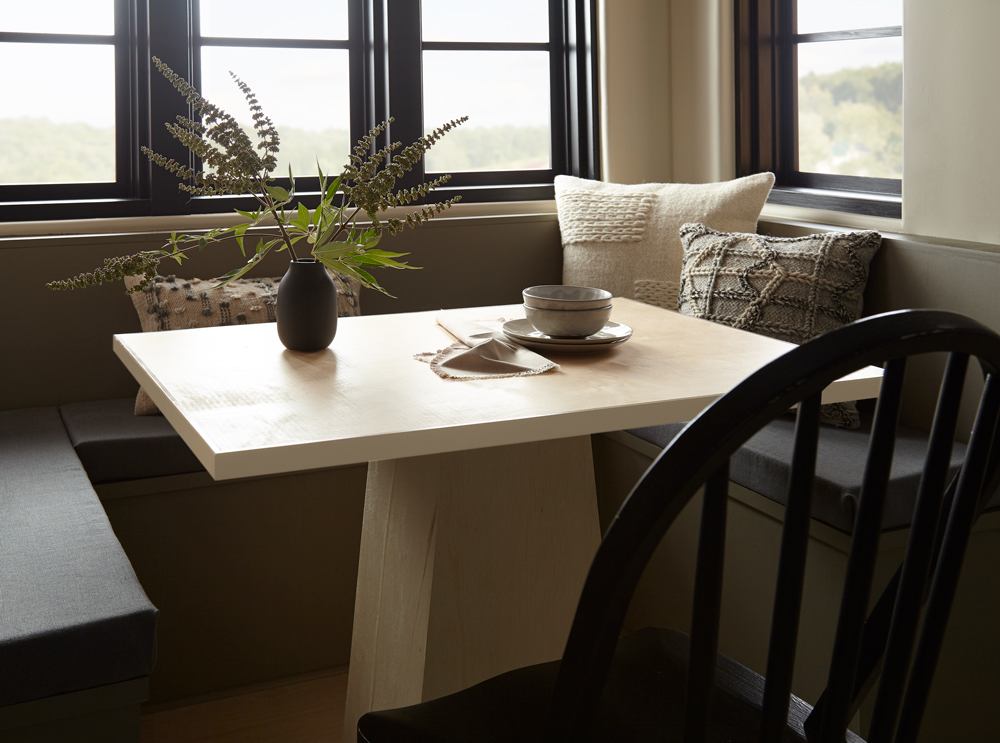
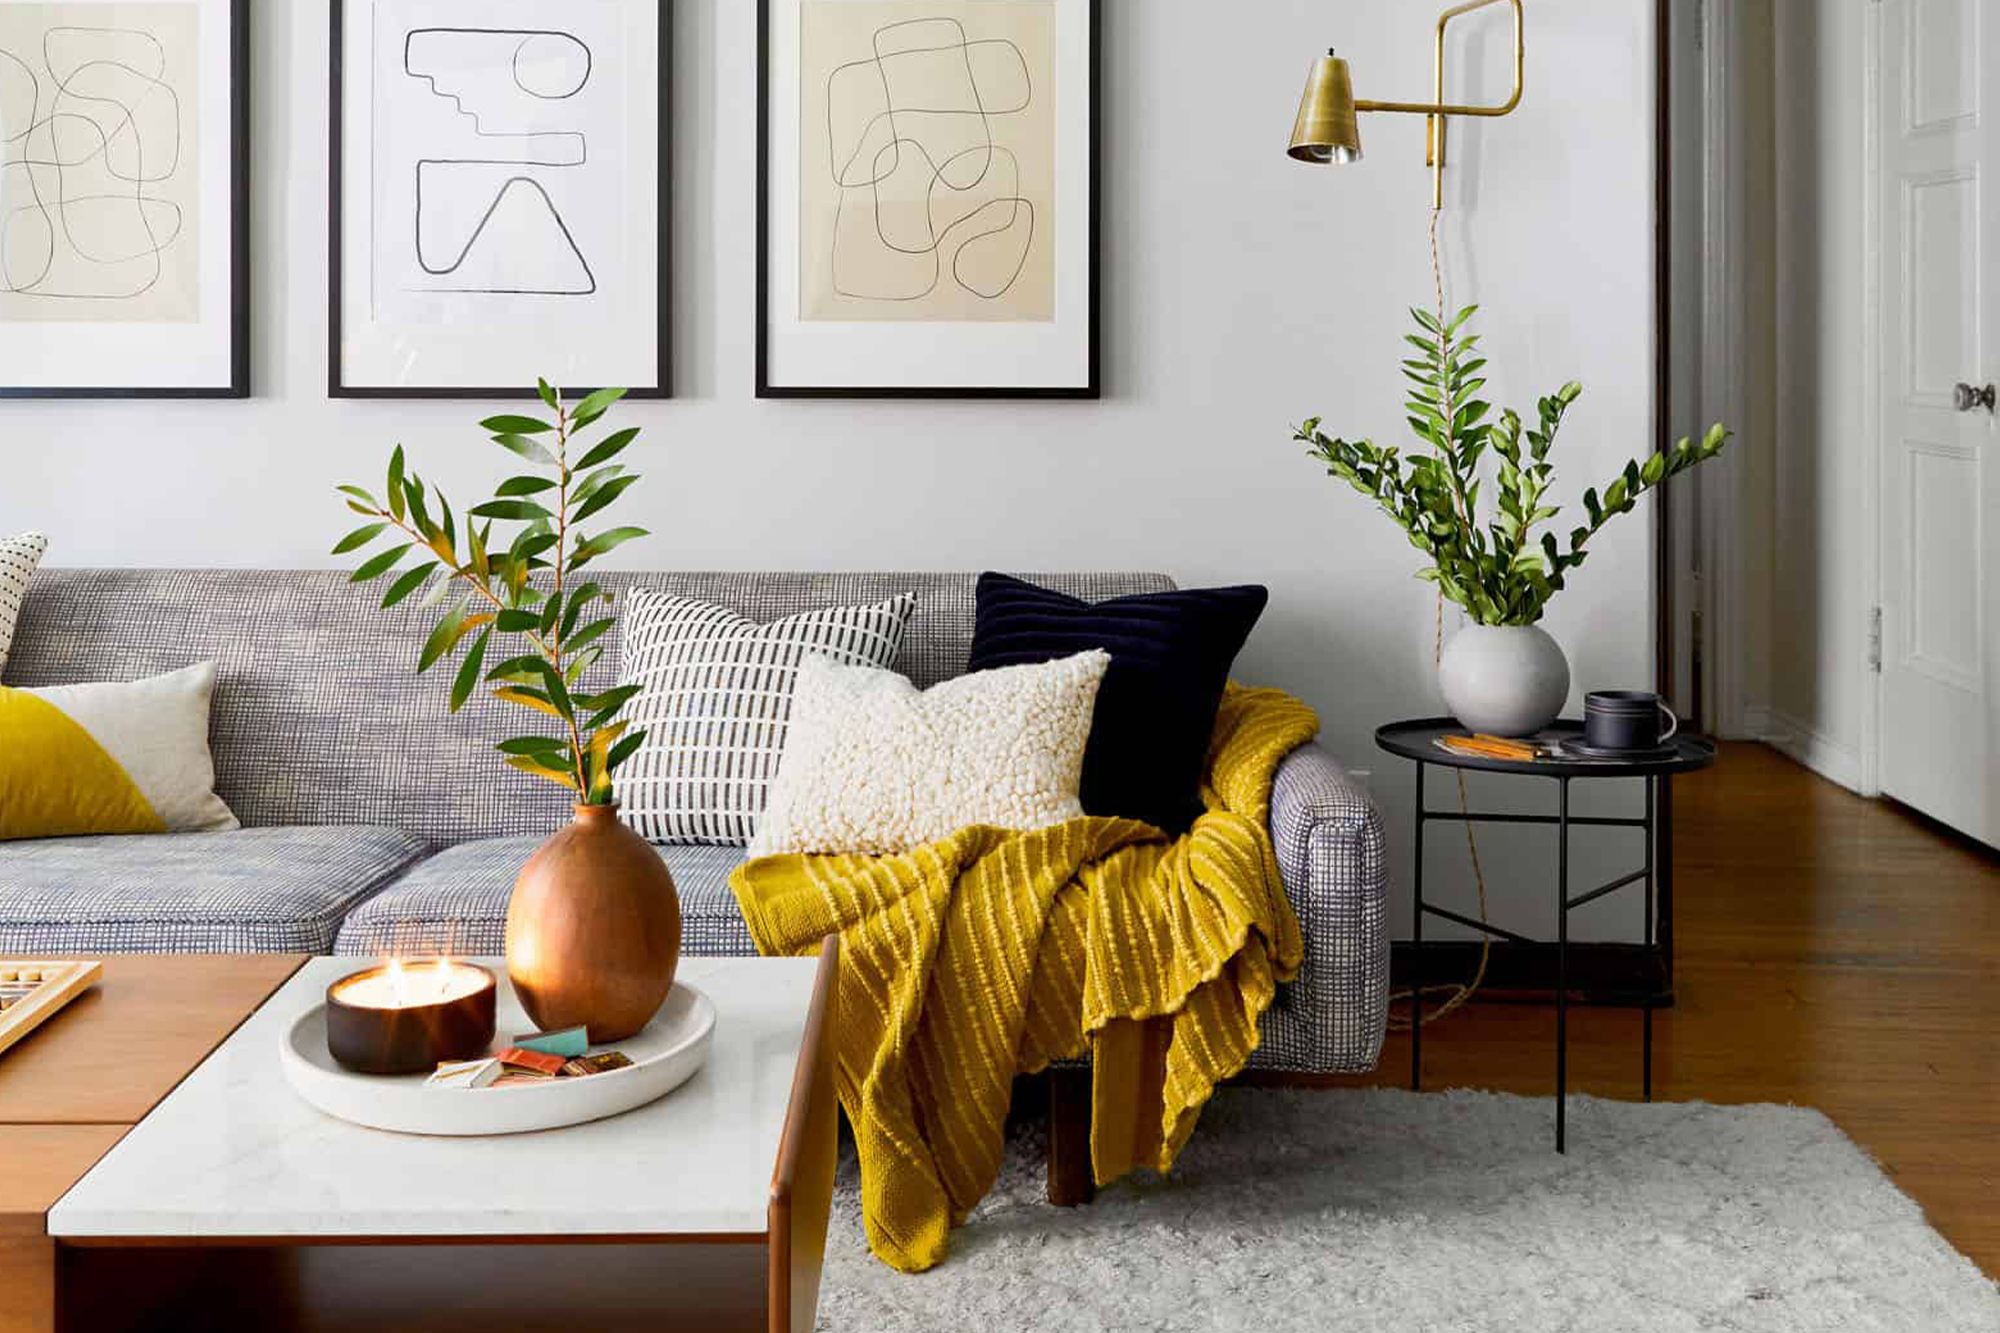
Magnolia Home: Modern Breakfast Nook
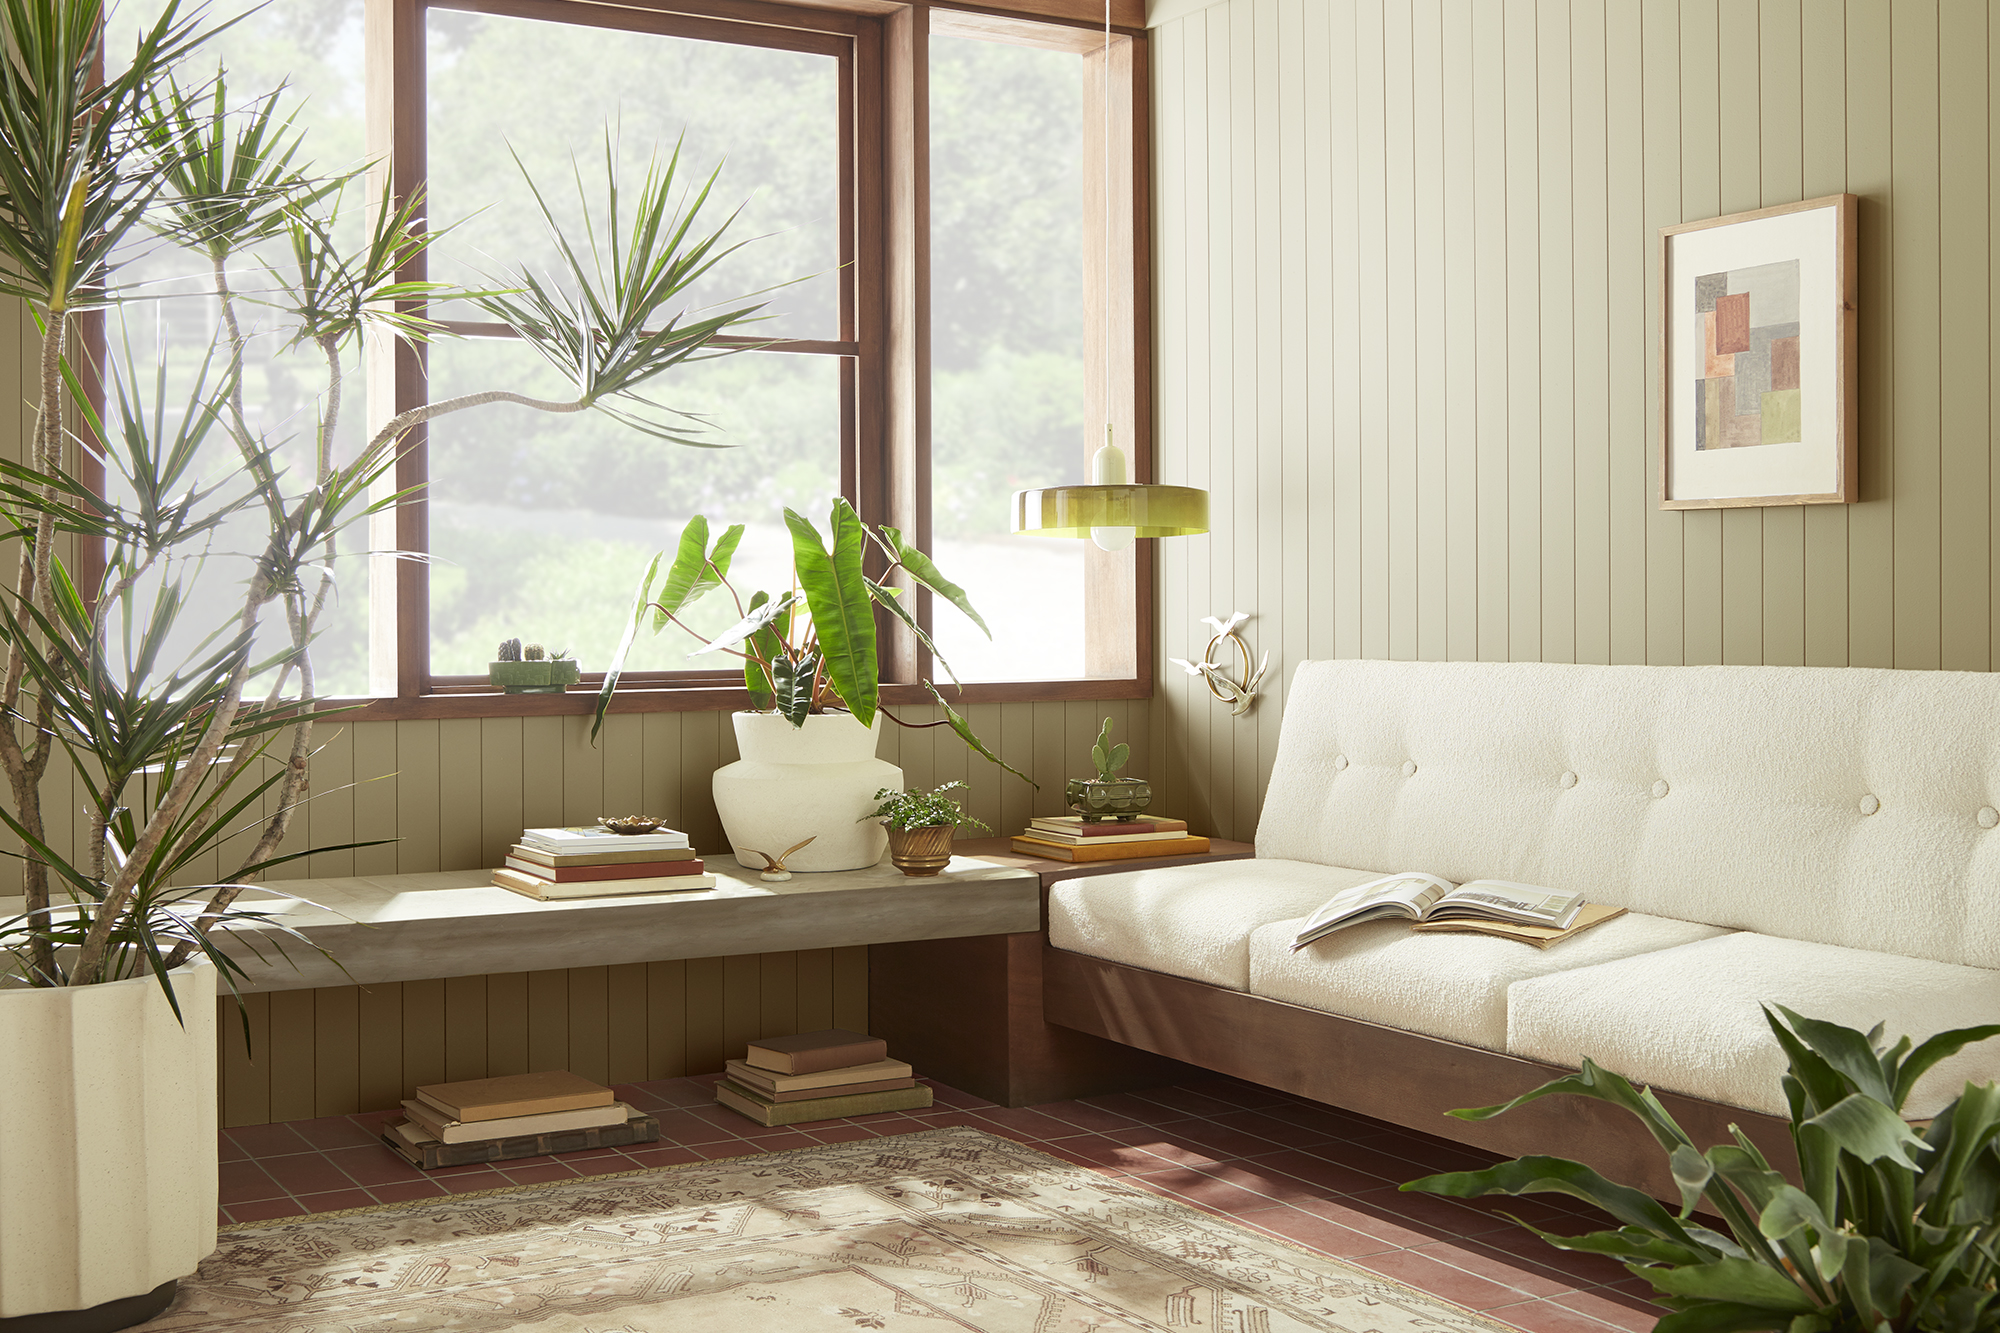
April 19, 2021Gathering with family or friends for a meal is one of the best ways to connect, and the experience is made even richer with a cozy and inviting environment – like this beautiful breakfast nook. A combination of modern tones and natural textures, this space proves that neutral colors can still make a design statement. The muted browns and golden grays in this eating area are a perfect recipe for a relaxing space.
“These grays bring a warm, grounding color to the walls, giving this breakfast nook a modern yet natural feel.” – Joanna Gaines
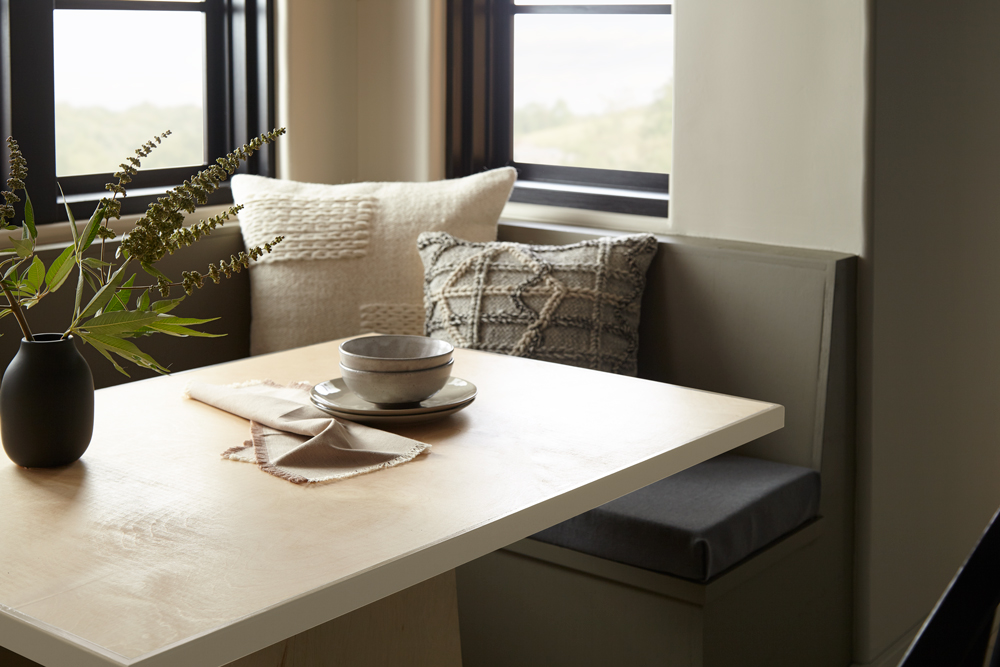
The impact of neutral paint colors is often determined by their undertones. A white shade with cool undertones might evoke a feeling of renewal or energy, while a neutral hue with a warm undertone can instill a welcoming coziness to a space. In this breakfast nook we used Magnolia Home by Joanna Gaines® paint in Gatherings, a golden gray with warm amber undertones, for the walls.
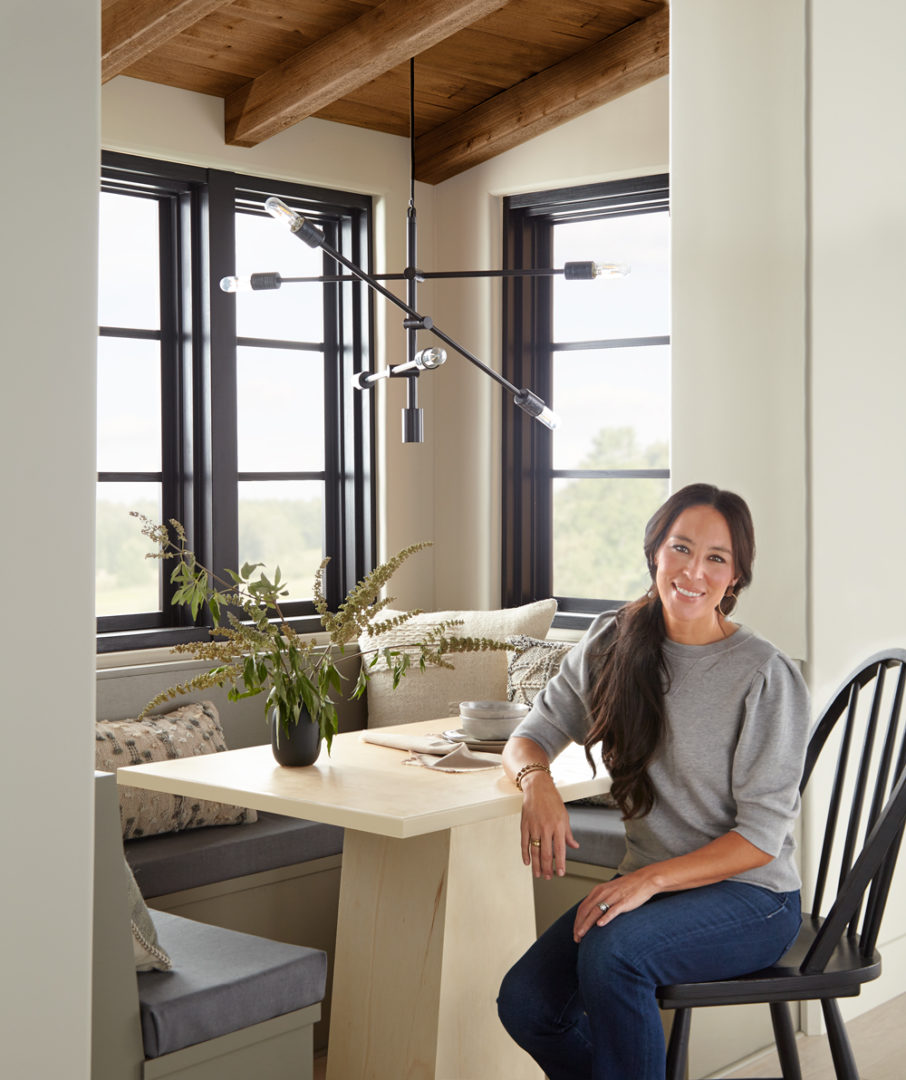
The built-in bench was coated in Reclaimed Wood, a muted smoky brown that added just the right amount of depth to the dining space. Looking for more neutral paint pairings? Explore the palette below of six shades, all picked to coordinate with Gatherings and Reclaimed Wood. And for additional color inspiration, explore all 150 colors in the Magnolia Home by Joanna Gaines paint line on kilz.com/magnolia.


Magnolia Home by Joanna Gaines paint is available at select Ace Hardware store locations, and online at AceHardware.com and Magnolia.com.
RELATED ARTICLES
get inspired:
FOLLOw us:
@kilzbrand
SHOP
PRODUCTS
Ask the Pro: Primer Makes a Paint Job Better
April 19, 2021
It’s no secret that here on The Perfect Finish we’re advocates of proper prep work, and for us that conversation always includes priming before you paint. Primer can do a lot for your paint job, and the professionals know it’s worth the extra step.
To share all the reasons why and how primer makes your paint job better, and answer some often asked primer questions, we brought back Product Manager John Golamco. He’s been on the KILZ team for over six years and has a wealth of primer knowledge. Ready to learn more? Let’s get rolling!
Is primer only necessary when your paint does not have primer in it?
Applying primer is an essential prep step when you apply paint or a topcoat coating. As such, it is important to apply primer first and then (once it’s dry) apply the topcoat/paint over the primer coat. Primer is engineered differently from paint – primer has more resin/binder in the formula, which is the “sticky stuff” that helps with adhesion and other additives that give the primer its ability to solve a variety of problems. Paint, on the other hand, has more pigment in the formula in order to deliver color.
How does primer make my paint job more durable and long-lasting?
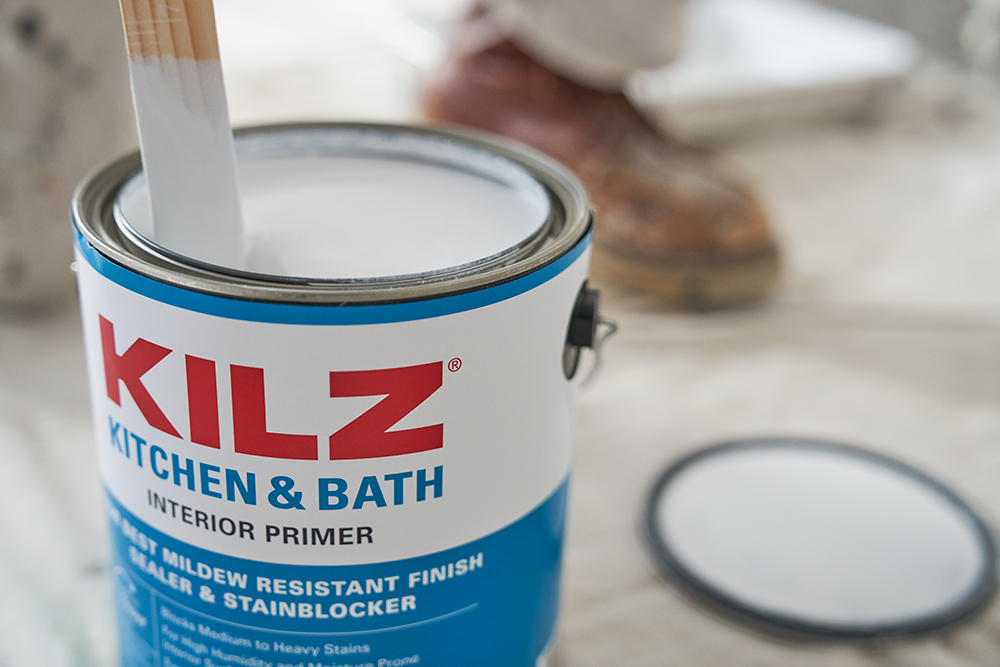
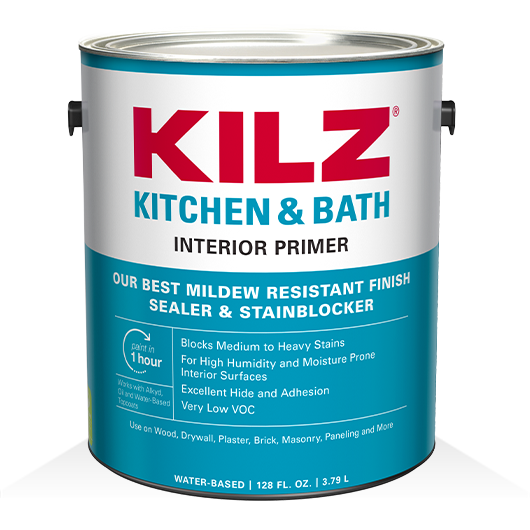
Primer helps the paint or topcoat stick to the surface better and prevent problems like peeling and cracking – ensuring the topcoat lasts longer on the surface. Depending on the type of primer (there are several types), it can solve a variety of surface related conditions and problems that could ruin your topcoat paint if you didn’t apply primer first. Primers can evenly and uniformly seal porous surfaces; hide previous colors or marks and stains; block and seal in bleeding stains (like tannin, grease, nicotine, water stains… just to name a few!); seal in unwanted odors; enhance adhesion and help bond the paint/topcoat to the surface; and prevent mold or mildew on the primer film surface, and other special features. There are even primers formulated for different spaces in the home, like KILZ Kitchen & Bath Primer.
How many coats of primer do I need?
Typically, you only have to apply one or two coats of primer to achieve optimal results for which it is intended. One common misconception is that you need to continue to apply coats of primer until you completely cover the surface in a white finish or hide every area possible like you would do a paint. It is not the primers job to provide the final complete paint finish – that’s the paint’s job. Even if it doesn’t look completely covered, one or two coats is all you need as long as it is evenly applied. For blocking water stains or tannin from a “fresh” red wood surface, more premium stain blocking primer is recommended.
Does primer work on all previous paint sheens?
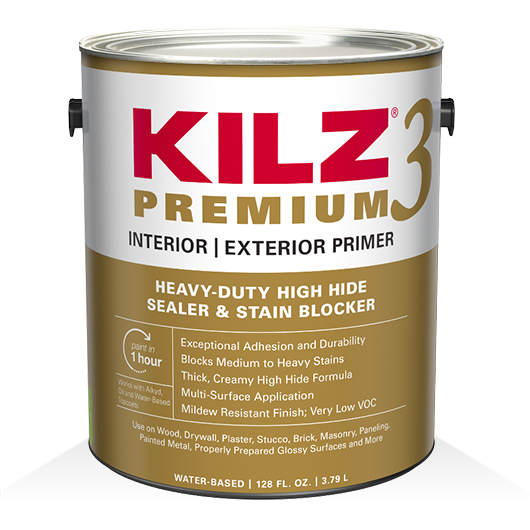
Just like most things you can buy, there are different types of primers ranging from the simpler ones that are made to just seal porous surfaces to the more sophisticated ones that offer additional features and benefits. Typically, the higher performing, more premium primers have better adhesion performance that allows it to stick to more surface types. Typically, the denser/harder the surface and the more sheen (higher gloss), the more difficult it is for paint or primer to adhere to. We recommend using high adhesion bonding primers for dense, glossy surfaces. Sometimes it is also necessary to perform a light sanding of the surface to help the primer bond to it. A high-performance primer such as KILZ 3® Premium Primer or KILZ® Restoration Primer will work with most paint sheens.
Can I apply primer on wallpaper?
When it comes to painting over old wallpaper, the best practice is to remove it completely, remove any old wallpaper glue and dirt residue, ensure the surface is clean and smooth and then apply primer and then topcoat with new paint. However, if painting over old wallpaper is needed, we recommend ensuring the old wallpaper is not peeling and adhesion to the wall is still sound. Then use an oil base primer such as KILZ® Original Primer to prime the surface before applying paint. Using an oil base primer will make sure there is less chance the adhesive of the wallpaper (which may be exposed at the seams) is compromised.
Is there a primer with a clear finish?
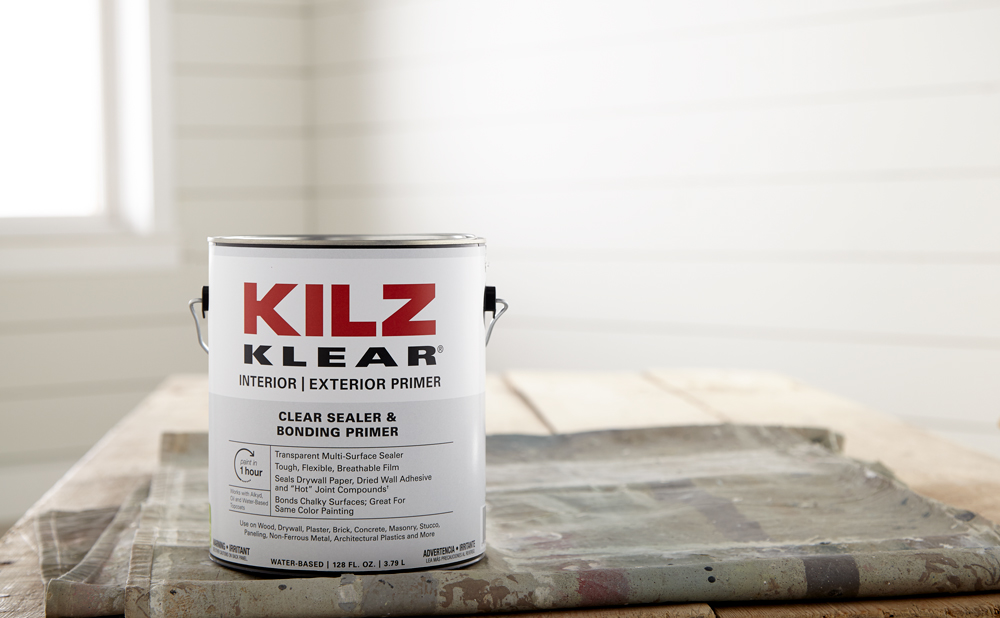
Most primers will adhere to wood however there are special primers that will apply in a clear transparent finish. We recommend KILZ KLEAR® Clear Sealer & Bonding Primer – a high performance fast-drying, multi-surface clear primer developed to seal highly porous surfaces inside and outside your home. It is also recommended for use when painting the same topcoat paint color on top of an existing paint coat.
Can primer be applied to peeling paint?
Applying primer or any additional topcoat coating to already peeling paint is not recommended. The adhesion or bonding of the paint to the surface is already compromised. Adding more layers of primer or any coating will add weight to the compromised paint and might cause it to peel off completely. We recommend removing the peeling paint and starting fresh with a clean surface.
Always remember to refer to our website kilz.com or product back labels for additional information on which primer is right for your project and detailed instructions on how to apply our products.
RELATED ARTICLES
get inspired:
FOLLOw us:
@kilzbrand
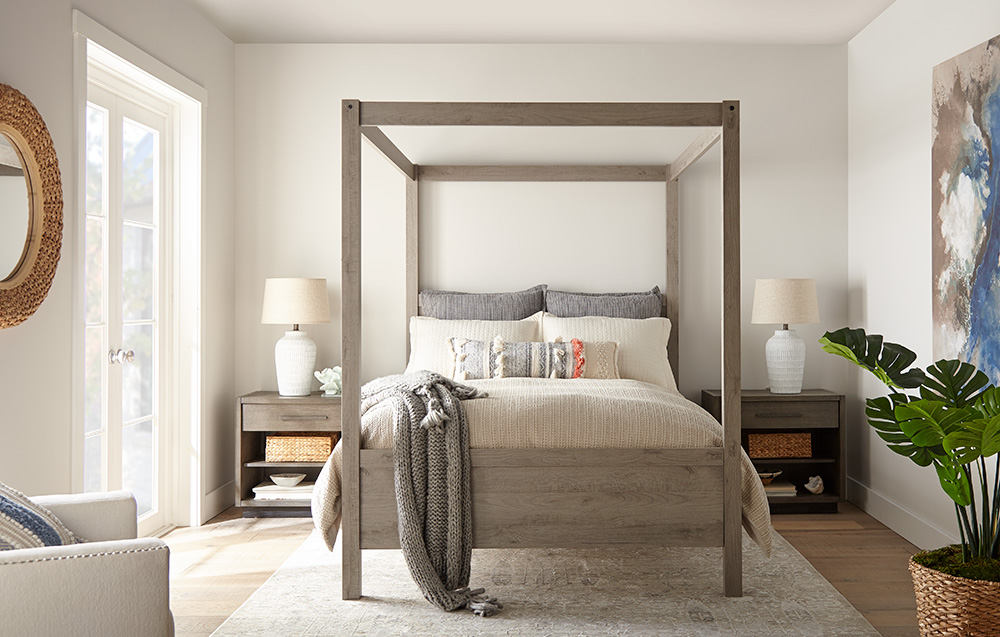
Transforming a Boring Bedroom into a Relaxing Oasis
April 8, 2021Nothing dulls the spirits more than a boring, dated bedroom design. That’s why we couldn’t wait to lift the spirits of this depressing bedroom with new colors and textures to make it sparkle with freshness.
Color has a huge impact on mood and energy levels; and especially given the stresses of the past year, it’s more important than ever to promote a healthful, stress-free atmosphere in all areas of your home — and most particularly, your bedroom. That’s why we chose creamy off-white colors that create a soothing atmosphere of calm and relaxation, while opening up the space visually so it doesn’t feel as stuffy and confined.
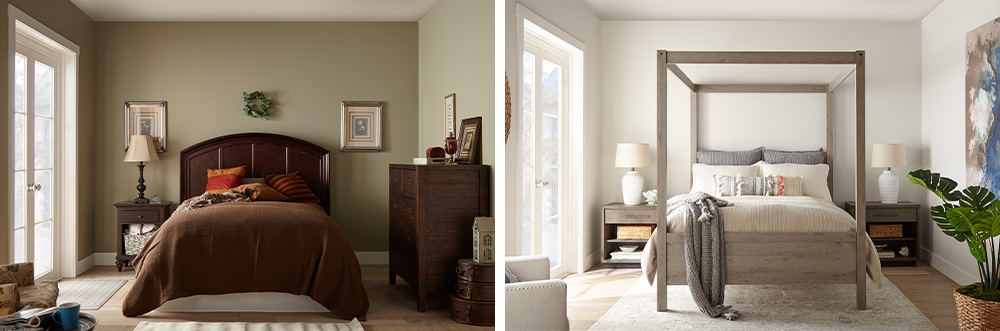
We began our project with the most valuable tools for any DIY makeover — primer and a coat of paint. For this makeover, we chose KILZ 3® Premium Primer, which did an amazing job of covering the old, drab olive-green paint and creating the perfect foundation for the new fresh white paint. KILZ 3 Premium Primer offers excellent adhesion and durability, allowing the new paint to glide on smoothly and adding to the longevity of your paint job.
Next, we added a coat of KILZ® Tribute® Paint in Collector’s White (TB-31). This is a creamy, barely-there white with subtle undertones of greige (gray/beige) to take the brightness down a notch, making it ideal for reflecting the sunlight filtering in from the glass doors in this master bedroom. Because of its cool undertones, we were able to use Collector’s White throughout the entire bedroom, creating a soothing, gently glimmering sparkle without a hint of harshness.
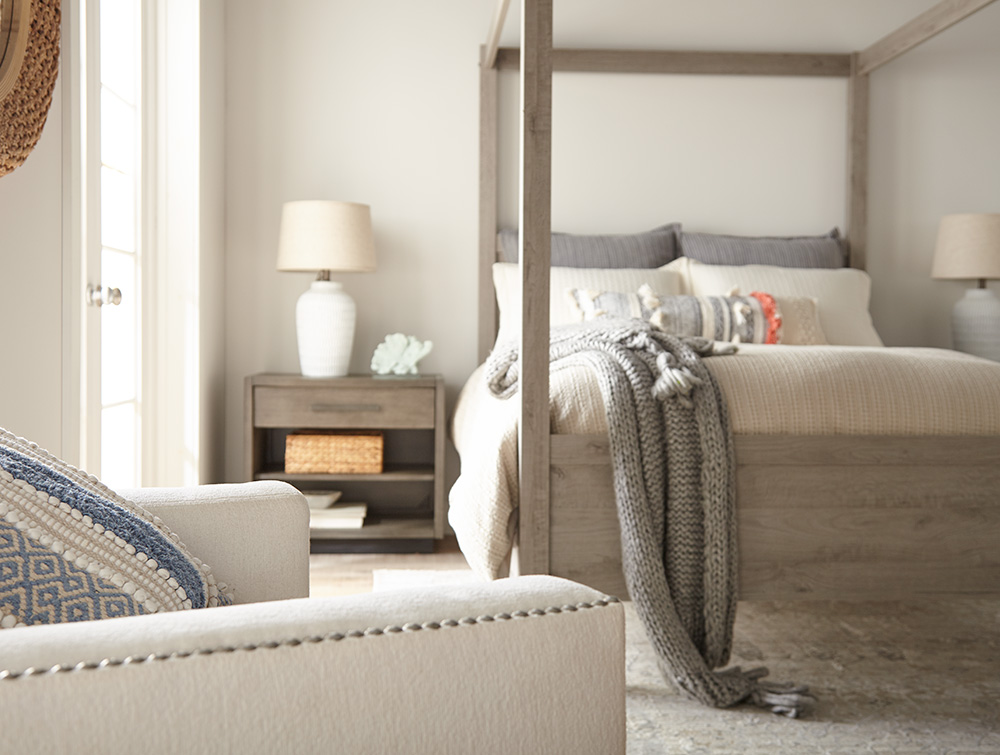
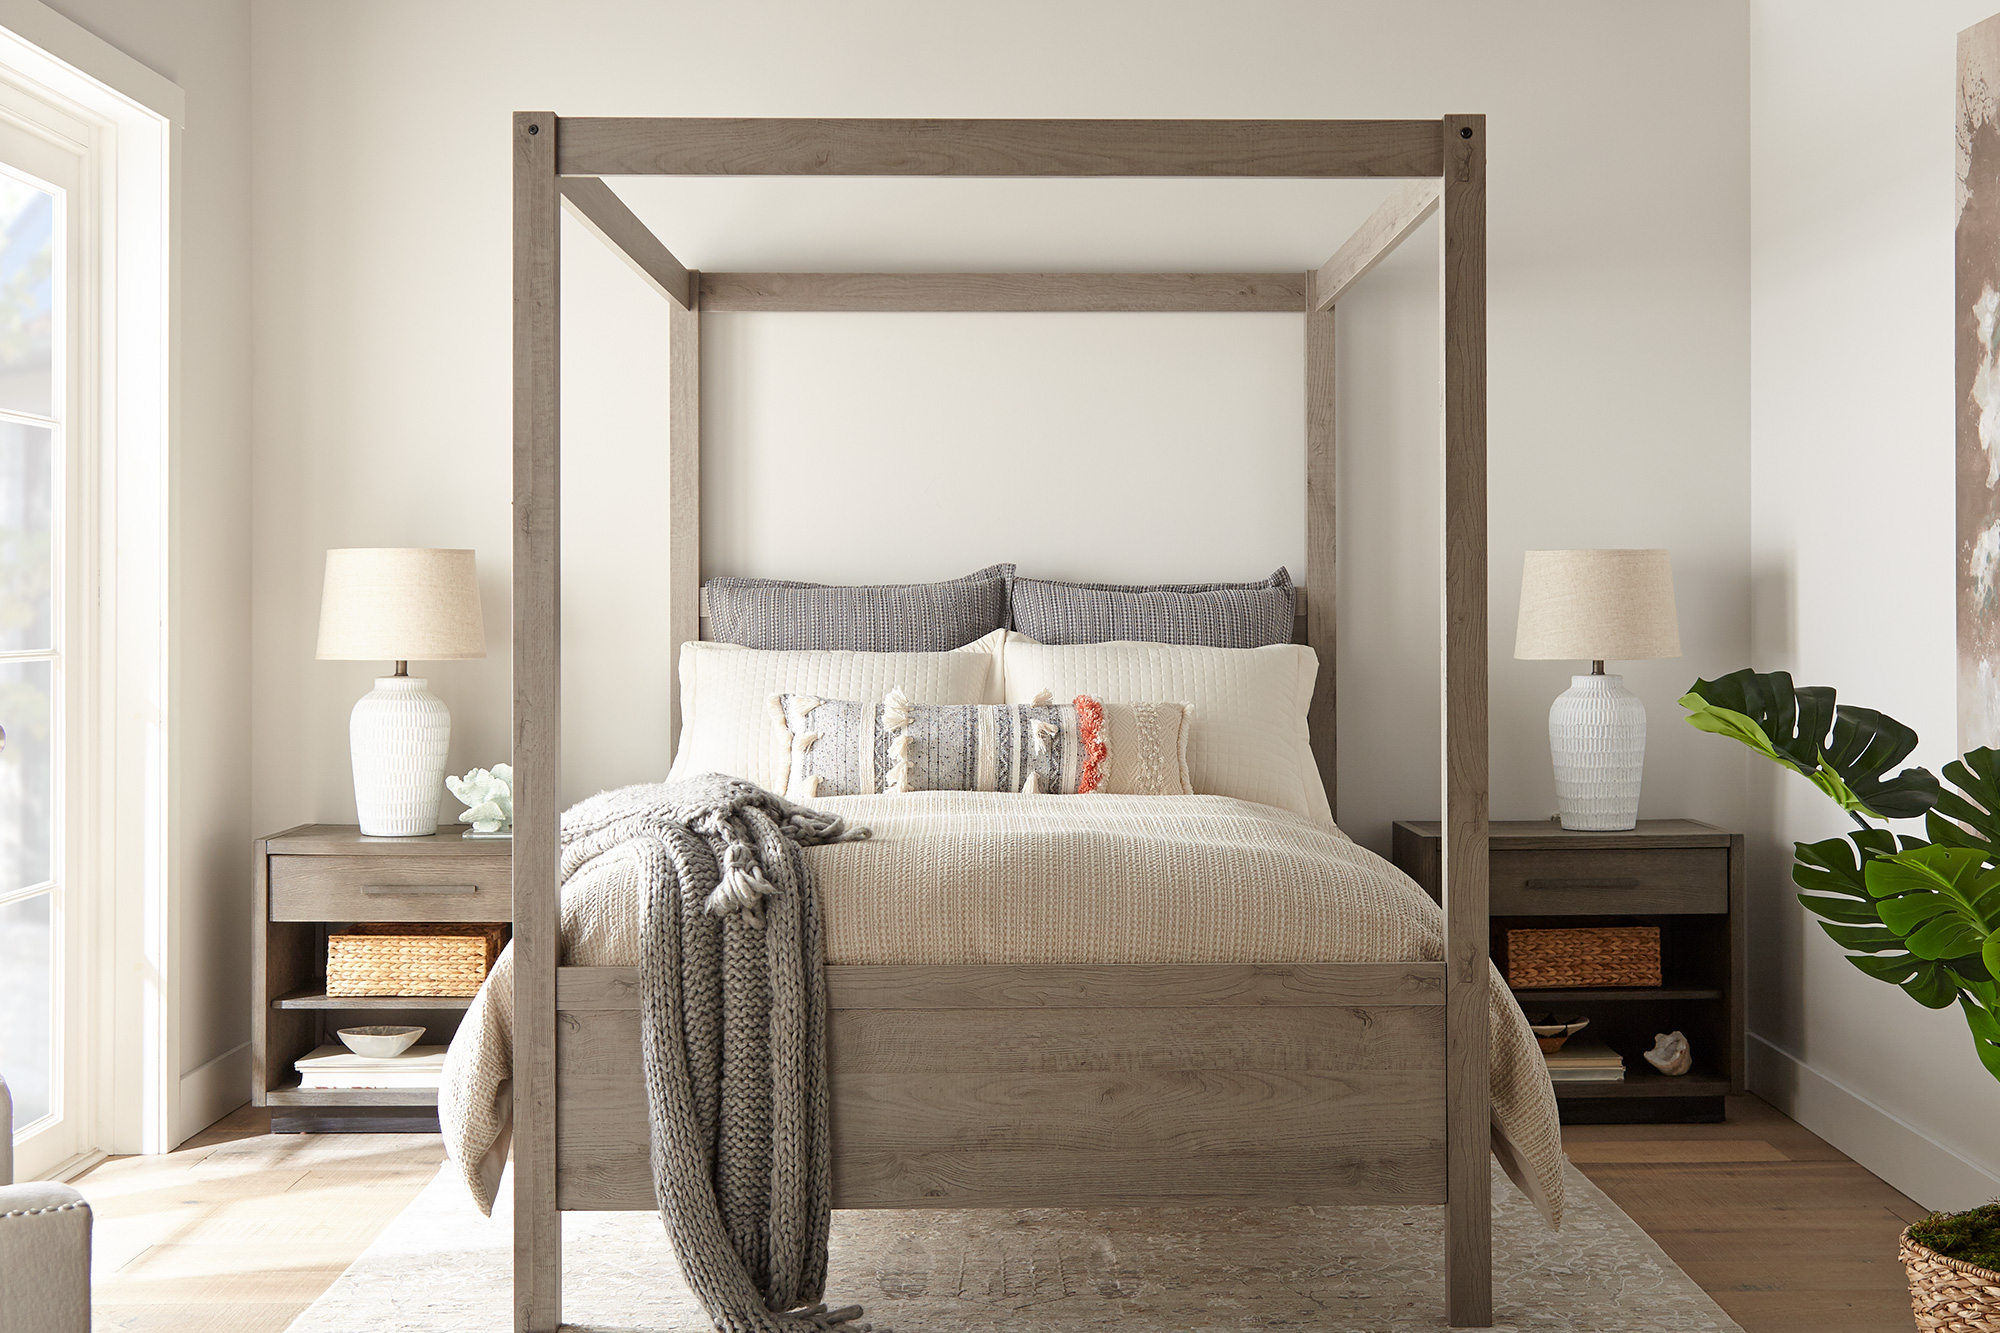
Our keynotes for this makeover were airy, simple, calm and relaxing, and we accomplished these with a streamlined Contemporary Swedish-Meets-Coastal California theme. For the focal point, we chose a modern four-poster bed in gray-toned brown natural wood. We added matching lacquered wood bedtables in a similar brown/gray shade, styled in keeping with our Scandinavian/Danish Modern theme.
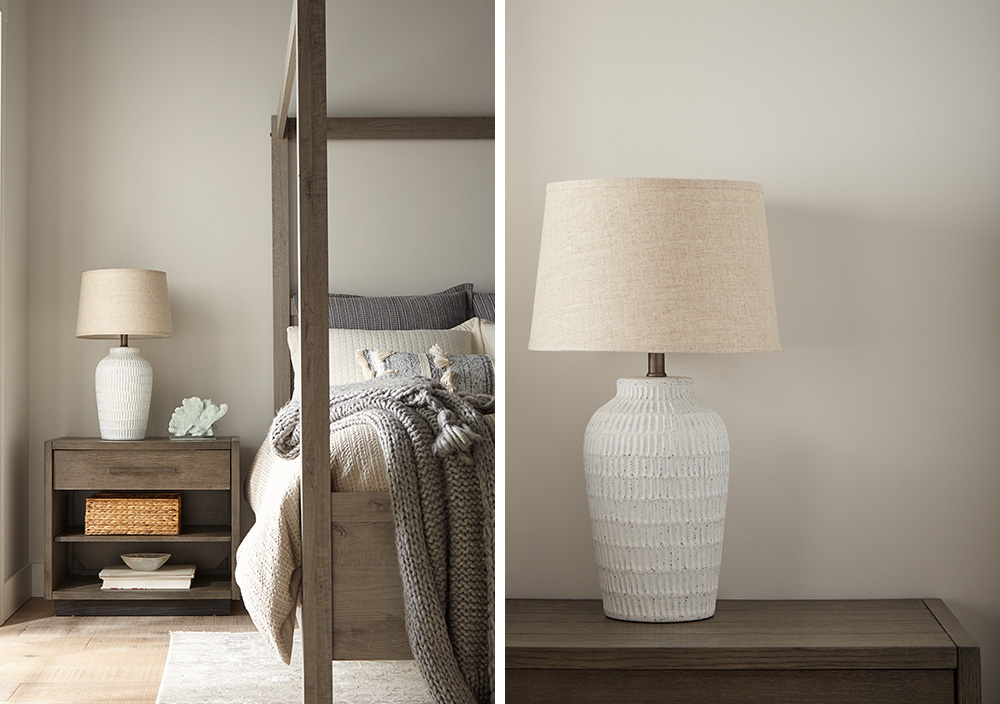
We kept the attractive, natural hardwood floor, but added a cozy off-white rug. Other furnishings and accessories — including an armchair, lamps and bedding — were chosen to reflect the creamy white of the walls.
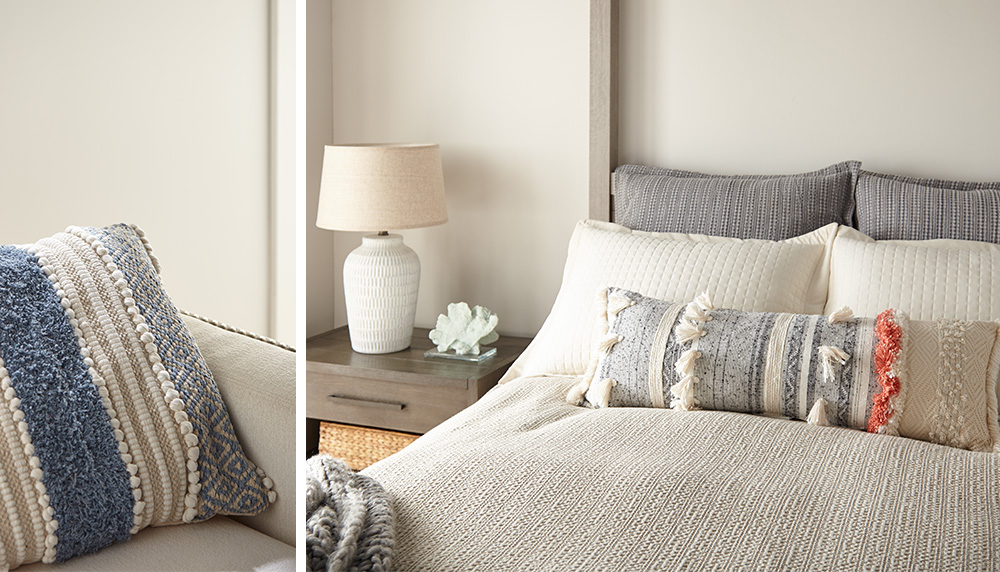
One interior designer’s tip: Pillows and other textiles are a great, affordable way to underscore your design scheme. We choose plump, oversized woven natural-fiber pillows in shades to tone in with the rest of the room, with handcrafted touches such as pom-poms and fringe. We finished the look with two attractive white ceramic lamps, styled in the Danish Modern tradition and topped with pale ecru linen shades.
The overall look is one of natural textures — crisp linens and woven cottons — giving this master bedroom a clean, fresh, inviting look of soothing freshness. When coupled with the bright sunlight filtering in from the glass doors, the impression is of a gleaming, glistening oasis for rest and relaxation — the kind of ambience you would look for in a luxury spa or hotel. And with quality primer and paint, the good news is that this pristine, fresh clean look can be easy to maintain as well.
Anyone can achieve a room transformation like this at an affordable price. The key is to choose colors that reflect the mood and ambience you want to create — whether it’s light and airy or warm and nostalgic. That’s why paint and primer are your greatest tools in any DIY makeover. They’re not only affordable, but they’re also so easy to apply that even a newbie can do it without any help, and with spectacular results.
With primer and a coat of paint, you can transform a dull, outdated room into a showplace. The primer will enhance all your painted surfaces, while protecting them from household dust, dirt and mildew. Likewise, a fresh coat of paint will lift a room into a new dimension of beauty and vibrancy. Just add a few pieces of furniture and accessories within your budget — and voila! You’ve created an affordable, elegant room makeover that will stimulate your sense of color and beauty, while relaxing your mind and spirits.
Always remember to refer to our website kilz.com or product back labels for additional information on which primer is right for your project and detailed instructions on how to apply our products.
RELATED ARTICLES
get inspired:
FOLLOw us:
@kilzbrand
Smart Spaces With Emily Henderson
April 5, 2021RELATED ARTICLES
get inspired:
FOLLOw us:
@kilzbrand
SHOP
PRODUCTS
Ask the Pro: Misconceptions about Primer
April 5, 2021RELATED ARTICLES
get inspired:
FOLLOw us:
@kilzbrand
join the conversation:
SHARE this post: